Friday, December 31, 2010

Pull My Strings, I'm Your Puppet (Warp)

Ever wonder what a straight, staid businessman who rides a straight, staid motorcycle does on the weekends?  Well, based on today’s image, he trades in the staid motorcycle and goes cruising on his “chopper”.  Instead of sitting upright, he leans into the wind, puts on flashier colors and lets his wild side show through.  Actually, if you take a close look at the smaller image you’ll find it’s the same image.  Today’s image started life as that thumbnail on the right.  I’ve never taken a shot at using Adobe Photoshop CS5’s Puppet Warp applet, until today.  I saw the clips about what it could do in the teaser videos before CS5 was released and thought “that’s kinda neat”, but never came across a reason to do something serious with it.  I guess the holiday break was a good time to tax my brain and look at a couple features in Photoshop that aren’t exactly mainstream.  Between Wednesday’s messing with the Liquefy Filter applet and today’s playing with its Puppet Warp I’ve been able to add a couple more arrows to the quiver.  Today’s image is about Puppet Warp, but there’s several other techniques that were used to get the end result.  To find the list (and short explanations) of what was used, hit the “read more”.
Read more!

Wednesday, December 29, 2010

Following A Magazine Tutorial

I was at a newsstand the other day and saw a magazine called “Advanced Photoshop – The magazine for Photoshop Professionals”.  Notice that it does make any claim to be about Photoshop for photographers.  I thought it looked interesting and it dealt with a part of Photoshop I don’t typically play in.  The artsy part.  The part where a photographic image is just a starting point.  The cover art was of a model who had had a Manga-style treatment applied.  I thought it might be something to play with to follow the twenty step tutorial.  A couple things make a portrait “Manga style”.  The pointy chin, lots of hair, the large eyes, the flawless skin and a tiny nose and mouth.  The resemblance between the starting point of today’s image and the end result is pretty slight.  I’m not sure the subject would recognize herself.  The number of things that had to be done just to get the image to the starting point of the tutorial was fairly extensive.  You might be able to check out the tutorial for the technique on the magazine’s website http://www.advancedphotoshop.co.uk/index.php or do a Google search and, I’m sure, you can find similar versions of the same technique.  What I’ll do is explain the steps involved in getting to the starting point.  If you’d like to check out the gyrations needed, hit the “read more”.
Read more!

Tuesday, December 28, 2010

What Happens When A Ghost Shows Up In Your Image?

Actually, I’m not kidding.  Take a look at the original of today’s image (click on it to expand).  On the far left you can see a guy walking into the frame.  I was there, along a road in West Virginia, when I saw this old gas station and thought it might make an interesting image.  We stopped the car, backed up to a more advantageous spot, got out and started shooting.  For all the time I was there, no one came by.  This was such a remote oasis that, for the twenty minutes or so that I was shooting, not one car came down the road.  No one walked by, no one went up to the store, no one was anywhere near while we were happily snapping away.  Yet, there’s a man walking into the shot on one image.  Only one.  Nothing was said, no one nodded or waved or smiled, nada, zip and yet he’s there.  I have no idea how to explain it, but it does make a great case for geotagging shots.  This was taken prior to getting the GPS unit for the camera, so I don’t think I’d be able to find this place again in a hundred trips through WV.  If I did know where it was I’d be tempted to take a ride down to WV just to investigate who this fellow is.  It sounds like one of those stories where the traveler picks up a hitchhiker, drops him/her off at the destination, discovers something left behind and goes to return it only to find out the hitchhiker has been dead for X number of years.  Pretty weird, but nothing to do with today’s image.  To find out about today’s image, hit the “read more”.

Read more!

Friday, December 24, 2010

Taking It One Step Further

I got a kick out of what I did the other day with the Rectangular to Polar Filter (Filter/Distort/Polar Coordinates) so I thought I’d try another one and take it up a notch.  Rather than an orb floating in the blackness of space I thought I might “put it somewhere”.  I didn’t have any “file photo” I could tap into, so I had to find something to shoot.  The list on components that make up today’s image would be a long one.  It started out as a five shot panorama that got spun around into a rather oval polar Image of the original pano.  Some Free Transform (Ctrl T) action pushed it into a round configuration.  In order to get a perfect circle the Elliptical Marquee Tool (M) was used holding the Shift key down to constrain it to a circular configuration.  The Space Bar was added to move the selection around before committing it.  The Selection was then Inversed (Ctrl Shift I) and the outside Filled (Shift F5) with black.  The Free Transform applet was used again to turn the circle so the church wound up at a twelve o’clock position.  In order to spin it, more real estate had to be added around the circle using Canvas Size (Image/Canvas Size) with the Relative check box selected.  The result was Saved (File/Save) and the image Closed (File/Close).  It automatically saved an edited copy in Adobe Photoshop Lightroom 3.3.  The blue in the sky was adjusted in the HSL (Hue/Saturation/Luminance) Panel in the Develop Module.  The adjusted image was brought back into Adobe Photoshop CS5 for further “enhancements”.  An Inner Glow (double click on the Layer indicator in the Layers Panel) was applied to the globe to give the appearance of glass.  All that was for the globe only.  To learn what else was added to complete the image. Hit the “read more”.
Read more!

Wednesday, December 22, 2010

No HDR, Just Playing

It’s true, despite the garish colors and the heavy patterns, no HDR work was done to today’s image.  The colors were pumped up, a Divide Blend Mode was used on a Layer, filters were used to push and pull the image into an oval shape, Smart Objects were put in Layer upon Layer to keep everything editable, but no HDR.  It looks HDRish, but no HDR applet, plugin or application was used.  It started out as just another shot of Bearskin Neck on Cape Ann, Massachusetts.  The idea was to straighten it up a little (it’s a wide angle shot so it showed a little barrel distortion), adjust the colors and be done with it.  Then I got to playing.  I went down a couple rat holes and had to back out a few times, but each wrong turn took me further down a rabbit hole until I felt like Alice.  Since I already was in a “Wonderland” of my own making I decided to explore a little.  I went left, I went right, I stumbled a couple times and finally got to where I thought I was at an end.  It was pretty much an extreme posterization of the image and looked reasonable.  I thought, what’s another step I could add seeing as, by that time, I was fairly deep in the woods anyway.  Decided to play with Polar Coordinates (Filter/Distort/Polar Coordinates) to see if I could come up with something circular.  To find out how I got “the town square circle” , hit the “read more”

Read more!

Monday, December 20, 2010

Still Looking

Does anyone know this guy and his son.  I asked that question in about the forth post ever to be put up on the blog.  I’m still looking.  I found this fellow sitting just inside the performance tent at the Festival of Green Corn held at Foxwoods casino a few years ago.  After creating today’s image the intent was to give him a copy.  We couldn’t get to the pow-wow the following year and by the time the third year came along the festival was put on what has become a permanent hold.  The boy has to be in school now and I’d still enjoy giving the family a print of the image.  The day the image was taken was miserably hot.  How his makeup stayed as fresh looking as it is I have no idea.  I asked for permission to take a single shot as he sat in the entryway of the tent trying to catch a little breeze in the only shade to be had.  I’m guessing that, as he grabbed his son over and then okayed the shot that he thought having the boy included would ruin the imagery.  I’m guessing it was what made the shot for me.  They were sitting with the side of the tent as a backdrop.  Just the plain canvas as the tent, with the sun lighting it very evenly.  Later in the day, just about the time the heat had gotten to us and we were  heading for the exit we passed a vendor selling clothing and jewelry.  The buffalo skull was on display, laid out on a skin draped over a frame.  I almost past right by.  I saw the skull, didn’t even bother squatting to get a more direct angle on it and hit the shutter.  Just a record shot.  To get an idea of the “happy accident” that made today’s image possible, hit the “read more”.
Read more!

Friday, December 17, 2010

A Reprise Of An Early Image


Today’s image was one of the earlier postings on the blog.  It’s up at Acadia National Park in Maine.  If you’re looking for a vacation place in the north eastern US, to go have a good time, to commune with nature and get some really iconic shots, Acadia is a place to go.  The whole area is packed with places to get good shots.  You can find Puffins one peninsula away.  Maine has to have fifty lighthouses along the coast.  Every time you wonder down one of the fingers jutting out into the sea there’s a lighthouse at the end of the road.   There are harbors you’ve undoubtedly seen on calendars, posters, advertisements, artwork, and probably in your aunt Millie’s postcards about her trip to Maine.  Acadia has water: lakes, the ocean, a fjord and streams, carriage roads with stone bridges and wooded lanes.  Many of the shots are either right outside your car or a very short walk down a path.  Today’s image came about on the side of the road.  We were driving along Park Loop Road and came to a fork.  Left led back down into Bar Harbor and right continued on the loop road.  We sailed down the left fork, only to slam on the brakes and back up back to the fork.  Today’s image is a result of pulling the car off the road and stepping out the door.  You can’t tell if we were on the side of the road or deep along one of the many hiking trails.  It’s like that all over the island.  If you like shots of quaint little towns, Bar Harbor is great.  If you like harbors filled with pleasure boats, Southwest Harbor is nice.  If working harbors are your thing, complete with fishing boats, Northeast Harbor will beckon you.  I made a real nice pano of the golf course there.  You’ve got the “rock bound coast”, a sandy beach, thundering waves and sunrises/sunsets like you wouldn’t believe.  You can probably tell that the coast of Maine is one of our favorite places to visit.  Today’s image is so straight forward you can ignore the “read more” at the bottom of the posting.  Today’s image is a straight shot.  The colors are bumped up, the image sharpened and a vignette applied. Other than that it’s as is.  Hope you enjoy the shot and let me know what you think after you visit America’s first National Park east of the Mississippi.  It is a special place.  You might want to bounce back a few pages and checkout some of the earlier work from the Kayview Gallery.  Thanks for the read.
Read more!

Wednesday, December 15, 2010

Celebrating 250 Posts About Adobe Photoshop Today

Of the 250 posts that have appeared on this blog I believe 248 or 249 have been accompanied by an image and some explanation about what was done to it.  I thought it was about time to take a look at today’s image.  After all, it’s been the “bookends” of the banner from day one.  It’s an old shot, taken with an old camera on an outing with my granddaughter.  She’ll be entering high school in September and the image comes from a time before she had started school.  So, it’s an oldie.  It has been updated, so you might want to check out the explanation of what was done.  I’d like to thank everyone who has been reading the blog for any length of time.  I’m surprised by where in the world it’s popular, but it has been read in 85 countries and every state in the US except South Dakota, Wyoming and Alaska (where are the Palins when you need them ;-) ).  There’s only been one visitor from Delaware (guess Biden’s been busy too), but, in general there is a “following” in almost every state.  If you’ve enjoyed the postings here at “The Kayview Gallery” how about either leaving a comment or sending an email telling me what you like or asking for information on some Photoshop subject.  One of the things I’m most gratified by is the sites that refer people to the blog.  The sixth, seventh and ninth most common sites that people come from are those written by Dave Cross, Scott Kelby and David Ziser.  Joe McNally’s comes in at number thirteen.  The blog has been picked up by www.alltop.com and http://www.blogsurfer.us/ .  It’s been “tweeted” about, it’s shown up on people’s Facebook pages and has enjoyed pretty good “word of mouth” distribution.  Knowing people are reading and sending emails make continued writing a pleasure.   Now, back to today’s image.  If you’d like to know what was done to “update” the image, hit the read more.

Read more!

Monday, December 13, 2010

Adding Implied Motion With Adobe Photoshop CS5

Okay, I’ll admit it.  Not too many people have two left arms and two left legs, including the subject of today’s post.  As I was shooting a girls softball game I noticed that the catcher threw the ball back to the pitcher with almost the exact same motion every time.  The same motion of the arm.  The same cock of the leg.  Everything about the delivery shows that she had been taught and had practiced throwing the ball.  Interpreting that motion in a still image has to be done with a trick.  Maybe some motion blur or duplicating the image and ratcheting it forward slightly for faux multiple exposures.   Seeing as I had a couple of shots with the same motion over the span of a couple of games it became fairly easy decide that overlaying one image over another might be an interesting way to portray movement.  The first decision was which image should be the top, or front, shot. A close examination of the face confirmed which image had the best intensity of expression.  That would be the top image.  Therefore, it was the one that needed the first mask.  The Quick Selection Tool (W) got us 90% of the way there.  The Refine Edge applet took us another six or seven percent.  To find out what got us the “last mile”, hit the “read more”.

Read more!

Friday, December 10, 2010

Four Shots To Makeup One Image

There’s been all sorts of composite images here on the Gallery, but most are made up of two images put together.  There’s been skies replaced, people either put in or taken out, a flag put in a window a bird put in a sky and all manner of things added for one reason or another.  Today’s image is make up of four distinct images.  At least two, and possibly three, images are pretty obvious.  The flower, with its stem and branches is one.  The butterfly is another and the blurred background result in two more.  The one you wouldn’t guess, unless I told you, is a shot of a cloud formation.  Its only purpose is to break up the symmetry of the blur.  One thing to say is that each element of the image was born from the camera.  Nothing was fully made in Adobe Photoshop CS5.  Getting the silhouettes wasn’t as easy as it might seem.  It wasn’t “hard”, but involved more steps than I had anticipated.  One of the biggest things that had to be dealt with is using restraint, not letting it get crazy.  I do have to give a lot of credit to Richard Gaffney.  I was “thumbing” through the images on the NAPP (National Association of Photoshop Professionals) portfolio site and came across his image of (I think) a snowy egret.  It caught my eye and I opened his portfolio.  He has a couple of silhouette images there that I thought were very good in their simplicity.  One is of a butterfly on a flower.  I said to myself, “self, you have images of flowers and images of butterflies; surely you can come up with a rift on his theme”.   I actually like Richard’s better than mine, but thought mine was “successful”.  I figured putting on the same type of framing as he did would be too much, but I do think it helps “make” the image.  That’s enough gushing about Richard’s work.  To find out how today’s image was made, hit the “read more”.

Read more!

Wednesday, December 8, 2010

Seventeen Screened Layers And One Layer Mask

There’s a reason for saving a selection as an Alpha Channel rather than making the Selection, using it and moving on.  If you haven’t saved your Selection and you’ve gone on to your next step and then need that Selection again, the only option is to remake the Selection.  What a pain.  If you have any version of Adobe Photoshop that isn’t creaking with old age, you have the ability to Save Selections as Alpha Channels.  If you use Adobe Photoshop Elements of any version you don’t have Alpha Channels available.  That’s one of the shortcomings of Elements as of yet.  If you get into compositing images or dissecting an images and adjusting individual pieces of the image it is a great benefit to be able to have a list of Selections to reactivate at will.  A whole series of choices had to be made to “make” today’s image.  One, it started out as two shots.  I was flipping through some folders in Adobe Photoshop Lightroom 3.3 and came across a visit to Mystic Seaport in southeastern Connecticut.  I noticed I had an image of the whaling ship Charles Morgan out the window of one of the shops.  I also had an image of the apothecary’s bottles and a wash basin in front of the window.  I brought that shot into the Develop Module of LR3 and cranked up the Exposure to see if there was any detail in the dark shadows on the table and along the frame of the window.  No problem.  That’s where the key to today’s tutorial comes from.  To find out more about the transformation from dark into the light, hit the “read more”.
Read more!

Monday, December 6, 2010

Not All Panoramas Are HorizontalPanos Today's image

The word panorama brings to mind shots of wide expanses and grand landscapes.  That’s not necessarily the only way to think.  Panos can go left/right, up/down and any combination of the two.  Check out the World’s largest circular panorama.  According to the site it took three days just to do the shooting.  It’s 80 GP and the detail is spectacular.  You can drill down to individuals on the streets and in the gondolas of the London Eye.  The folks behind the project took more than ten thousand shots and used a wee bit more than a PC to do the stitching.  In their thank you section they give a nod to Fujitsu for providing the hardware.  They used dual six core CPUs, 192 GB of RAM and 4 GB Graphics card.  That’s not a Super Computer, not even as big as those used to play chess against some of the Grand Masters of Chess.  It’s a work station that you might find in any number of shops along Madison Avenue.  They did put in a disclaimer and said using that setup “allowed this record breaking photo to be created a few weeks faster than would have been possible on any other available PC.”   The underlining is my addition to the quote.  They bring up two questions.  If they had access to a Super Computer like the top ranked Tianhe-1A located at the Notional Supercomputing Center in Tianjin, China they probably would have finished the pano over a coffee break.  While the Fujitsu machine used to make the pano probably doesn’t hit a GFlop (1 Billion Floating Point Operations per Second [that’s doing the mathematics for graphics]), the Tianhe-1A runs at 2,566,000 GFLops.  That’s quick.  Neither system would be available to the casual home user, but doing a four shot pano like today’s image will tax the typical (fast) home computer.  By tax I mean it will take a moment to assemble a four shot panorama.  To find out more about today’s panorama, hit the “read more”.

Read more!

Friday, December 3, 2010

A Simple Fix

I’ve included the two components that make up the final image to demonstrate how a so-so shot can be “rescued” with a simple cut and paste.  A buddy of mine and I were up at Lime Rock Park in northwestern Connecticut back in early October.  I did a post about getting the shot right out of the camera with zero processing.  It was a discussion of shooting styles and just that two shooters can arrive at the same end and use two different routes (methods) to get there.  Today’s image goes toward the other extreme.  I liked the little red 914 Porsche, but as you can see, it had a horrendous background.  I had several shots with proper backgrounds but uninteresting action.  The cars in the “background shot” were pretty dull and really didn’t grab my eye.  The panning speed remained fairly constant from shot to shot staying in that particular spot.  The difference is shooting about fifteen degrees to the right of the car’s image was shot.  Just that much, fifteen degrees is all it takes sometimes to make the difference between a good background and something that’s messed up.  Making the composite image was pretty easy thanks to the fence running through both shots.  To find out what the details were, hit the “read more”.
Read more!

Wednesday, December 1, 2010

Testing A New Camera

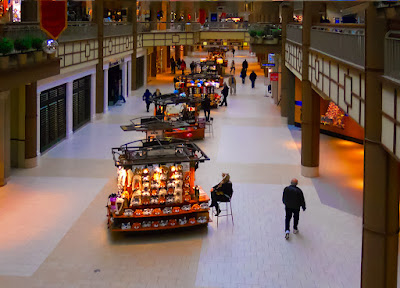
A new camera?  Ah, visions of more pixels, maybe a full frame, better glass to go with it, and more weight to lug around.  Well, actually, no, no, no, and no.  Chase Jarvis has a book out that with a title every photographer should memorize.  It’s “The Best Camera” with the subtext of “Is The One You Have With You”.  The entire book is shots Chase has taken using his iPhone, and it isn’t even the latest iPhone.  The book was published about or before the latest iteration was introduced.  Here’s a professional photographer with tons of equipment and his thought goes back to lyrics from a 1970 Crosby, Stills & Nash song.  “If you can’t be with the one you love, love the one you’re with.”  When we go out doing some casual shooting we have two camera bags, a bag of just lights, two gear bags, a selection of different size reflectors, a couple tripods and a pretty full trunk.  Just in case.  And yet, we miss a at least as many shots as we get.  We miss them because they pop up as life goes by.  As a result, we ordered a couple Nikon S3000 Point and Shoot cameras two weeks ago.  They’re tiny, they’re 12 MP, they have a 4x zoom and one of them took today’s image.  Are we going to chuck the big guns?  No!  But I’ve been popping mine in my pants pocket when I dress in the morning.  Doris bought a case and carries her camera in her pocketbook.  Does it compare to the bigger cameras?  Only in the fact that each tales pictures.  Are there things that make me nuts?  You bet!  The shutter lag is something I thought manufacturers had minimized long ago.  Not so.  With 12 MPs will I be able to make 20 x 30 prints?  So far I don’t think so.  The JPG compression appears to be too great.  There seems to be a pretty high noise level with the Auto ISO turned on.  Will I not carry it?  No, I’ll keep it in my pocket so I’ll have a better chance at getting those shots as life goes by.  To find out what “tricks” were done to today’s image in post, hit the “read more”.

Read more!