It's nice when a photo op walks right up to you. That look on the face of the deer in today's
image kind of says to all. It was a
stare down to see who would move first (and in which direction). I had just dropped the missus off at work and
was leaving the companies property when I saw this deer munching on some
foliage. I slowly stopped the car and
even slower I turned my head. Didn't
want to spook her. She looked up, turned
her head and looked back at me. I hit
the button to lower the window and she just watched the window go down. Still looking at me. I reached into the back seat and grabbed my
camera bag. Fiddled around getting the
camera out and changing to a longer lens and she was still just looking at
me. I took several shots out the
driver's side window and she just stood there looking at me. By now I was thinking this girl might be
daring me. "Come on out of that car
and you'll get a deer hove up your a$$."
Not being the brightest photographer, that's exactly what I did. Slowly pulled the handle on the door, equally
slowly swung the door open and dropped one foot to the pavement. She still just stood there looking at
me. I put the strap around my neck and
rose out of the seat. Finally was
outside the car and she was still doing the stare down thing. I looked down to make some adjustments to the
camera. That's when she started her charge. Thankfully it was into the woods and not at
me. Pulled the camera up to my eye and
snapped off a burst of shots of her white tail bouncing into the forest. To find out how the shot was finished, hit
the "Read More".
Read more!
Wednesday, August 29, 2012
Wednesday Q&A - Photoshop - Sharpening By A Nose
Labels:
acknowledgement,
Adobe,
CS5,
CS6,
Lightroom,
LR4,
Photoshop,
recommendation,
technique
Monday, August 27, 2012
In Camera Metering For Photoshop
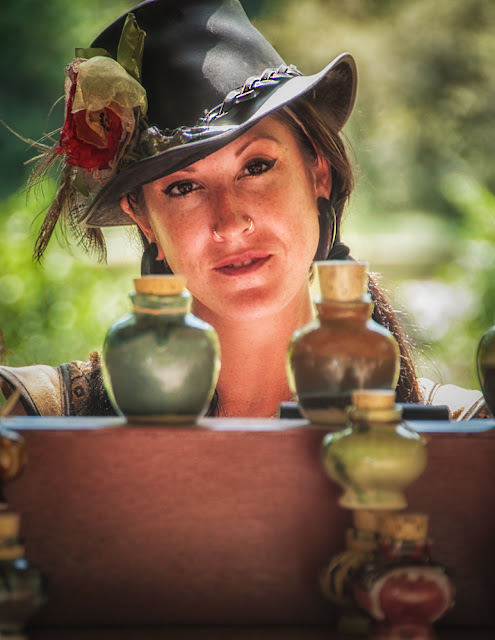
We were running around the New York Renaissance Faire in
Tuxedo, NY over the weekend and had some challenging shot opportunities. Today's image is a good example of a tricky
lighting situation. Since we were just
at the Faire to have a nice summer afternoon we hadn't brought any reflectors,
speedlights or modifiers to try to tame the bright sunlight. I find it's always a good idea to ask
"the talent" for permission to shoot them. In fact, one of the performers, when asked
for his okay, said "sure, and thanks for asking". These people are there, being paid to
perform, sell and interact with the visitors.
I'm sure most (99%) are aware that part of the duty is being available
for people wondering around with cameras.
The young lady in today's image was most gracious. I asked and she offered to come around in
front of her stand to pose. I asked her
to stay in back so I could include her wares in the shot. She sold perfumes in interesting looking
bottles. To find out how the shot was
setup and what was done in Adobe Photoshop Lightroom 4 (LR4) and Adobe
Photoshop CS6 (CS6), hit the "Read More".
Friday, August 24, 2012
Subtle and Not So Subtle Changes in Photoshop
Today's image has a little bit of everything. Part of it is an HDR, but I didn't like the
sky, so I switched it back to a non-HDR version. There was an air conditioner in the upper
left window, so I took it out. There was
scaffolding in front of the greenhouse and window to its left, so I took it
out. I pumped up some of the colors
using Hue/Saturation Adjustment Layers in Adobe Photoshop CS6. It's a cropped pano rather than a
multi-shot. And it took a trip over to
Nik Software's Color Efex Pro 4 just to play with it. To find out the air conditioner was removed, hit the "Read More".
Read more!
Wednesday, August 22, 2012
Wednesday Q&A Come On People, Adobe Photoshop Smart Objects Rock
I've said it before, but it continues on. The number one keyword search bringing people
to the Gallery concerns Adobe Photoshop Smart Objects. It's probably closely followed by search
asking how to get rid of Smart Objects.
My big question back to those folks is why do you want to get rid of
Smart Objects? For those who don't want
to learn about Smart Objects and want to read as little as possible... The way to get rid of a Smart Object is to Right
Click on the Layer using the Smart Object (anywhere on the Layer ribbon other
than the name or the thumbnail. You'll
get a dropdown menu. Slide down to
Rasterize Image and click. That's
it. That's the way to get rid of that
little Smart Object icon in the lower right of the thumbnail and revert
whatever you had back to a plain old Layer.
TO learn more about using Smart Objects, hit the "Read More".
Read more!
Monday, August 20, 2012
Inspiration Interpreted In Photoshop
National Historic Sites in the US are typically places meant
to inspire us. There are 89 of these sites,
only one in Connecticut and only one dedicated to American Painting. It's Weir Farm NHS, located in the towns of
Ridgefield and Wilton. "It
commemorates the life and work of J. Alden Weir, the American impressionist
painter and member of the Cos Cob Art Colony." It's only about ten miles from the gallery
and we go there at least four times a year.
Today's image is a panorama of the back of the house from a lower
garden. One of the more interesting bits
about Weir is the fact that he initially disliked impressionism, saying "I
never in my life saw more horrible things" (Wikipedia). This from a man who later championed
impressionism and his fame came from that style of work. (Ya never know, do ya.)
It is an peaceful place and
one full of photographic potential. The
buildings, the rock walls, the orchard, grounds, pond, meadows and gardens all
make good photographic fodder. Walking
around the grounds for as little as ten minutes can produce scores for images,
different on each visit. Today's image
is an amalgam of a four shot pano and a set of clouds taken a couple weeks
ago. The sky was an overcast gray and
pretty flat. To find out how the sky was
placed (it was really easy), hit the "Read More".Read more!
Friday, August 17, 2012
A Little Bit Of Everything In Photoshop and Lightroom
Like the title of this post says, there's a little bit of
everything in today's image. It's a four
shot panorama put together in Adobe Photoshop CS6 (CS6). It was desaturated in Adobe Photoshop
Lightroom 4 (LR4). It was straightened
using the new Adaptive Wide Angle filter in CS6. It was hand colored in LR4. CS6's
Content Aware Fill was used to fill in gaps in the sky and water. LR4 was used for the final crop. Another trip to CS6 gave today's image a
"painted" effect with CS6's new Oil Paint filter. And, finally, a vignette was applied back in
LR4.
There is a reason why each step was done in either CS6 or
LR4. To follow a rundown of each step
and an explanation of why it was done in which application, hit the "Read
More".
Read more!
Wednesday, August 15, 2012
Wednesday Q & A: What Is Sharp? Photographically.
Got
an email the other day from a fellow I know from the local summer college baseball
league. He's at all the games and is the
unofficial team shooter. In the email he
had several shots posted online by a Boston area photographer. He just wanted to ask a question about them,
so there's no piracy of intellectual property.
His point was that the shots were nice and sharp and he wanted to know
why his shots didn't come out like that.
The shots involved were of a vintage baseball game. I just shot a vintage game back in June, so I had a couple shots I could use to
explain what he was seeing in his comparison of the Boston photogs shots versus
his. The shot on the left in today's
image is similar to the one from Boston.
The other is the original of the shot.
The Boston guy left all the MetaData on his shot, so it was easy to see
what he was doing when he clicked the shutter.
High shutter speed, slightly elevated ISO, lens cranked out to 200 mm,
F4, and the subject was 21' away. I was
able to take a SWAG (Scientific Wild A$$ Guess) at what was going on. To find out the secrets I uncovered (sounds
like a mystery novel), hit the Read More.
Monday, August 13, 2012
Lightroom Saved My Bacon On This One
Now I'm not as bad as a buddy of mine (LF) when it comes to
charging into places where you're not supposed to be to get a shot, but I got
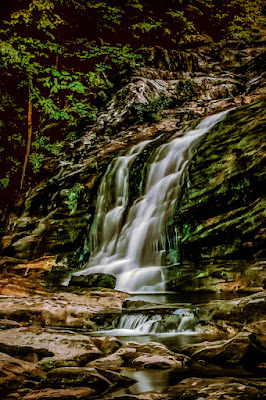
nailed on today's image. The shot is of
the second level drop (from the bottom) of Kent Falls in Kent Connecticut. It was taken a couple weeks ago, so it's a midsummer
kind of time frame. It's also a
"shoot it when you're there" shot.
I wanted to try out a nice, new six stop ND filter I'd just gotten and
had the idea of shooting some flowing water.
The streams around here sort of suck at the moment and, as you can see,
the falls didn't exactly have torrents of water coming over the drop.
The pool at the bottom of the falls was full of people
trying to beat the heat. So, that was
out of the question. I looked around and
spotted a route that was doable. A
little tricky and I'd have to pick my way up the drop, but I figured I could
make it. I scrambled (okay, slowly
scrambled) my way up, occasionally putting the tripod down, climbing and
reaching down to regain the tripod. Like
I said, it was a little tricky. Once I
was up I set up the 'pod. Since it was
the first time using the six stop ND filter I figured there would be some trial
and error to zero in on the right settings.
Thought maybe five or six shots.
I'd gotten the first test shot off when the hair on the back of my neck
started tingling and I got the feeling of a presence at my back. It was one of the park rangers, with his
hands on his hips and a real stern look on his face. "Didn't you see the Off Limits
sign?" he roared. I told him I hadn't
and he asked how the heck I'd gotten up there and missed the sign. I pointed out my route up the face of the
falls. His stern look turned quizzical,
his head dropped about three inches and he said " there's a trail right
over there". Oops, hadn't thought
to check for a trail. Who knew? He told me the second tier was out of bounds
even for idiot photographers. I
explained that I had just gotten set up and asked for two more shots. He agreed.
The first shot, test shot, had been way off. Basically couldn't see much of anything on
the screen. Figured it was a combination
of sunlight and a blown exposure.
Cranked the shutter speed up (longer) about two stops. Little better, but no cigar. Getting desperate, I went another two
stops. I could make out a stripe of
white and held to my word and closed up shop.
The ranger started for the side trail, pointed out the sign, and lead me
over to the main trail. I thanked him and
asked what time they started work. Figured
I'd have to get there before their day started to get back up to that
tier. At least next time I'll know about
the trail. To find out how much I was
able to recover using Adobe Photoshop Lightroom 4 (LR4), hit the Read More.
Wednesday, August 8, 2012
Wednesday Q&A - When To Use Lightroom And When To Go To Photoshop
I've been seeing a lot of keyword searches bringing people
to the gallery asking about when should you stick to either Adobe Photoshop
Lightroom (LR4) or Adobe Camera Raw (ACR) and when should you go to Adobe Photoshop
(PSCS6). I'm not going to give the
"right" answer, because there is no "right" answer. It depends on all sorts of factors. One would be what are you comfortable
with. We're talking about the Develop
Module in LR4 or using ACR. If the only
reason you're considering buying a copy of LR4 is the Develop Module, don't do
it. The Develop Module in LR4 is exactly
the same as ACR. The only difference is
where they put the tools. That's it!
If you're interested in LR4 for the fast (super fast) sort
and cataloging of the Library Module, go for it. If you want to use the Map Module and Geo Tag
your images, go for it. If you're
interested in the Book, Slideshow, Print or Web Modules, go for it. But if you're only interest is the Develop
Module, fo git about it (as they say in New York). To find out about the workflow of today's
image and when it goes from LR4 to CS6 and pingpongs back and forth, hit the
"Read More".
Read more!
Monday, August 6, 2012
Sometimes It Just Ain't A Photoshop Thing
Why not? The shot
could be taken from just about anywhere, stick a tree along the left side, put
a little grass along the bottom and you've got a pretty reasonable
composite. Easy to do in Adobe Photoshop
CS6 (or earlier versions). Then again,
every once in a while, the shot is really there. That's the case with today's image. It's a one position panorama. I say a "one position" because it
is a three shot from the single position.
It's a three shot, but not an HDR.
Confusing enough yet? Let's get
started on how today's image was worked.
Read more!
Thursday, August 2, 2012
Dealing With Details In Lightroom 4
Little bit of a celebration before we get started. We've just pasted 400 posts here on The
Kayview Gallery. Not a bad
accomplishment (I think?). There's been
"about" 400 different images.
I say "about" because a couple posts had little sketchy kind
of things (like the other day) to explain how something was done and I think I updated the
processing of one image with new techniques.
So, like I said, "about" 400.
We were at Buttonwood Farm in Griswold Connecticut over the
weekend. They were having their annual
charity event and the place was mobbed.
Literally, you couldn't get near their ice cream stand and the line for
the rides through the fields must have been one hundred people long. The big "prize" for photographers
is the fields of in bloom sunflowers.
The farm is at the 90 degree intersection of two roads and the fields
occupy all four quadrants surrounding the crossing. They must switch off where they plant the
sunflowers, but there's always acres in blossom.
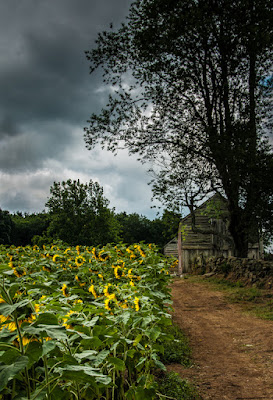
Today's image is at the edge of one of the fields. The sky was pretty dramatic, so I didn't have
to drop a sky into the composition. The
image did take a very short trip over to Adobe Photoshop CS6 to use Content
Aware Fill to take out a road sign on the far right. It ended up being an unnecessary excursion,
because the area with the sign got cropped out back over in Adobe Photoshop
Lightroom 4. That's where all "the
work" was done on today's image.
That means that (for me) it's a pretty darn straight image.
Subscribe to:
Posts (Atom)