Showing posts with label acknowledgement. Show all posts

Monday, August 17, 2015

Sometimes Photoshop Just Can't Do A Person Justice

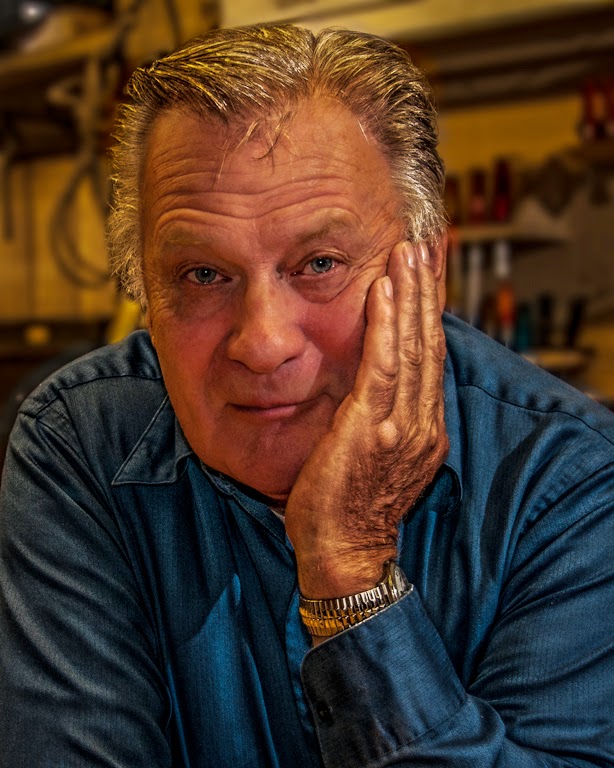
The fellow in today's post is a friend.  That's a word I don't take lightly.  I have many acquaintances, some I like more than others.  But, the term friend has special meaning to me.  The guy in today's post is ninety five years old.  He lives in the same "active over 55" village we do and is truly "active".  His name is John.  Early in what he calls another life he was a photographer for Kodak.  Kodak doesn't hire bums as their official, shoot the world photographers.  At least they didn't.  Somewhere, in mid-life, he changed careers.  He became what I know him as, a master woodworker.  He's still at it.  He's the monitor at the village wood shop on Sunday mornings.  In the heat of the summer or the frigid air of winter the shop can get pretty lonely for most of the monitors, but not during John's shift.  When he's in charge there's always people there to see what he's doing, to learn from him, to enjoy the treasure we have in our midst.  
Here's a link to a 1982 article about John from the New York Times.   Read more!

Wednesday, June 24, 2015

More On Easy Ways To Get Better Images

The subject of today's image was at the same Renaissance Faire as the person in my last post.  If you check them both out there's something you may notice that makes them similar.  There's not a whole lot to look at other than the subject.  That's today's key to getting better "starting points" to having a successful image.  There's a fairly prolific photographer/writer out in the wild by the name of Rick Sammon.  I've seen him speak a couple times and have come to the conclusion that Rick's biggest fan is --- Rick.  There is, however, one phrase he uses that goes along with the way I've shot most of my career.  His saying is "the name of the game is fill the frame".  He's not the first guy (or the last) to espouse that philosophy.  There's a guy out on YouTube who goes by the handle Fro Knows Foto.  According to him, he doesn't crop.  Says he shoots the frame he wants in the camera.  Cropping is apparently against some bizarre cult rule he's set up for himself.  My guess would be that he must not frame and hang a whole lot of prints.  It almost impossible to find frames that fit the standard format of a camera's sensor.  Today's image is 100% of what the camera saw when I clicked the shutter.  To find out way that's both a good thing and a bad thing, hit the "Read More".

Read more!

Thursday, May 21, 2015

Using Luminosity Masks In Photoshop

Click image to enlarge. 
Well, played hookie from working again yesterday.  I was "supposed to be" cleaning out the spare bedroom.  Getting rid of (or at east organizing) buckets of photographic bits and pieces.  Instead, a friend suggested anyone interested should get together and go down to the New York Botanical Gardens.  Sometimes you just can't say no to that kind of temptation.  It didn't take a whole lot of persuading to get Doris' buy in on the caper.  Flowers have been sort of her thing lately, taking equally good shots with both her Nikon and her Samsung cell phone.  She has a very good eye, but I swear I'm going to "accidently" smash that phone because of the quality of the images she gets with it.  Oh well, sometimes the gods are with you and sunlight finds it way to exactly the right spot.  To find out how a couple of Luminosity Masks rounded out todays image, hit the "Read More".
Read more!

Friday, April 10, 2015

On Safari With Photoshop Thanks To Glyn Dewis

Click on image to enlarge.
I recently picked up a copy of Glyn Dewis’ new book titled “ThePhotoshop Workbook”.  I’ve been a fan of Glyn’s ever since Scott Kelby “discovered” him and started bringing him over to “Photoshop World”.  In the first chapter he shows an image he made of a couple giraffes out on the savannah.  I said to myself “self, we have a couple images of giraffes from the Bronx Zoo”, hmmm.  I thought I might be able to do a reasonable takeoff on his image.  From his description it seemed he had a fairly easy time extracting the animal from its original location.  In the one I did, I didn’t have too much trouble, but apparently more trouble the Glyn.  Not a big deal, but it proved a point.  I did want to make my image different enough from Glyn’s so no one would thing I just filched his image.  To find out what I did and the differences between the two are, hit the “Read More”.
Read more!

Monday, October 20, 2014

Using Lightroom's Radial Filter To Add Emphasis

We spent this past weekend with some friends (and made some new ones) at PEEC (Pocono Environmental Education Center) for a photo workshop with John Barclay.  Had a good time, laughed a little, shot a lot, slept on a rock (at least that's what the mattress felt like), and learned a new photographic technique.  During John's welcoming presentation he showed some of his work, including a technique he referred to as "swiping".  I'll let the cat out of the bag and reveal his "secret" technique after you hit the "Read More"
Read more!

Monday, September 8, 2014

A Little Joel Grimes - A little Glyn Dewis In My Soup Ala Mambo #5

As it says in the Billy Joel song "John at the bar is a friend of mine".  In this case the bar might be a bar of steel or aluminum.  We sort of went for an environmental portrait in the shot.  The head of a combined wood working and metal working shop asked me to take a few shots of some of the fellows.  For most it was a case of lighting the person against a green screen and shooting the shop totally separate from the person.  John was the exception.  The shot is pretty straight forward.  I'd set up three speedlights around his playground.  The metal working portion of the shop.  The plan was the same as other places, but this just popped into the viewfinder.  John is what's known as a raconteur, a storyteller, a conversationalist, a wit.  He was just there, holding court, with me sitting across his bench.   I'd just set up three lights, gave them a quick glance and thought "we might have something here". I (and others) think it's a pretty good likeness of a fine character.  The "trick" to today's image is what happened after the shutter clicked (oh good, now I sound like I'm channeling Joe McNally).  To find out about the finishing of today's image, hit the "Read More".
Read more!

Monday, July 28, 2014

Topaz Labs Simplify - Who Knew?

Topaz Labs (TL) just came out with a new version of it's Remask plugin.  It's a free upgrade if you're already a Topaz Suite user and some minimal cost if you'd be interested in it as a stand alone.  (With the suite pricing I can't imagine why anyone would pick and choose individual pieces.)  I've really struggled with earlier versions of Remask, so I figured I'd download their newest and see what I thought.  Not bad, much improved from what I've played with from them before.  The caveat is that I can still do complex masks quicker using Adobe Photoshop (PS) Calculations if there's a lot of interior detail.  (The sky showing through the leaves of a tree for example.)  I tried a couple of "outline" only things (flowers, etc.) and the TL Remask does a very good job on those types of selections.  While I was playing around with the Topaz Suite plugins I thought I'd take a look at a couple other pieces I've never played with.  Today's image comes from TL's Simplify.  I was pleasantly surprised, not that today's image is a simple as you might think.  To find out why, hit the "Read More"

Read more!

Monday, June 30, 2014

What Did You Do To This Image?

Some friends ask me that all the time. They assume (naturally or not) that I must have messed with the original image in some way. Often they can see that I've done "something" because it's pretty darn obvious. Flip back through a few posts and you'll see several examples. But! Sometimes an image looks pretty straight and it's been worked to death. I get a kick out of those who say "I like to get it right in the camera". I like to get a well exposed digital negative. Today's digital negative is a digital positive, but what I'm getting at is that I like to get all the information I need on a properly exposed NEF file. (If I'm going for a straight image and not some HDR thing.) If you go to the "absolute" people who want the image to magically come out of the camera ready to go, do you know who you'd be eliminating? How about Ansel Adams? Bill Eppridge. Alfred Stieglitz. Any of the masters of film photography. Adams is quoted as saying "thee negative is comparable to the composer's score and the print to its performance. Each performance differs in subtle ways. Read more at http://www.brainyquote.com/quotes/quotes/a/anseladams110426.html#8dAkmOgKBFwVpJoy.99 . I was at a talk by Bill Eppridge (look him up) and he explained that he spent the entire day in the darkroom one time making print after print until he got the image he saw in his head. He wasn't just clicking the enlarger's light on and off. He was "creating" his final image by burning and dodging small areas of the print. He mapped out what tone should be in what exact tones he knew were there. There's more to today's image than there is in many of my more obvious manipulations. To find out more about today's image, hit the "Read More".


Read more!

Thursday, April 17, 2014

500 Posts And Counting

It was five years ago (almost to the day [4/21/2009]) that The Kayview Gallery (TKG) had its initial post.  I looked back at some of the early images and, frankly, some of them gave me a giggle.  What the hell was I thinking?  There's a few I still like.  The very first post was about an image I took at one o'clock in the afternoon and turned it into a reasonable night shot.  A retired professional photographer, when looking at the print, wanted to know how, if it wasn't a night shot, did I get the interior to look right.  I think I remember telling him it was a very special trick I used.  Truth is, what looked like an interior was actually the reflection of the building across the street.  I changed the color of the panes of the window using the Color Blend Mode to give the appearance of warm tungsten light.  It was an exercise in the mind seeing what it wanted to see rather than what was reality.  Other things going back through the Blogger online database for TKG I'm reminded for the slow start we had.  The first post, to this day, has only seven total views.  Even today, TKG isn't exactly one of the big name photography blogs.  Just an eclectic few (hundred) who read it on a regular basis.  There are thousands who pass by, but I've come to recognize some of the frequent readers.  Some folks in Bozeman Montana check TKG about every day to see what's new.  According to Google Analytics there been twenty one different people from Bozeman stopping by almost three hundred times during the past year.  There's about 38,000 people in Bozeman.  If I could get that same ratio of readership from New York City that would be something over one hundred thousand reads (for one city) rather than a little less than one thousand.  Guy (or folks) in Bozeman?  I appreciate your support.  TKG has been one of the blogs featured in the Photoshop section of Alltop  .  We're selected as "Most Topular" often enough to make me smile.  Thanks to Alltop.  Thanks also to all who have mentioned TKG on their blogs and sites.  We've gotten nods from Planet Photoshop, Lightroom Killer Tips, MasterPhotoshop, Photoshop User and a bunch of others.  It is nice to know we're occasionally noticed by the heavy hitters. 

How about if we make post number 500 a record breaker.  Make it some sort of chain letter type of thing.  Send it to ten of your friends and ask them to send it to ten of theirs.  There won't be any sort of prize or payoff, but if the results are magical I'll report back on the next post.

So, thanks to all readers.  Those loyalists and those who are dropping by for the first time.  I appreciate your interest.  I hope you get a kick out of today's image.
Read more!

Monday, November 18, 2013

A Friend Has That Currier & Ives Look Down Pat

I never begrudge anything anyone can do in Adobe Photoshop or Adobe Photoshop Lightroom.  I'm always either trying to learn new things or figure out how someone did something.  I recently saw a couple images by a friend and frequent reader of these posts (Hi Ed).  He's come up with an old timey, Currier & Ives type look to some of his landscapes.  Very, very interesting look.  He asked me for some pointers on how to extract objects from images.  I think we need to trade tips.  Today's image is an attempt to take a shot at going for the old time feeling.  It works, just not as good as Ed's.  Couple of things.  It is an HDR image with quite a bit of post processing in both PS and LR/ACR (Adobe Camera Raw).  With the Creative Cloud version of PS (PSCC) you can use ACR as a filter.  As long as you make the Layer a Smart Object you can pop back and forth into and out of ACR as often as you'd like.  Great for tweaking things as you go.  You doing something "straight" to an image, jump over to ACR.  Doing anything that needs a Mask, bounce back to PS.  Compositing images, use PS.  Just remember where your base image came from, 'cause that's where it'll go back to when you eventually do a Save and Close.  (Notice I said Save and not Save As.)  If you use LR as a DAM tool (Digital Asset Management) and you go to PS to do something that requires PS you should probably use "Copy With Lightroom Adjustments" (CTRL E to get to the dialog box and then use the top option).  That eliminates the need to do the old fashioned "make a copy of your Background Layer just in case" thing.  People used to do that to protect their original image.  If you "use a copy" you're not touching the original, so you don't need that copy of the Background Layer.  When it's time to Save your creation it'll be put back right beside the original images (or set of images in the case of HDR or panoramas.  But, what's up with today's image.  To find out, hit the "Read More".
Read more!

Wednesday, November 13, 2013

Wednesday Q & A: Where The Hell Have I Been

It really hasn't been too much of question in the real world, but for people who are readers of The Kayview Gallery it got some attention.  The gallery is featured on Alltop.com under the Photoshop section.  One of the things that happens there is that you sort of slide down the pecking order unless you post frequently.  After a couple weeks you tend to drop off the bottom of the page.  When I recently posted the shot of a Santa Claus looking guy (my brother-in-law), the gallery was back to being included on Alltop.  That's where a couple of notes came from asking what had happened.  What happened was that we moved.  Now, that shouldn't explain a four month sabbatical, but that was it.  Our explanation of why we were selling was that we had an eight room house and we used three.  The kitchen, the bedroom and the playroom/den/tv room, whatever.  The boys are gone, the excess rooms were either dust or junk collectors, we aren't (never have been) into liking yardwork or snow shoveling, so what was the point of staying.  Today's image is a cell phone shot of the front of our nice new (to us) condo.  Now instead of eight rooms and using three, we have four rooms and use three.  The condo actually has more room than the house had before the addition.  The master bedroom suite is smaller than we had at the house (but then again most master bedroom suites [in "normal" houses] are less than 650 sq. ft.).  The living room/dining room is larger, the kitchen is about a wash and the second bedroom now (for the moment) collects dust and junk (er, useful items used for photography).  To find out why it's taken almost four months to get back to some resemblance of order, hit the "Read More".


Read more!

Wednesday, June 12, 2013

Wednesday Q &A: Privacy? Are You Kidding?

Frequent readers of the blog know I’m retired from a little west coast startup named Intel.  (Yea, that Intel.)  All this flap over privacy cracks me up.  Let’s go back to “the old days” of 1999.  Intel had just come up with a great technology for the “new” Pentium III processor.  Each chip would have (basically) a serial number.  This would be a great boon to large companies for the management of computer assets.  The IT Department could do all sorts of things to keep the TCO (Total Cost of Ownership) down, manage the software on each computer, target updates to specific machines and streamline troubleshooting problems.  Only problem was that every chip, not just the ones in large companies, would have the serial number (identifier).  Conspiracy theorists went nuts and claimed “Big Brother” had arrived and everything you did would be subject to being tracked.  Intel backed away from including the ID'r code.  Scott McNealy, then CEO of Sun Microsystems, was asked by a reporter (Stephen Manes) to weigh in about the noise.  His quote was (and remember this was 1999) “You have zero privacy anyway.  Get over it.”  Things haven’t changed.  You have zero privacy.  Every time you make a phone call, send an email, tweet what you had for lunch, post an instagram, or use a credit card, someone is gathering information.  To see an example of what can be done and why you have no privacy, hit the “Read More”.
Read more!

Thursday, June 6, 2013

Wednesday Q & A: Does LR4 Have Alpha Channel Masks?


The easy answer to today question?  No.  The harder answer would be yes.  The first thing that needs to be discussed would be what is an Alpha Channel, and the second would be how are they used.  I did a post a while back about a similar topic.  It was about Alpha Channels in Adobe Photoshop Elements.  The answer is very close to the answer to today’s question.  Full blown Adobe Photoshop CS XX (whatever) definitely has Alpha Channel.  The big difference between PS CS and PSE and I’d think LR5B is that you have access to Alpha Channels in PS CS.  If you have the default Layers Panel open, take a look at the tabs.  It goes Layers/Channels/Paths.  A Channels Panel is available to you.  The first thing you see (if you’re working is an RGB mode) is four “Layers”.  RGB/Red/Green/Blue.  RGB is the composite of the other three.  The Red Channel is a B&W (there’s also an option to see it in color) representation of everything that contains even a little bit of red in the RGB image.  If you click on only the Red Layer you’d see a B&W image.  Full Blacks, full Whites and shades of gray.  Same thing happens when you click of the Green and Blue Layers in the Channel Panel.  As you click through, the B&W representations will change.  If you think of it as a painter would view his/her paints, you see which colors and what amounts the painter would have to mix her/his colors in to get the desired end color.  If you were to put a big old X (make one leg Black and one leg White) across the Red Channel (any Channel you choose) and then look at the RGB Layer you’d see a rainbow of colors.  What’s going on?  You’ve changed to amount of Black and the amount of White in the Alpha Channel.  To find out what happens in PSE and LR, hit the “Read More”.
Read more!

Monday, June 3, 2013

105 Shots Of A Stick And One Bird

How much of your camera do you actually use?  I’ve had my Nikon D300 for five or six years now and I’m still finding new things it do to play with it.  I’ve played with Auto Bracketing for years to create HDR images.  I have multiple Nikon speedlights so I can use Nikon’s CLS (Creative Lighting System).  My latest thing to play with is the built in Interval Timer.  We put a bird feeder out in back of the master bathroom over the winter.  (It wound up being much more of a squirrel feeder rather than a bird feeder.)  It was about four feet away from a window, just slightly above the level of the upper pane when opened.  We set up a stick for birds alit on before dropping down to the perch on the feeder.  All was set.  I put the camera on a tripod on the counter and focused on the stick.  With the focus set to manual I knew it wasn’t going to “hunt” and would stay on the stick.  With the Interval Timer on the D300 I could set the number of shots, the time between shots and when I wanted the sequence to start.  Well, I wanted the sequence to start immediately (and that’s an option), so I clicked the shutter and walked away to do other things.  What happened to all those shots?  Hit the "Read More" to find out.

Read more!

Wednesday, May 29, 2013

The Passing Of A Really Great Photographer

Does he look familiar?  Do you know any of his work?  Probably not.  His name is Bob Devine and he died over the weekend.  Today’s image is from somewhere near 1974-1975.  The young boy with him is our oldest son, who would have been 43 this year.  The shot is typical Bob.  He was a teacher to anyone he’d go shooting with.  It didn’t matter if he was with peers, kids, interested “newbies” or just friends. 

The last time I saw Bob was last year at a local camera club.  He just happened to stop down and gave the club’s president some medals the club had won back in the 60’s and 70’s.  I didn’t recognize him and asked him for his name.  He said “I’m Bob Devine”.  I replied “I’ve got your lights”.  The message didn’t connect and he couldn’t figure out what I was talking about.  He said “what?”.  I again told him I had his lights.  His retort was “who the hell are you?”  I told him I was Tom Peterson.  He cracked a smile and said if I didn’t get the lights back to him pretty soon, he wouldn’t loan them to me again.  I borrowed them back in the 70’s, so I’d guess him hadn’t missed them that much.  They were pretty much the thing back in the 70’s.  Hot lights with daylight balanced tungsten bulbs and 10” reflectors.  That’s what passed for “studio lights” at the time.  As an aside, I called my wife over.  Bob took one look at her and said "Doris, why haven't you aged at all?"  The guy was smooth.

We used to travel together to shoot and judge camera club competitions.  The two of us and our “third amigo” (Ernie Stonebraker [real name]) would go off for the weekend and blow a boat load of film.  One trip to Maine, between the three of us, we had something like 120 36 exposure rolls of film.  Typically it was either slide film or Tri X B&W film.  We used to scare the hell out of camera clubs when we’d walk in to judge a competition.  We’d ask what the scoring range they used was and then tell them we would be using the entire range.  Back in the 70’s the range was usually three through nine. 

Bob mentioned, when pushed, that he had driven stock cars “back in the day”.  I read his obit. today and found out he was the USAR champion a couple times.  The stuff you never knew. 

Well, he was a buddy.  As far as I’m concerned, you don’t have to see someone on a weekly basis to be a friend.  People I call friends come dear to me.  I have all sorts of acquaintances, but the number I call friends are very few.  Bob was one of the best.  Peace to you my friend.
Read more!

Tuesday, May 28, 2013

Testing Topaz Labs' New Clarity Pull-in


It’s new, it’s on sale (until 5/30/2013), the demos look good, but is it all it’s cracked up to be?  Today’s image is of one of the twenty-two named waterfalls in Ricketts Glen State Park in Pennsylvania.  We went there over the Memorial Day weekend specifically to shoot some of the falls.  As you may have guessed from the color of the reflections in the water, today’s image isn’t from that trip.  The falls in today’s image is probably as close to the road as you can find.  When we first “discovered” Ricketts Glen we had the place to ourselves.  Over this past weekend, we didn’t.  The parking lot for this falls was full, full, full.  The parking place for the next set was also chock-a-block full of cars, vans, SVUs, pickup trucks and campers.  We drove to what we thought were the undiscovered gems that were basically pull-offs on the side of the road, that gave access to a couple of interesting spots.  Nope, jammed packed.  That’s why I pulled up a shot from a fall trip we took in 2011.  Had to try something to test Topaz Labs’ Clarity.  To see what I found, hit the “Read More”.
Read more!

Wednesday, May 8, 2013

Wednesday Q&A: Photoshop CC - Yes, Or Kick It To The Curb

Today’s image is another that’s just eye candy.  I might offer a paragraph at the end, but the news out there about Adobe Photoshop CC is far more important.  So, Adobe’s going subscription for either the whole shebang (all [almost all] Adobe applications) for $49.95 per month or $19.95 on a per application basis.  I use Adobe Photoshop CS6 and (at the moment) Adobe Photoshop Lightroom 5 Beta.  I’ve kept up with all the updates since Adobe Photoshop 7.  I don’t use any of the other Adobe applications.  No In Design, no Illustrator, no Premier, Muse, etc.  I understand that LR will continue to be a consumer product, not subscription (at this time).  It’s come down to being available for $79.00 at most outlets in the USA.  Version updates (CS3 to CS4, CS4 to CS5, etc) have been about every 18 to 24 months and have cost $199.00 for each version.  That works out to somewhere between $8.00 and $11.00 per month.  Adobe has a one year “special offer” for those who are up to date (using CS6) for $10.00.  That works out right in the ballpark of what we’ve been paying for the past ten years or so.  If they make that a permanent subscription price for plain old PS (not an Extended Version), I’d sign up today and happily pay by the month.  I’ve never used 3D, I don’t believe I need 3D.  If I had it available to me I might find it to be a wonderful thing, but I don’t think so.  Hopefully Adobe will figure out a slightly more tiered pricing structure during this first year.  I do have a couple thoughts on what I “might” do if I would have to go up to $19.95 a month for PS CC only.  Hit the “Read more” to find out what my thoughts are.
Read more!

Monday, April 29, 2013

When Can't You Snap The Shutter?


I was giving my sister-in-law a ride down to one of the New York airports this morning and she was telling me this story about how she had gotten in trouble taking some pictures over at the local mall.  Now, mind you, she was taking pictures of the swans swimming around in the retention ponds outside the mall, beyond the parking lots.  A security guard (???) went over to her and said she couldn’t take pictures, it was against the law.  Yeah, right.  Today’s image presents sort of the two sides to that story.  It is a photograph, taken with a digital camera and “photoshopped” to look like a sketch.  The house is the Mark Twain House at Nook Farm in Hartford Connecticut.  It’s on private property as is the mall in this discussion.  If today’s image were a “real” sketch, the artist could have sat at the same spot, put up an easel and sketched away.  (Would have been a really nice pencil sketch, but you can probably find a hundred artists who could do it justice.)  At times, the (whatever it is) Nook Farm Association or Mark Twain Society or something invites/sponsors/encourages artists to do “en plein air” work in the yards.  I don’t know that the mall does the same type of thing, but it’s certainly something they “could” do.  So, the question is:  Canvas? Yes. Camera? No.  Hit the “Read More” to find out what’s up. 

Read more!

Friday, April 26, 2013

A Rant On Using Manual Exposure Mode On Your Camera

Raw images are notoriously dull.  Straight out of the camera there’s no sharpening, no contrast or color adjustment, no here’s Nikon’s (or Canon or Sony or whoever) best guess as to what the finished image should look like.  Take a look at this past Monday’s post.  It has a before (right out of the camera) and after (the lead image) and demonstrates where an image can be taken to by developing a RAW image.  Typically photographers fall into a few categories.  Those who shoot exclusively RAW and will develop an image.  Those who shoot exclusively JPG and let the camera make the decisions.  Those who consider what they’re shooting and why and decide either to shoot RAW or JPG.  If they’re shooting personal stuff that might become a portfolio piece, they shoot RAW.  If they’re shooting a local high school baseball game, they shoot JPGs to get the shots to the newspaper or school without needing to do additional work.  Then there’s another, rather odd duck, sort of shooter.  He/she will shoot everything in RAW.  If the images will be developed or printed as is, they still shoot RAW.  It’s rather bizarre.  Another case would be something that I came across the other night.  I was out doing some test shooting with some friends.  We have a night shoot coming up and were trying to get the parameters down.  Somehow the subject came up and one of the women said she only shoots in Manual mode.  She was very proud of that fact.  Now, she has one of the more expensive cameras out there.  I don’t understand why someone would buy an expensive computer (the camera) and then use it as if it was a shoebox.  Knowing her, she’s just not that capable enough to determine exposure just by looking at a scene.  It appears she’ll take a shot, say “oops, it’s too dark (or light)”, fiddle with the settings, try another shot and keep going.  Again, another bizarre thing to do to get an image.  I understand why she doesn’t shoot sports.  As we were shooting she would make comments like “I was at F10, but it was too dark.  I’ll switch to F 9 and try again”.  Really, was she so close to a great exposure that she was changing by 1/3 stops to get the absolute perfect exposure?  No, she was closed to 3 stops off than 1/3 of a stop.  I suggested she change it by a full stop.  She said she had, from F 10 to F9.  Where’s a rim shot when you need it?  (Music term, not photography.)  To find out my thoughts on using manual settings on a camera, hit the “Read More”.
Read more!

Wednesday, April 17, 2013

Wednesday Q&A Adobe Lightroom 5 Best Guesses


A friend just bought Adobe Photoshop Lightroom 4 less than a month ago.  When the public Beta of Lightroom 5 was announced the other day I sent him an email with a link to a sneak preview and a review.  I was on the fence as to if I was going to download the Beta or wait for the RTM (release to manufacturing) version.  It took me two days to decide I needed/wanted the features of LR5.  Today’s image doesn’t look like it would have much to do with LR5, but it wouldn’t be possible without it.  At least not easily.  It’s not that today’s image didn’t take a couple trips over to Adobe Photoshop CS6, it certainly did.  It’s a partial digital painting.  I been slightly fixated on making photographic images look like painting/photograph hybrid.  Today it was taken to a wee bit of an extreme.  To find out was due to LR5 and what was because of CS6, Hit the “Read More”
Read more!