Friday, December 28, 2012

Making Fancy Paper With Photoshop CSS

Have you ever received (or sent) an end of the year recap to friends and relatives?  We get several each year.  Some from folks we like to keep up with and others from people who we'd just as soon not keep up with, but we get it anyway.  You probably know the type.  You casually know the adults, but they detail the goings on of each child (who you've never met) and every time they've stepped out the door to either go on vacation or to the grocery store.  Many come snail mail and a few are now arriving in our inboxes.  In most cases they look pretty drab, setting the mood for what's to come.  The other evening I watched the +NAPP NAPP NAPP-A-Thon and saw +Scott Kelby  (the head Photoshop Guy) do a neat trick using Adobe Photoshop CS6's new Iris Blur filter.  He used it to produce some Bokeh that could be used as a background in a composited image.  It got me to thinking about where else someone could use the technique and today's image is one of the things I came up with.  To find out where the the background comes from and my take on Mr. Kelby's method of producing it, hit the "Read More".

Read more!

Wednesday, December 5, 2012

Wednesday Q & A: How to get Lightroom 4 Effects In CS6

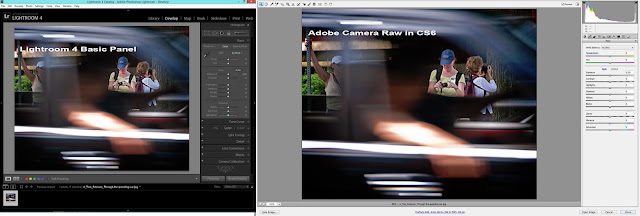
Comparison of Lightroom 4 Develop Module  and Adobe Camera Raw Basic panel.

I saw today's search query come through bringing someone to The Gallery.  At first I just passed right over it.  By the time I finished checking out the list, that one search item stuck in my mind.  My initial thought was "what could this person mean?"  I seems to be sort of a crisscross type of question.  I'm sure the intent wasn't the database functions, where Adobe Photoshop Lightroom 4 (and before) far outstrips the speed of Adobe Bridge (that comes with Adobe Photoshop CS Number) .  So, I believe the questioner was talking about getting the type of adjustments you can get in LR4 Development Panel while using CS6 (or 5).  Before Lightroom was introduced, I (and everyone else) did everything in Photoshop.  There wasn't another Adobe choice.  Since Lightroom was introduced the pendulum has swung the other way.  Now, I do everything I can in LR4 and only go to CS6 to do what can't be done in LR4.  So, to get the answer to today's question, hit the "Read More".

Read more!

Monday, December 3, 2012

Do's And Don'ts For Shooting Pemaquid Light

s

I did a post last week (or so) saying when you're shooting Pemaquid Lighthouse in New Harbor Maine to make sure you turn around and shoot the crashing waves.  It seems like a good idea, but, at the same time it might be a bad idea, but one that can be easily corrected.  Not in Adobe Photoshop CS6 or Adobe Photoshop Lightroom 4 or "in the camera".  This "fix" is in the camera bag.  To find out what the "fix" is, hit the "Read More".
Read more!

Monday, November 26, 2012

Controlling Blur In Camera, Not In Photoshop

So, what's the big deal.  If you have a shot where the background is too in focus and the image would look better with the background out of focus, no problem.  That's what Adobe Photoshop (CS6 or before) is for.  That's a hell of an excuse for not knowing what the camera will be doing before you press the shutter.  Today's image is pretty (really) straight for a shot by me.  Just a little touchup in Adobe Photoshop Lightroom 4 (LR4) and it never needed to go to CS6.  A friend and I were out shooting a vintage baseball game during this past summer.  He was using a 80 - 200 F2.8 lens and I was using some 70 - 300 F4.5 - 5.6 glass.  Before the game we did some informal portraits while the visiting team was warming up.  He took a couple shots and said "I can't throw the background far enough out of focus to make things interesting".  Duh!  He had the faster glass and he couldn't get some nice blur????  I turned around to see what he was shooting.  He was about twenty five feet from his subject.  I asked what F-stop he was on.  2.8  Again.  Duh!  What focal length?  200  Double duh!  I looked at his screen and just shook my head.  He had a little blur, but not enough to get that soft background you'd want for a informal portrait.  What was the difference between his shot and mine?  Hit the "Read More" to find out.
Read more!

Friday, November 23, 2012

Turn Around - Lightroom Works Both Ways


Today's image shows what happens when you turn around when you're shooting an iconic scene.  While we were in Maine last month we stayed at the Hotel Pemaquid in New HarborMaine.  The thing that makes this hotel somewhat unique is that it's (according to the website) 150 yards (meters) from Pemaquid Light.  Pemaquid Light is the lighthouse found on the US Quarter (25 cent piece) featuring the State of Maine.  It's, at least, as iconic as is Portland Head Light.  Another interesting fact is that the room rates are very reasonable.  I'd guess that comes from the fact that it's not likely that the hotel is someplace you'd just happen to pass.  It's not like it's on a main road.  But, the rooms have been newly "restored" to their past glory.  From what the receptionist said, the Carriage House across the street from the main building was (in part) "restored" through the work of the owner's friend, Norm Abram of This Old House fame.  The place is actually a pretty great place to spend the night.  Planning is necessary.  There are only two restaurants within fifteen miles or so and they close by 8:00 PM.  Convenience stores?  You must be kidding.  The hotel and light are about a half hour south of Damariscotta, Maine.  If you like a drink or a bag of chips as a snack in the evening, you'd better get them before leaving Route 1.  But, this isn't a travel blog.  It's a photography blog.  So, to find out what happens when you turnaround at an iconic spot, hit the "Read More".
Read more!

Monday, November 19, 2012

Hand Painting With Photoshop


There's all sorts of methods to jack up colors using Adobe Photoshop CS6 (CS6) and Adobe Photoshop Lightroom 4 (LR4).  You can do a faux HDR (in CS6, Image/Adjustments/HDR Toning).  You can use Hue/Saturation Adjustment Layers (Layers/New Adjustment Layer/"Hue/Saturation").  You can "paint" over an area and change the Blend Mode to Color.  But, today's image is done in LR4 with a small assist from CS6.  About 90% of what's been done was done in LR4.  To find out what was done, hit the "Read More".
Read more!

Friday, November 16, 2012

Photoshop's CTRL/ALT/SHIFT/E Debunked


It happened again on Thursday.  I watched an online tutorial and the person was pushing the fact that whenever you got to a place using Adobe Photoshop CS6 to retouch a photograph that you wanted to have a place you could go back to you should use the keyboard shortcut CTRL/ALT/SHIFT/E (CASE) to create a composite of all the work you'd already done.  What CASE does is Merge all the Layers and put the result on its own Layer.  The tutorialist (is that a word?  It is now.  Somebody's got to make up new words.) said this would save all your Layers so you could go back and make any changes at a later time.  Bullsh**.  What CASE does is put a line in the sand that says "you can't go back further than this point without scrapping all the work you did above".   If you've done five Layers of work and made the CASE move, then another nine and CASE, then seventeen and another CASE and found out you had to make a change on Layer three, you're screwed.  You'd have to dump twenty six Layers worth of work to make that change.  Depending on what you were doing, that could be hours of work down the drain.  I can think of one way to go back to Layer three and fix the mistake/error/oversight/whatever.  Eliminate each of the composite Layers.  If that's the case, why would you bother creating them in the first place?  Dumb!  There is a way to have your cake (make a composite) and eat it (make changes to any Layer at any time) too.  To find out what this magic trick is, hit the "Read More".
Read more!