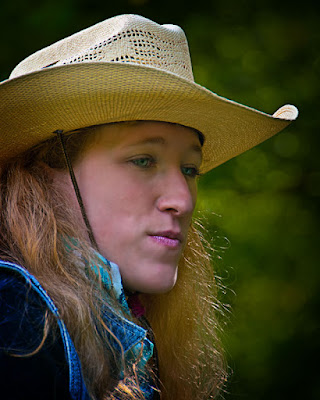
 Sometimes, even with a little pop of flash, you wind up with shadows above the eyes. This was the case with today's image. You can see the face is shaded because of the western hat. You expect the eyes to have the same shadow. Problem is that the ridge of the upper eye brow puts and additional shadow above the eyes. So, we have a compound shadow just where we want the viewer's gaze to go. Hats of any sort tend to present problems. The hat in today's shot isn't as bad as some would be. It's a straw hat and transmits "some" light. With a felt western hat the shadows would be much more pronounced. Still, what has to be done to bring out the eyes to make them the center of attention. To learn about the technique used to bring out the eyes, hit the "read more".
The technique used gives just about absolute control over making adjustments like what's needed for today's image. If you have Adobe Photoshop CS4 you have no issue. The Dodge and Burn tools have been reworked and they now maintain the color characteristics of the image. In anything older than CS4 the Dodge and Burn tools probably should have been burned. They threw a color cast on whatever they touched. For anyone using a version of Photoshop older than CS4 or Adobe Photoshop Elements here's a work around to be able to "Dodge and Burn".
.
First thing to do would be to make a new layer. That's probably a no brainer, since you should make a new layer for just about everything you do. Hit a Shift F5 to bring up the fill dialog box. Under "Contents" select 50% Gray. Leave the Blending Mode at Normal and the Opacity at 100% in this dialog box. Hit enter. Now, in the Layers Panel, change the Blend Mode to Soft Light. Make sure your foreground and background colors are at their defaults (keyboard shortcut is D ). Select a nice soft round Brush (keyboard short is B ). To bring the size of the Brush up or down, use the right and left square bracket keys. To bring the hardness of the Brush up or down, use Alt and the right and left square bracket keys. Set the opacity of the Brush (that would be up on the horizontal bar) to a very low number (between 10% and 20%). Now, on your 50% gray layer, use black to Burn and white to Dodge. You can switch back and forth from black to white by using the X key as a shortcut. You will buildup the effect by going over the same area several times.
.
You may want to use separate layers for Dodge and Burn. This way you will be able to use the Opacity slider to fine tune. If you have several areas you wish to control you could even have several layers of burns and several layers of dodges. In order not to drive yourself nuts, I'd recommend putting all your burn and dodge layers in a Group (keyboard shortcut Ctrl G ).
.
Control is the name of the game. You don't want to be ham handed with any tool you use for adjustment. Just because a tool is set to 100% right out of the box, doesn't mean you should use it that way. That's what the sliders are for.


0 comments:
Post a Comment