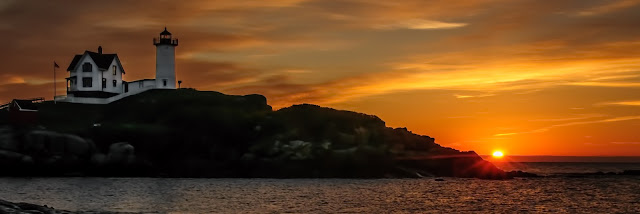
Today's image is real.
No HDR, no trickery. Just being
at the right place at the right time.
That doesn't mean there was no burning, dodging, tweaking, pushing and
pulling in Adobe Photoshop CS6 (CS6) and Adobe Photoshop Lightroom 4
(LR4). The image is processed. Since it was taken as a RAW file (an NEF
Nikon image) it had to be developed. I
just finished watching a PBS show about Ansel Adams. Part of it discussed the fact that he could
spend an entire day in the darkroom working on a single print. We have a luxury Adams didn't have but would
certainly have used. His first pass was
probably a general print with no messing around. He'd probably look at it and make an estimate
of what needed to be done. He'd translate
it to the vision of what he saw, the emotion he felt, the soul of what was
there. What he didn't do was take the
image as shot and print it. Done. Finished.
He worked at his post processing as much as at capturing the scene in
the camera. He was (still is) the master
craftsman of photography. Okay, I'm not
the second coming of Ansel Adams. I'm
just one of the common ruck. Taking
pictures and having the great good fortune of living in the era of the digital
darkroom. Each pass at an image by Adams
meant blindly doing all the work we can do in the light and starting over with
each trial. By the time he would have
gotten to attempt four, or six, or eleven he would have developed a recipe. Dodge this, burn that, double burn in that
little spot, Hold back the sky, deepen the foreground and on and on. All this and not being sure of what you'd get
until the paper went into the developer and the image would blossom into its
full glory. Boy, do we have it
easy. We get to see what's going on as
we develop the image. Oh, that made it
look better. Opps, that made it look
worse. Hit CTRL Z and the misstep is
gone. No waiting twenty minutes (between
going through other twists and turns and getting the paper into the developer)
and then realizing you'd screwed up.
Adams would have loved Photoshop.
He was "photoshopping" images before Photoshop was ever
thought of. To find out about what was
done to today's image, Hit the "Read More".
Today's image is another one that never had to take a trip
from LR4 (or it could have been ACR) to CS6.
It just wasn't needed. The shot
was taken as part of a group, but the bracketed group was for selection rather
than HDR. The single shot used in this
case was down at a -2 1/3 EV (Exposure Value).
That means the selection used was 2 1/3 stops underexposed compared to
what the camera's metering system determined was a "proper"
exposure. The reason that setting worked
was the fact that the metering system took the landmass (in deep shadow) into
the equation and was trying to make a very "average" exposure. Not what I was looking for.
The first adjustment in LR4 was the Gradient Tool. It was brought up (using the Shift Key to
keep it straight) from the bottom and the Exposure Slider moved slightly to the
positive side to open up the water in front of the island.
An Adjustment Brush Pin was dropped on the landmass and,
again, the Exposure Slider was moved to a positive number. In fact, several pins were placed on the
landmass to put emphasis on specific spots (primarily on the rocks). Another set of Pins were dropped on the house
and lighthouse.
The color that was "tweaked" isn't the one you might
think. The blue and aqua were brought up
in both Saturation and Luminance to give a hint of the coming day.
One of the keys to getting
a shot like today's image is being there.
The only time you can get a sunrise shot is (ya wanna guess?) at
sunrise. That means being at the site
before the sun even gives a suggestion that a new day is about to dawn. Lose a little sleep, get an interesting
image. No problem.


0 comments:
Post a Comment