 I was out with some friends last night and one of my “buddies”
said he had recently "discovered" the Adobe Photoshop Pen Tool (P). His sidekick asked if I used the Pen
Tool. My response was that no one has
used the Pen Tool in the past decade. He
insisted that it was a new “wonder tool” they’ve both added to their arsenal of
“ease of use” tools lately. I asked if
he had also just upgraded his auto sound system to an eight track player. He said, having been practicing a little, he
could now create a Path around an object in less than five or six minutes. I shook my head and rolled my eyes. I resigned myself to the fact that I wasn’t
going to convince either one that they were “going down a rabbit hole”. Once home I got to thinking about what they
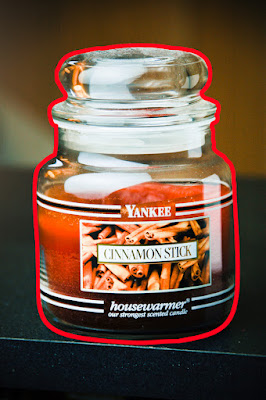
were trying to do and where using the Pen Tool might be a good thing. Today’s image is just a shot I was playing
with a couple years ago to look at some lighting. Once I finished playing with it I “put a ring
on it”. I put a Stroke (Edit/Stroke) on
it just to show the Selection I’d made.
To find out about my thoughts on the Pen Tool (P) (pro or con) hit the “Read
More”.
I was out with some friends last night and one of my “buddies”
said he had recently "discovered" the Adobe Photoshop Pen Tool (P). His sidekick asked if I used the Pen
Tool. My response was that no one has
used the Pen Tool in the past decade. He
insisted that it was a new “wonder tool” they’ve both added to their arsenal of
“ease of use” tools lately. I asked if
he had also just upgraded his auto sound system to an eight track player. He said, having been practicing a little, he
could now create a Path around an object in less than five or six minutes. I shook my head and rolled my eyes. I resigned myself to the fact that I wasn’t
going to convince either one that they were “going down a rabbit hole”. Once home I got to thinking about what they
were trying to do and where using the Pen Tool might be a good thing. Today’s image is just a shot I was playing
with a couple years ago to look at some lighting. Once I finished playing with it I “put a ring
on it”. I put a Stroke (Edit/Stroke) on
it just to show the Selection I’d made.
To find out about my thoughts on the Pen Tool (P) (pro or con) hit the “Read
More”.The big reason I thought of today’s image for doing a couple of experiments is the black on black shading at the bottom of the jar. I figured it would probably be a pretty tricky Selection using the typical, “modern” Photoshop tools. I tried the Quick Selection Tool (W), the Magnetic Lasso Tool and Calculations. The same problem came up with each tool. There’s, basically, no separation between the bottom of the jar and the surface it’s sitting on.
The Quick Selection Tool kept popping out to the sides of
the frame every time I tried to refine the selection. As careful as I might, it created a lumpy
selection that could never be used for any project.
The Magnetic Lasso Tool (L) got totally confused in the same
area. It would have large gaps in the
points it was dropping and then, randomly, fly halfway across the base and
plant a flag cutting off a third of the jar’s bottom. Again, nothing useable.
Calculations?
(Edit/Calculations) Forget
it. Calculations rely on the contrast between
ajoining areas. No contrast, no selection. Same thing went for Color Range (Select/Color
Range). No difference in color, no selection.
I could have gone with the Polygonal Lasso Tool (L), but that
would have meant making arbitrary point selections and would have ended up with
a mock curve.
So, I did come up with a use for the Pen Tool (P). The closest I came using one of the “modern”
tools was using the Quick Selectio Tool (W).
As I said, it came out with a “lumpy” selection. With the lumpy selection in hand I went to
the Paths Panel. At the bottom is a set
of icons. The middle icon is labeled
Make Work Path From Selection. The Path
comes up with many more points than you’d ever need to make a clean
selection. The first thing to do is to
get the Delete Anchor Point Tool. (It’s
part of the Pen Tool, but doesn’t react to the keyboard shortcut P. It has to be selected by right clicking on
the Pen Tool icon.) The trick is to
eliminate four out of five (or nine out of ten) Anchor Points in the fuzzy (difference
wise) area of the image. The “automatic”
selection tools make too many choices. Once
most of the points are dumped it’s easy to grab the remaining points and smooth
out the curves. (One hint: if the curves get a little [or a lot] crazy,
elinimate the point and make the curve adjustment from the next on up the
line.)
So, I really can’t urge Adobe to trash the Pen Tool
altogether. Learning how to use it is a
useful exercise. (Learned to use it
years ago.) But, its use is becoming more and more marginalized with the
introduction of increasingly sophisticated “modern” selection tools.


0 comments:
Post a Comment