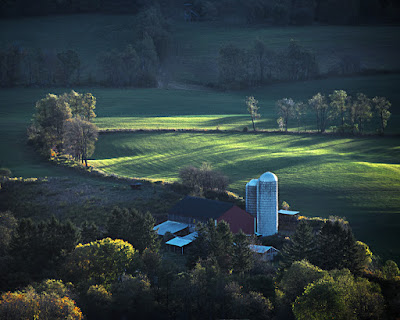
We’re baaack! We were in the wilds of West Virginia (which wasn’t as “wild” as I had hoped) over a long weekend. I’d read the information on the web and believed (foolish boy) what they said about late September being the height of the foliage in northeastern West Virginia. Maybe it was just this year and the hotter than typical summer had pushed the foliage season back a couple of weeks, but it was midsummer type shooting everywhere we went. Today’s image is typical of what we saw, with rich, creamy greens and scenes backlit by the setting sun. This, fairly dramatic, scene was taken from a “scenic overlook” along Route 55 at one of the few times I hadn’t plugged the GPS into the camera. No matter, if you’re driving east from Moorefield on the newer highway you can’t miss it. As has been the case in the past several posts, I’ve included the Layers Panel for those who’d like to follow along. Today’s image is pretty straight forward. It started out in Adobe Photoshop Lightroom 3 and what we see is the “after” of the hop over to Adobe Photoshop CS5. To find out what makes today’s image different, hit the “read more”.
For the most part, today’s image is pretty standard. The first thing done doesn’t even show up in the Layers Panel. The typical aspect ratio we crop to is 4 x 5, 8 x 10, 16 x 20. Most images are cropped to 16 x 20 @ 150 ppi. Some may gasp, knowing that hundreds of articles have been written about using 300 ppi or at the minimum 240 ppi. The only thing that shows is that hundreds of writers don’t have a good grasp of the relationship between the screen and a printer. Every pixel on the screen can represent any one of 16,000,000 colors if the screen is set to 32 bit color depth. Every dot on a print is made up of five drops of ink. In the “old days”, when printers printed at 300 dpi you could actually see the dot pattern made by the printer. Today, with printers giving 1440 dpi to 2880 dpi, the dot pattern can’t be seen with anything less than a fairly good loop. The big thing to make note of is that we’re talking of ppi (pixels per inch) on the screen and dpi (dots per inch) on the printer. If each “dot” on the print is made up of five drops you can easily see that there’s more than enough information given by giving the image 150 ppi. So much for a rant on sharpness.
Read more!
Wednesday, September 29, 2010
Friday, September 24, 2010
The Low End Of Adobe Photoshop CS5's Hue/Saturation Adjustment Layers
All three posts this week have been about Adobe Photoshop CS5’s Hue/Saturation Adjustment Layers. Monday’s image had multiple adjustment layers of the same color (3 Red, 2 Green, 23 Cyan, and one each of Yellow, Blue and Magenta). Wednesday’s image had one adjustment layer for each color, but each one had fairly highly abused masks. Today’s image’s Layers Panel shows one Hue/Saturation Adjustment Layer and none of the masks has any areas held back. Sometimes it just happens that way. Colors looked good with bringing up the saturation evenly across the frame of the image. What the image did need was to brighten specific areas. Each different area needed to be attended to with its own amount of light added to separate components. There is one additional Hue/Saturation Adjustment Layer, but, as usual, it has its own special twist. It doesn’t matter if or what color was used to make the adjustment. The Adjustment Layer affects only the white stars and stripes of the flag. Being in the shade, the white areas of the flag had a slight blue cast. To bring it into a crisper, whiter appearance the Saturation was lowered (-54 on the Master Saturation). Find out more about each Brightness/Contrast Adjustment Layer by hitting the “read more”.
Read more!
Wednesday, September 22, 2010
Kent and Adobe Photoshop CS5 Adjustment Layers Revisited
Today’s image may look fairly familiar. We were out shooting over the weekend in northwest Connecticut and the car sort of automatically steered toward Kent. Kent has to be one of the great strolling towns in New England, if not the world. There’s always a lively street scene going on and several sidewalk cafes are typically abuzz with folks socializing. As I walked down Main Street, a young couple stopped me to talk about cameras. It’s just that type of place, friendly, social, pretty, quaint, urbane and just a plain neat place to visit. Today’s visit might be thought of as a revisit of the image that appeared here on June 2nd. It’s the same cafĂ©, with the same umbrellas, but a different cast of characters. Other than the people in the shot and the date the shutter was snapped, the reason for the revisit is to show the Layers Panel used to make up the final image. One thing frequent visitors may notice in the Layers Panel is that there is no Threshold Adjustment Layer to correct any color cast. There a couple reasons for that. I’ve probably done more than one hundred different HDR images now. The first reason for no color correction sequence is that, after creating the baseline HDR image, all the Curves Adjustment Layers seem to have a curve that’s zero, zero, zero. No Changes. The second reason is: who’s to say what “correct color” is on a pushed HDR image. You certainly can’t look at today’s image and say “the colors look so natural”. HDR can go one of two ways. To make a scene look “very natural” or to make it look “hyper-natural”. If you go for the “very natural”, surely you want the colors to look as correct as possible. If the “intent” (we’ve discussed “intent” several times here on the blog) is “hyper- natural” the end colors can be a wild as you like. To see the discussion of today’s Layers Panel, hit the “read more”.
Read more!
Wow! Hello Montreal, Outremont, St Laurent and Laval.
Wow is all I can say. In the past month, readership north of the border has skyrocketed. I’d like to welcome the readers from the greater Montreal, Quebec, Canada area. The blog has readers in 76 countries around the world and, in most cases, numbers have climbed at a steady rate. In the past thirty days the increase in Canada in general, and the Montreal area specifically has made a real jump. The data I get only shows the cities and town around the world where readers are. Absolutely no personal data is obtained. Therefore, without being able to send each of you a personal email, I can only give a general acknowledgement and say how encouraging it is to see the same cities pop up day after day.
All I can say is that I appreciate your readership and will continue to try to provide interesting anecdotes and techniques on photography and Photoshop related subjects. Let me know what you’d like to hear about and I’ll put up a post on the topic. Thanks to every reader, everywhere. Read more!
Monday, September 20, 2010
What Happens After Adobe Photoshop CS5's HDRPro?
I’ve had several inquiries lately about “how” I get the bright colors you see in my images and “why” I keep talking about using an individual Hue/Saturation Adjustment Layer for each color (Red, Yellow, Green, Cyan, Blue, and Magenta). Along with today’s image I’ve included the Layers Panel that goes along with it. Clicking on the image of the Layers Panel will produce an enlarged image of it and may make following along easier. First, a little explanation of how the image got into the state it’s in. It did start out as a three shot HDR Pro image. The EV (Exposure Value) settings were -.3, -2.3 and +1.67, so it’s a three shot bracket at two stop intervals. My “normal” EV setting is -0.3 stops, so that way you see what might look like strange numbers rather than 0, -2 and +2. The reason for the “normal” being one third stop to the minus side is just to provide a denser initial shot. The Layers Panel shown is only what was done after the HDR Pro work was completed. The panel only shows the “finishing” of the image to its current state. Of the fifteen steps in the panel you’ll see that eleven are Hue/Saturation Adjustment Layers. Wednesday I show a Layers Panel that considerably calmer, but today’s is a little more on the extreme side. There’s three Red Hue/Saturation Adjustment Layers, one Yellow, two Green, two Cyan, and one each of Blue and Magenta. One of the first things you might notice is that every Mask that goes along with the adjustment layers, except one, are very different looking. No two are alike. The “how” and the “why” questions about the colors in my images both relate to my use of the Hue/Saturation Adjustment Layers. Take a look at the explanation in the “read more”.
Read more!
Friday, September 17, 2010
How Many Balloons Can You Get In One Shot?
Well, the easy answer is as many as you want. Today’s image involves several techniques, getting five balloons into the shot. Three actually come from one snap of the shutter. The other two are placed to ad interest to the image. The three in one snap are the small, blue balloon, the balloon in the lower right and the balloon in the upper, almost center. The balloon with the glow of the fire in the lower left was added, as was the one in the upper right. Just because the three were in one shot, doesn’t mean their positions were as shown. Some “trickery” was done to position them. Before finding out about what was done (in the “read more” section), see if you can come up with a logical explanation of how they were move around. The glow is the foreground balloon is definitely a glow, but, perhaps, not the glow you might thing. One of the most important things to keep in mind if you’d like to try to do a composite image like today’s is to be aware of where the light comes from. If the balloon in the upper right had the sun shining on it from the opposite side it would be glaringly obvious. By matching the direction of light it fits in quite naturally. The sky was actually that blue through a circular polarizer. It was also that cloudless. That made for some pretty boring images if you only had one balloon in the shot. So, let’s get on with what was done to each piece of the images to create the final composition. Check out the notes in the “read more”.
Read more!
Friday, September 10, 2010
It's Almost Time For A Field Trip
Every year in the September/October time frame we take a couple of days to go out shooting. For the past four or five years we’ve headed to the Maine coast. Bar Harbor, Boothbay Harbor and almost every spit of land twenty miles down at the end of each peninsula jutting out into the sea have been targets for our wondering. This year we’ve decided to put the car in reverse (so to speak) and head in the other direction. I took a look at the distance up to Bar Harbor (about 440 miles) and spun the compass around the opposite way. It came up to western Pennsylvania and the eastern panhandle of West Virginia. We did the western PA thing a few years ago to check out largest Elk herd east of the Mississippi. Basically you need a longer lens than we had at the time or trample through people’s yards. If you ask the “officials”, they’ll tell you there’s a “viewing area” where you’re sure to see herds of elk. Sure enough, they said to be there about a half hour before sunset and there had to be a couple hundred elk in the field. Only problem was that the field was about a half mile away. There is the official viewing area, but some of the elks didn’t get the memo. You’re just as likely to see one, two or three elk standing on the side of the road or in someone’s back yard. On our way back from the viewing area we stopped along the side of the road and were within six feet of a couple of elks. We tried to get a couple shots, but the light had faded enough that they all came out blurry. Oh well. This year we’re heading to the eastern panhandle of West Virginia. A couple places we’re hoping to hit are the Dolly Sod area and Blackwater State Park. We’ll be spending one night at the Blackwater Lodge, on the Canyon side. We have two “guide books” we’re using to plot an itinerary. One is “Scenic Driving in West Virginia” and the other is “Waterfalls of Virginia and West Virginia, A Hiking and Photography Guide”. Both have been very informative. But, today’s image isn’t in West Virginia. To find out where it is, hot the “read more”.
Read more!
Read more!
Wednesday, September 8, 2010
You Might Think This Is A Night Shot
Like the title says, you might think this was shot at night. Actually, the shot was taken at 4:13 on the afternoon of July 18th, a bright, sunny, hot summer day in Shelbourne Falls, Massachusetts. The facts of the shot are that it was shot at F16 @ 1/400th of a second. The EV (Exposure Value) was reduced by .85 stops, so the equivalent shutter speed would have been close to 1/800th of a second. Well above the “normal” sync speed of a camera. No sun blocking device was used on the background and yet, the background is dark. The close up creates kind of a moody portrait of a flower. So, we have a contradiction, an enigma, a brainteaser of a shot. Not so much. I’d talked about the same technique a couple of weeks ago. The shot was made using Auto FP High Speed Sync. One of the lesser used ways of firing a flash. A couple things to remember about Auto FP are that you can use any shutter speed, up to the limit of your camera and that you lose a ton of light doing it. The camera was set to Manual mode and the f-Stop and Shutter Speed set to give big depth of field and have a reasonably fast shutter speed. Being the cheapskate that I am, I used two SB600 Nikon Speedlites rather than one SB900. The camera was held in my right hand and both flashes held in my left. Doris was off shooting her own set of flowers and we hadn’t brought any light stands. So there I was, bent over, lens almost stuck inside a flower, flashes in one hand and camera in the other. It’s a wonder someone didn’t snap a shot of me working the flower. It had to be a pretty strange sight. People will often give out of kilter glances when they see someone using flashes on a bright, sunny afternoon. The thought is “doesn’t he have enough light already?” It’s not the amount of light that’s important, it the control of the light. A good example would be an outdoor movie set. Everything is setup to work with the ambient light. Then the stars are put under a shade screen and lit independent of the overall scene. The objective is to have flattering light on the star and make it appear that he/she blends in with the ambient. It’s all about control. To find out what happened to the image after the shutter snapped, hit the “read more”.
Read more!
Read more!
Monday, September 6, 2010
Maxing Out Adobe Photoshop CS5's One Image HDR Toning
I knew exactly what image I wanted to use for today’s post. I haven’t taken it yet, so that presented a small problem. It was supposed to be a beautiful weekend around here so I thought the time was right. It’s starting to get dark earlier, the evening temperature was going to be tolerable (compared to trying the same shot in January or February) and the sky was forecasted to be clear. So, off we went on Saturday late afternoon. The route goes past one of our favorite restaurants (The Cook House in New Milford, CT), so leaving earlier left time for dinner before setting up. The goal for the evening was “star trails”, so darkness, without light pollution was a must. Arriving at the restaurant and surveying the skies didn’t exactly give us a warm, fuzzy feeling about the prospects for success. A recheck as we left the restaurant was a little more encouraging, as the clouds were breaking up a bit. Heading up Route 7 into the darkness of northwestern Connecticut, with an eye on the sky, teased us onward hinting of clearing. We got to one of the targets at late dusk. Enough clouds persisted to dash out hopes of shooting any stars. Sunday we had the gear packed in the car as we left for a family picnic. The picnic was still going as darkness closed in. At one point my brother-in-law and said “what are you looking at”? I replied “stars” and we were off chasing the night. Again, headed north to escape the light pollution, we arrived at the place we’d scouted on Saturday. Everything was set, the time was now, stars were sparkling, the night cool and clear and we at the right spot. Told my wife I that before we got out the tripods I was just going to do a couple of hand held shots just to check for exposure. I said they would, undoubtedly be blurry, but they’d only be a quick test. That’s when the sad fact that I’d left the camera on for a week and completely drained the batteries became apparent. That’s when Doris said "let’s was pack it up and go home. I’ll get my shots the same night you do”. Very nice of her. So, that’s the tale of how today’s image was selected. If you’d like to learn about what was done to it, hit the “read more”.
Read more!
Read more!
Friday, September 3, 2010
Just A Splash Of Color
Count the peppers. How many do you see? If you said two, you’re missing one. It’s not there, not because of some trick, but by careful use of a Hue/Saturation Adjustment Layer. Frequent readers know that I use individual (Red, Yellow, Green, Cyan, Blue, and Magenta) Hue/Saturation Adjustment Layers in a specific way. I make a half dozen ALs, one for each color, and maximize the Saturation only. I draw the slider all the way over to 100% and, while holding down the Shift Key, walk the saturation back down to what gives the maximum color without getting garish. Holding the Shift Key down moves the amount in ten point increments rather than one point steps. The difference between 60% and 50% is noticeable. The difference between 55% and 56% isn’t. Today’s image has an added wrinkle thrown in. On the Red Adjustment layer the Hue Slider was moved to turn the red peppers green. Each Adjustment Layer comes with its own Mask. The purpose of that Mask is to affect the adjustment that was just made. By creating a Selection (using the Quick Selection Tool (W)) and replacing the mask was all that was required to return the two subject peppers to their original color. With the third pepper effectively removed from the image a “normal” image could be started. There are a couple of things that will direct a viewer’s eye in a shot. One is an acceding color placed against a receding color. Warmer colors, reds, yellows, oranges, etc. project forward in an image. Cooler colors, blues, greens, muted purples all fall back in an image and serve to accentuate the hotter colors. Another device that can be used to separate a subject from a background is focus. Sharp focus brings things to the front and soft focus pushes objects further into the depths of the shot. To hear about how each technique was used in today’s image, hit the “read more”.
Read more!
Read more!
Wednesday, September 1, 2010
Looking Through A Dirty Window
Okay, it’s another gimmick shot, but it looks pretty cool to me. I have to give props to Scott Kelby. A couple years ago he put out, for download, a set of Triptychs. He explained that he had some time (I believe on a flight) and just started messing with different ideas for Triptychs. The result was about fifteen different ideas. Most of his were verticals, a couple were two verts and a horizontal or vice versa, but none were horizontals like what you see today. That does mean it an original, just a modification of one developed by Scott. The actual image is mine and it’s an eight shot panorama. The unfortunate part of the whole thing is that the shot was taken prior to having a GPS attached to the camera, so I haven’t the foggiest idea exactly where it is. I think we were in western Massachusetts, traveling along the old Route 20 and saw a sign saying something about a “farm museum” just to the south of where we were. I remember driving down an increasing narrow road and crossing, what looked like, a half lane bridge. (It was almost too narrow to be a one lane bridge.) Just past the bridge the road rose up to the farm. It was a small museum and the highlight was being able to walk out to the pastures and see the animals and gardens. If anyone recognizes the farm, please leave a comment. There’s more to today’s image than initially meets the eye. To find out what went on to get to today’s image, hit the “read more”.
Read more!
Read more!
Subscribe to:
Posts (Atom)