 |
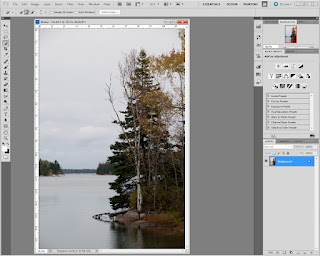
| This is the image at the start of the process. |
Adobe Photoshop CS5 has this great new tool called the Quick Selection Tool (W). There have been a lot of tutorials done showing how well it does, when used with the Refine Mask dialog box, to select wispy hair and other complex "solid" objects. One place I haven't had much luck with it is on complex objects that look like Swiss Cheese. Something with lots of open space within the outline of an object. Today we start out with an image that has possibilities, but a rather bland sky. The Quick Selection Tool - Refine Mask combination can't figure out the internal lattice of the trees. In order to make an accurate selection and come up with a Mask we'll take one step back to take two steps forward. The one step back is using the Calculations dialog box (Image/Calculations) to come up with a good Mask. The rest of this tutorial is all visual with captions to walk through the "two steps forward".
One of the things I like to see in tutorials is what's going on "behind the scene. So, each image will show the whole screen so you can follow along easier. " Hit the "read more" to follow the steps.
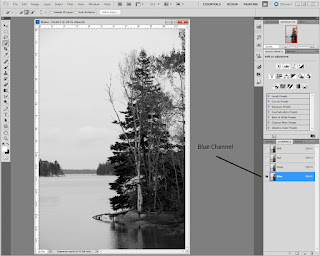 |
1. The first thing to do is to take a look at the Channels Panel and determine which Channel (Red, Green or Blue) has the greatest contrast to start with. In this example it's the Blue Channel. Select the Blue Channel.
|
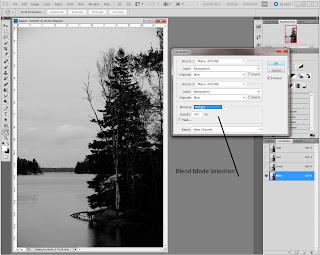 |
2. After selecting the Blue Channel, open the Calculations Dialog box (Image/Calculations). You'll see that the Blue Channel is set up (based on your selection of the Blue Channel) as Source 1 and Source 2. You can walk through the Blend Modes to come up with the mode that best darkens the blacks and lightens the whites. In this case it was the Multiply Blend Mode. The Result (the last selection dropdown at the bottom of the dialog box) should be set to New Channel.
|
 |
3. It time to start filling in the Mask leading to a strict Black and White Mask. Since the entire bottom (treeline on down) needs to be filled with black, an easy way to fill it is to use the Rectangular Marquee Tool (M) to select as much of the area as possible. To the left of the image we can see that the foreground color is set to black. Use black to fill the selection made with the Marquee Tool (in this case - Alt Backspace on a PC). Then Deselect (Ctrl D).
|
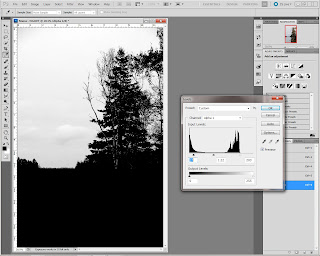 |
4. Bring both pointers (the black and the white) toward the center. This will deepen the blacks and brighten the whites. The center pointer can also be moved to increase the contrast. In this case it was moved toward the black pointer. Care must be used not to push the sliders too far so as to block up the blacks or push too much white into the fine details.
|
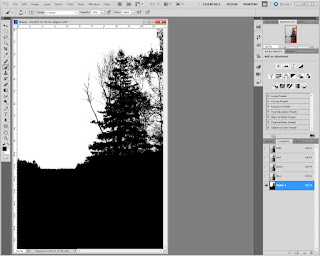 |
5. The Brush Tool (B) cn now be used to cleanup the Mask to its final, usable form. Take a soft Brush with the Mode set to Overlay and its Opacity set low (25% - 30%). This will limit the Brush to affecting only the Black areas or only the White areas. Set the foreground color to Black and paint over the image. Reset the foreground color to White (X) and repait over the image. The Black paint brush will deepen the Blacks and the White will ligten the whites. When finished, go back to the Layers Panel.
|
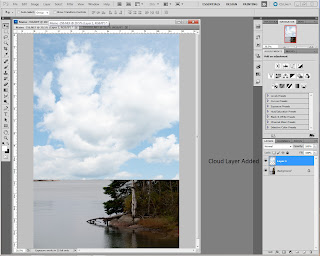 |
6. However you typically do it, bring the sky into the Layer Stack. Use the Move Tool (V) to position the sky where you want it. To the sky is too big or too small, use Free Transform (Ctrl T) to adjust size. You can't go nuts and make a little tiny sky into something usable. Once you have the sky in place go back to the Channels Panel and CTRL click on the Mask icon. This reselects the Mask we just worked on. Now go back to the Layers Panel. With the sky Layer selected, click on the Create New Layer Mask at the bottom on the Layers Panel. Magic happens.
|
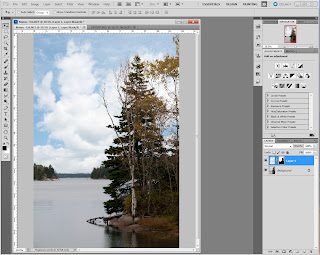 |
7. Here's today's image ready for any finishing you might chose to do. All it took is two Layers and nothing was done destructively. Anything can be modified as needed. I'd probably increase the color saturation in the tree portion of the scene using Hue/Saturation Adjustment Layers. If the sky needed to be deepened I'd make a copy (Ctrl J) and change the Blend Mode to Multiply. If that was too much I'd pull it back down by decreasing the Layers Opacity. I'd probably add a reflection of the sky in the water and Blur and Fade it's intensity. I'd sharpen only the tree area (using the same Mask to limit what was sharpened and then put a vignette on the overall image. |


0 comments:
Post a Comment