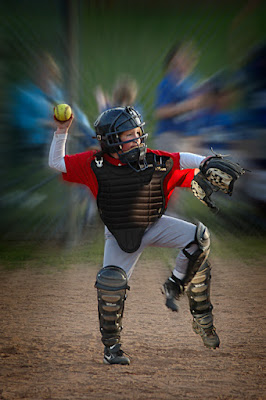
Okay, I’ll admit it. Not too many people have two left arms and two left legs, including the subject of today’s post. As I was shooting a girls softball game I noticed that the catcher threw the ball back to the pitcher with almost the exact same motion every time. The same motion of the arm. The same cock of the leg. Everything about the delivery shows that she had been taught and had practiced throwing the ball. Interpreting that motion in a still image has to be done with a trick. Maybe some motion blur or duplicating the image and ratcheting it forward slightly for faux multiple exposures. Seeing as I had a couple of shots with the same motion over the span of a couple of games it became fairly easy decide that overlaying one image over another might be an interesting way to portray movement. The first decision was which image should be the top, or front, shot. A close examination of the face confirmed which image had the best intensity of expression. That would be the top image. Therefore, it was the one that needed the first mask. The Quick Selection Tool (W) got us 90% of the way there. The Refine Edge applet took us another six or seven percent. To find out what got us the “last mile”, hit the “read more”.
There were a couple spots where the Refine Edge applet just couldn’t figure out what was what. It was in areas with very close coloring. The difference between the glove and the chain link fence in the background was too little for the computer to make an accurate parting line between the two. A situation like that is a great place to put a Wacom Tablet to work. I’ve had a tablet for six or seven years, but have only recently begun to use it in earnest. The tablet I have is the Wacom Graphire Blue Tooth model. It’s typically plugged in, being charged, ready at a moment’s notice. But, as I said, rarely used. The tablet winds up being another two hand instrument. One hand using the stylus and the other on the keyboard. As I was going through the image, there were areas that needed to have pixels added to the selection and areas that needed pixels removed. The plain old Lasso Tool (L) in the configuration I keep it in (in the “Add to Selection” mode) is easy to use to add pixels. Using the “Subtract from Selection” (holding down the ALT key) reverses the selection process. Using the keyboard and the Alt key and the Space Bar ends up easy to flip between adding, subtracting and moving through an image.
To increase emphasis on the catcher and reduce the influence of the people in the background a coulpe different blurs were added to a copied Layer (Ctrl J). The first thing done was to make the Layer a Smart Object. Next, a Gaussian Blur was applied. Then a Radial Blur was put on over that. The nice thing about using Smart Objects is that the filters become Smart Filters. Double clicking on the icon for either filter in the Layer Panel reopened the dialog box for the filter. Any adjustment can be made to the filters. Without using Smart Filters applying a filter is a one and done operation with no flexibility.
The Radial Blur by itself made the image of the catcher sort of hang out in space. Smart Objects come with their own Mask, very much like Adjustment Layers. To give the catcher something to stand on, a Linear Gradient (G) was applied to the Smart Object Mask. Hold the Shift key constrains the gradient to vertical or horizontal, which ever direction you click and pull the cursor. If you happen to put the Gradient on in the opposite direction you planned, just Invert it (Ctrl i) to reverse the fade.
Once any modifications to the image are made, all Layers are selected and the entire stack made into a Smart Object. The Smart Object is then copied (Ctrl J) and Sharpened using the High Pass Filter method (Filter/Other/High Pass). After the image is Sharpened select both Layers and create another Smart Object. Use this Smart Object to apply a vignette.


0 comments:
Post a Comment