 |
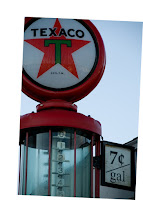
| Starting point for today's tutorial. |
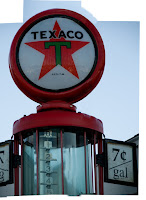
Today's "exercise" is going to be rebuilding the missing pieces of the pump. The upper and left tips of the star need a little help, obviously the bezel needs some major reconstruction and the left side of the pump body could use some sprucing up. The first step is to straighten up the pump (more artsy shooting). That way we have an axis to base all the work off of. With Adobe Photoshop CS5 where's an easy button you can push to Straighten and crop an image. Well, we really don't want to take more information away from the shot and have to rebuild that much more. CS5 does have a handy dandy modifier key to straighten and not crop a image. Just hole down the Alt key when you hit the Straighten Button and you get a straighten, full image with not cropping. Kind of like what you'll see as the first image once you hit the "read more".
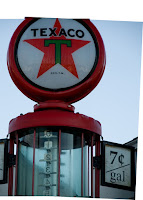
 Now that we have a straighten image with no loss of information we can start the rebuild process. First thing is make a copy of the Background Layer (Ctrl J). Use the Free Transform Tool (Ctrl T) and select the Flip Horizontal option to reverse the layout. Reduce the Opacity of the copied Layer to about 50%. Use the Move Tool (M) to nudge (use the up, down, left and right arrow keys to nudge an image) the upper Layer into as close alignment as you can. It is possible that you'll need the Free Transform Tool (Ctrl T) to rotate the top Layer just a little bit to get the matchup. Within the Free Transform Tool you can use a combination of rotate and nudge to move the top Layer. Once you've done the best you can (spend a little time, it'll pay off later)return the Opacity to 100%. You'll have something that looks like image #3.
 You can see the word Texaco is reversed in this image. Add a Layer Mask to the upper layer and mask out the reversed lettering to show the proper orientation. You'll find the those points of the star are pretty pesky. It's easier to let them fade and fill them in later. The way to do it is to use the Polygonal Lasso Tool (L) And extend the angles of the star to create the point. With the selection made it a simple matter of using the Clone Stamp Tool (S) to fill in the tips. Because you've made a selection of only the tip area you don't have to worry about "coloring outside the lines". The selection will constrain anything you do to within the selection.

 Next comes rebuilding the top of the dome. We really don't have anything that matches the way the left and right side matched, so we have to grab something and bend and shape it to what we need. Use the Rectangular Marquee Tool (M) to select the right side of the bezel. It's no problem to take a chunk of the face with you. We'll mask it out later. Use Ctrl J to put it up on its own Layer. Use the Free Transform Tool (T) to move and rotate the section up to the top. Right clicking within the selection will bring up the options for the Free Transform Tool (T). Chose the Skew option and push and pull the handles to bend the thicker portion to the right size to fit the bezel. You'll need to be careful not to distort the curve of the bezel. You'll probably have to do a little push pull dance to get it just right. Stick with it and it'll get into the proper spot. The bezel, where you picked it up from has a bit of a lip to it. Don't worry about the lip. Once you're happy with the positioning of the bezel you can use the Polygonal Lasso Tool to isolate the lip and easily clone it out.
By now the sky looks rotten. Don't worry about it, it’s a pretty bland sky and we'll be replacing it near the end. Next step is to get rid of the backwards sign on the left. Just take the Rectangular Marquee Tool and select the sign using the vertical pole as a guide. You can fill the selection with just about anything you want. Just make it something that will be able to be easily picked up by the Quick selectio Tool (W) later. (In other words, don't fill it with the red of the pump.) Again use the Rectangular Marquee Tool (M) to select the piece of the left pole that has the mounting bracket for the sign that was just removed. Use the Clone Stamp Tool (S) to clone out the bracket.
At this point we're just about done, but the sky still looks like crap. What this image needs is some drama in the sky. Find a sky you've taken and have in your "cloud folder" and bring it into the Layer stack. Turn off its visibility for a moment and use the Quick Selection Tool (W) to make a selection of the sky. Don't forget the areas between the upright poles and the glass gas meter. Right click on the selection and pick the Save Selection option. Relight and chose the sky Layer. Hit the Add Layer Mask icon at the bottom of the Layers Panel and the sky should pop right in. If, by some chance, the sky fills the pump area, simply invert the Mask by tapping the Ctrl I (eye) combination.
That's as far as we're going today. The build is complete. Now we have to "finish" the image. We'll do that on Wednesday. See you then.


0 comments:
Post a Comment