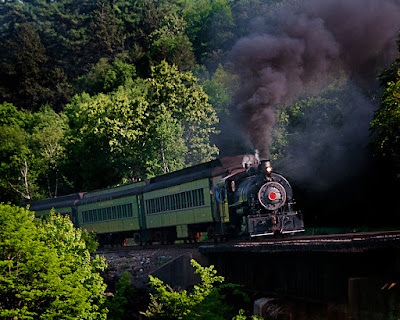
 You have to start somewhere. How's that for a philosophical statement to start a discussion of today's image. A couple months ago a buddy and I saw a photo charter in Roanoke Virginia being run by Peter Lerro. The cost was great for the photo shoot. Something like $65.00 for two nights shooting setups of a couple trains. Being from Connecticut, and the shoot being in Virginia, the cost of the shoot was a minor piece of the expense. What it did was to pique our interest in a niche of the photographic world neither of us had wandered through before. Since then we've talked about the possibility of doing a nighttime shoot in the local railway museum. We also did a Google search about what sort of train "things" were going on in our area. Over this past weekend, the Railroad Museum of New England in Thomaston Connecticut had an event (it's also continuing this coming weekend) with Hank the Tank Engine. A couple things as words of advice would be: 1) if the excursion is an out and back, bring a lunch. 2) Checkout the route for possible shooting locations before the event. 3) Ask someone (the Conductor, the Engineer, the Station Master, anyone) what the plan is. So, we did the Roanoke trek, we've run up to do a quickie locally and now we're talking to the local train enthusiasts about doing a night shoot with them. That's all well and good, but to find out about today's image, hit the "read more".
One of my advice tips is a good one. Check for shooting locations before the train comes by. We didn't and missed the train's first pass across the bridge in today's image. As you can see, the sun was out pretty bright the day we were shooting. Once the shot was "in the can" the real work began. Taming the exposure extremes was the first (and primary) piece of business. The easiest way I know of doing this (at this time) is to load a Channel (you have to decide which Channel [Red, Green, or Blue] gives the most contrast) as a Layer Mask. By using the Channel as a Mask you can push and pull the brightness and the shadows by using the Mask as is or by Inversing it (Ctrl I [eye] on the Layer Mask icon). Flipping back and forth on individual Hue/Saturation Adjustment Layers (one ADJ Layer for each of Red, Yellow, Green, Cyan, Blue and Magenta [as needed]) let's you bring the extremes into a range tat you can work with.
As usual, once that's done , I'll make the whole stack into a Smart Object. The Smart Object will allow you to go back to square one and make any changes that become apparent as you're finishing the image. With the Smart Object made, additional Adjustment Layers can be used to salt and pepper (adjust brightness and contrast) to taste.
After the image is nailed down with whatever Layers are needed, that stack can be made into a Smart Objects (you can nest Smart Objects within Smart Objects). At that point, either send the image back to Adobe Photoshop Lightroom 3 for Noise control, Sharpening and Vignetting. If you want to stay in Adobe Photoshop CS5 you can make two copies (Ctrl J [twice]) and use the first for Sharpening using the High Pass Filter (Filter/Other/High Pass) technique and the uppermost copy to apply your Vignette.
Whichever way you choose to finish your image, the key to bringing extreme contrast into a range that can be worked with is using a Channel as a Layer Mask to push and pull the highs and lows.


0 comments:
Post a Comment