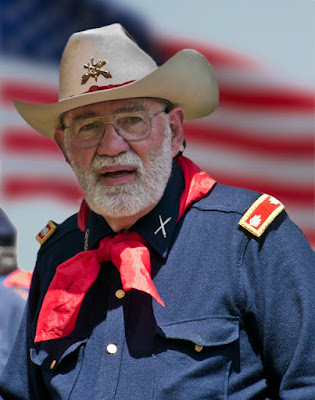
 What would your camera say about today's image? Today's cameras are pretty remarkable pieces of equipment. Another name for a camera might be a single purpose computer. It does fit the definition of a computer by having a processor and memory, memory, memory. Those are the two components that actually make up a computer. If you tie hydraulics, actuators, grippers and a motor to it you have a robot. If you connect a sensor, a couple thermocouples, and a valve to it you'd have a water cooler. If you put the computer in a light tight box, along with a different type of sensor and some glass you have a camera. Even with the power of the computers in today's cameras it's still up to the photographer to decide what he/she is going for. Even with all the computerization I had to go to Manual Mode to get today's image. Don't worry about the flag. That was put in during post production. Just take a look at the man in the hat. You can see the range of exposure between the bright sun on his shoulder, the neckerchief and the top of his hat compared to his face. I just saw a video by a photographer who was advocating shooting with the subject between you and the sun. Sort of like today's image. I've forgotten who the fellow is, or I'd be happy to give him credit and put in a link. The big discussion he was having was that he "had to" shoot in Manual Mode. To get my take on it and see how today's image was shot, hit the "read more"
The first thing I was interested in was the background. I didn't want to spend a lot of time cutting people and trees and wires from the piece of the shot I wanted. I moved until I had the man lined up against a white painted church across the street. Using a wide open aperture totally blurred the building and easily isolated the subject.
The top of his hat was so washed out that the cannoneer's crest couldn't even be seen. I made a Virtual Copy while still in Adobe Photoshop Lightroom 3. On the Virtual Copy I lowered the Exposure and brought the cap of the hat back to a better place. Since both the original and the Virtual Copy were of the same image, alignment would be no problem once the images were moved over to Adobe Photoshop CS5.
In CS5, making an Alpha Channel Mask of the out of focus, white church was no problem. A quick tap of the Magic Wand Tool (W) with the Contiguous box checked picked up 95% of what was needed for the Mask. Switching to the Quick Selection Tool (also W) allowed for any clean up to be very quick work. Right clicking on the sky and choosing Save Selection made the Alpha Channel Mask.
The image of the flag was brought in from a stock of flag images I've accumulated over the years given a fairly large Gaussian Blur (Filters/Blur/Gaussian Blur) . The Channel Mask was brought back (Select/Load Selection) and a Layer Mask was applied. By having the Alpha Channel activated when the Layer Mask was applied gave a premade, accurate Mask.
Had the camera made the exposure decision the fellow's face would have been far under exposed. By understanding what was going on with the sunlight, the human (me in this case) could see that the shadow on the face was going to be a problem and adjust the exposure to compensate. The camera would have put up a fight to get to the same exposure.


0 comments:
Post a Comment