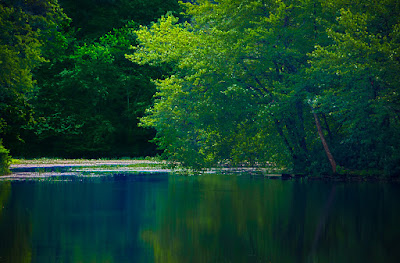
 Summertime and the living might be easy, but photography is as challenging as ever. You'll really have to click on today's image to see a larger version to be able to see the detail in the forest at the back of the scene. There is a lot of detail and it took a little work to bring it out. The sunlit tree in the middle ground showed detail from the start, but the shadow area looked almost blank. Just sort of a blue haze covered area that left a hole that was pretty unattractive. After processing, the area is rich with subtle detail. The day (yesterday) was somewhat overcast with threats of rain. In fact, a fine rain started just as we were leaving. There's a little bit of everything in today's image. To find out what steps were taken to "develop" the image, hit the "read more".
The original was shot as a five shot bracket, hand held. There was enough light to give a reasonable shutter speed and Adobe Photoshop CS5 did a great job merging exposures 1, 3 and 5 with its HDR Pro. The Remove Ghosts checkbox, in the HDR Pro dialog box, does a very good job taking care of any movement in the leaves.
Even though this was started as an HDR image, it wasn't pushed to the extreme side of HDR processing. HDR was used to provide a greater amount of realistic detail, not an illustrative effect. Detail was pushed up a little. Highlights were brought down slightly and Vibrance given a medium boost. No big, wild swings in this image.
A detail that might be missed was added while in CS5 before heading back to Adobe Photoshop Lightroom 3. The tree trunk on the right side of the image was "enhanced" with a little color to make it a focal point in the image. The Quick Selection Tool (W) was used to select the trunk. A new Layer was added and the Selection filled with a dark brown color. Thu=is results in a big old blob of color and looks terrible. Changing the Blend Mode to Color reveals the detail under the selection. The Opacity was reduced to give a more natural appearance.
After that the HDR image was brought back to LR3 by simply using the Save command (File/Save). Because the image started out as a set of RAW files (and nothing can be done to a RAW file) it produced a new image, fully cataloged, in the same folder the original files came from.
In the Develop Module of LR3, the Adjustment Brush was selected. The Exposure was brought to 100% and the trees in the back painted in. Once the Selection looked good the Exposure was returned to 0%. I use the extreme exposure to show the area being targeted. I prefer this method to using the Ruby Overlay or the actual end adjustment because the area being effected is obvious.
With the Exposure back at 0%, the Brightness was reduced and the Contrast, Clarity and Sharpness increased. The reason for the reduction in Brightness is because a Green color was used to bring out the colors in the foliage. Without a decrease in Brightness the Green color was overpowering.
The image was Sharpened in the Detail Panel and a Vignette applied in the Effects Panel to finish the image.
Be sure to stop by on Wednesday when I'll answer the number one, burning question that is leading people to the gallery through search engines.


0 comments:
Post a Comment