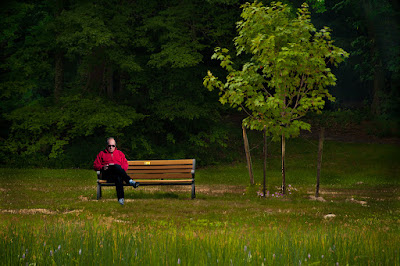
 What's the first thing that comes to mind when you look at today's image? Probably, "nice snapshot". A man sitting on a bench, reading a book. The thing is, the actual bench the guy was sitting on was about 25 miles and 9 months away from the bench you see here today. After I took the shot of the bench in the park, I couldn't help but think that it needed some human interest. The bench, the tree, the park scene was nice, but "if only". A couple of young lovers, a hiker taking a break, someone lying on the bench trying to get in a nap in the park, something, almost anything to make the shot have a little life. I remembered a shot from last fall, a nice shot of a guy sitting on a very similar bench, but the shot had a distracting background. Cars, walkers, wires, half of the guys dog, about anything you can think of that would mess up a reasonable shot of a man relaxing in the late summer sunlight. Benches like the one on the town green in Litchfield or in the State Park in Southford looked to be pretty similar. I dug through the shots from the fall shoot and spotted the shot I was thinking of. How the man traveled the 25 miles and 9 months will be revealed by hitting the "read more".
First to do was to find the image I remembered from nine months earlier. Luckily, Adobe Photoshop Lightroom 3 is a fine DAM program. (DAM = Digital Asset Management) There are several ways to find what I was looking for. Create a Smart Collection, use Keywords, pare things down with flags and stars and colors and other methods. The easiest way, in this case, was to go to the file tree. My method of saving shots (now) is to go to the folder for the type of thing that went on. Events, vacations, assignments, yada yada and photo walks. I knew it was on a Photo Walk. Under that sub-folder I have the places where the photo walk took place. I knew it was in Litchfield Connecticut. We go to Litchfield with some regularity, so under that there's a sub-folder by date. I knew it was late summer, last year, so picking out the specific date was fairly easy.
I found and brought the shot into Develop Module of LR3. Did any correction that was needed to the image of the guy. As far as I'm concerned, any of the background could have gone paisley. All I was interested in was the guy. Once finished with the corrections the image was brought into Adobe Photoshop CS5.
Since the benches were almost identical it was easy to match them up. After bringing the image with the fellow into the base image of the park and "target bench" the Opacity of the upper Layer was brought down to about 50%. (As an aside: When I say "about" some value it's because it's non-specific. By "about 50%" I mean anything from 45% to 55%. The difference really doesn't matter. It's a temporary state.) With the Opacity lowered it becomes easy to Move (V) the top Layer into position. The bench in the upper Layer was much larger than in the park image. The Free Transform Tool (CTRL T) was used, with the Shift Key held down to, Scale the bench to the proper size.
A Layer Mask, filled with black (ALT and the Add Layer Mask icon) was added to the Layer containing the fellow. With the Brush Tool (B) set to white, the fellow was revealed. Any minor tweaking of position was done using the Move Tool (V).
Once he was properly positioned the image was "finished" in the normal way, with Sharpening and a Vignette applied.
Matt Kloskowski, of Photoshop User TV has a book coming out in the next couple of weeks about Compositing. I have a copy on pre-order. I may comment on it once I've had a chance to read through it. Hope it's a good reference.


0 comments:
Post a Comment