 People come to the blog in several ways. Some come direct. Some by referral from other sites. Some through tweets or Facebook recommendations, but a lot are coming from Google searches. The Google searches tend to be lumped into general questions. The wording might be different, but a half dozen may be looking for information about how to use Calculations to make Masks in Adobe Photoshop CS5. More have been asking about Smart Objects lately. For the foreseeable future (nothing's permanent) I'm going to try to make Wednesday's a Q&A day based on the Google searches I see coming through. So, let's get started.
- More than 10% of the inquiries are about Smart Objects. What are they, how to use them, can they be nested and the like.
Smart Objects were introduced in Adobe Photoshop CS4. It sort of languished there with few people knowing about them or using them. In CS5, Adobe changed one of the ways to access them by putting an option in the Filters dropdown with the title of "Convert For Smart Filters". To use Smart Filters you first have to make the Layer a Smart Object. The indicator for a Layer being a Smart Object is the clipped lower right corner of the Layer's icon in the Layers Panel. To follow this discussion, hit the "read more".
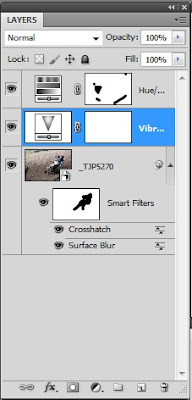
By making a Layer a Smart Object you preserve the original Layer and can go back to it at any time and make whatever modifications might be necessary. On the Smart Object itself, filters can be applied nondestructively. Rather than putting a Filter on a Layer and being stuck with the choices you've made, you have an icon for the Filter attached to the Layer and it comes with its own Layer Mask. Today's image shows a Layers Panel with a shot that has been opened as a Smart Object. In this case I just grabbed a shot I had been playing around (File/Open Recent) to use as an example. It happens to be the image from Monday's post.
I've added a couple of Adjustment Layers (those are above the image) and a couple random Filters (those show up below the image. Since the image is a Raw File it opened in ACR (Adobe Camera Raw). Adjustments can be made in ACR before opening it in CS5. I have ACR set to always bring the image into CS5 as a Smart Object. That gives you an idea how many I think of using Smart Objects. "Out of the box" ACR will just open the shot as a normal Background image. In that case, hold down the Shift key and the button will switch from "Open Image" to "Open as Smart Object".
As can be seen in the graphic, several changes appear to have been made to the original image. With Adjustment Layers, the Vibrance and Hue/Saturation have been altered. With filters, a Surface Blur and a Crosshatch pattern have been applied. If a Smart Object wasn't used, and the adjustment had been made using straight adjustments (Image/Adjustments), the image would be frozen. No going back. But a Smart Object was used and Adjustment Layers were employed.
You can see from the Layer Masks associated with the Filters and Adjustment Layers that portions of the image have been masked. If, at this point in the development of the image, you decided that changes had to be made on the original image in ACR, the change could be made with no problem.
Double clicking on the Smart Object will re-open ACR with the original RAW file. (As an example) A big, broad band of extreme exposure could be slashed across the image. (Why? Who knows. Artistic license.) Once the change was made, the image could be re-opened. The change AND the adjustments (the Adjustment Layers and Filters) would show up in the CS5 image.
But wait, it gets better. Next Wednesday we'll talk about the fact that you can take everything you see in the graphic, make that into its own Smart Object and keep on trucking. Nested Smart Objects are the holy grail of flexibility working in Photoshop. Check it out next week.


0 comments:
Post a Comment