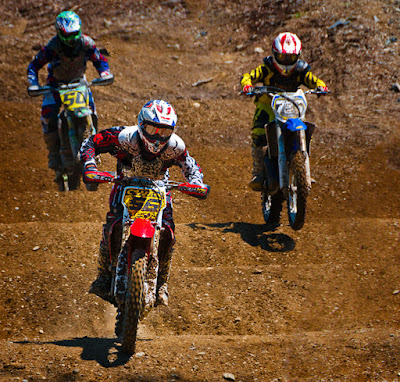
 You've got three similar objects in the frame. One has to be more dominate than the others. Today's image shows one way to put the emphasis on the one element you want to draw the viewer's eye toward. One way might be to fade the back two riders into either a ghost style or drain them of color. Both have been done before. They work, but are so obvious that it would be expected. Today's image has something that's not as cliché as other methods and as a little harder to do effectively. The colors have been brightened up on all three riders, but the focus has been heightened on the lead rider and toned down on the followers. The placement of the lead rider also adds impact due to his position in the frame rather than his position on the track. Since today's image is in a basically square format it's easy to guess that there's been some cropping. It find out about the three things that were done to finish today's image, hit the "read more".
One of the first things was isolating the lead rider. The Rectangular Marquee Tool (M) was used to select the rider. Then the Shift F6 keys were pressed to bring up the Feather Selection dialog box. The Feather was set to the max of 250 pixels. (This will be different depending on the resolution of the image being worked on.) How there's a rectangle with rounded corners. With the Selection active a Layer mask (Add Layer Mask icon at the bottom of the Layers Panel) was added. This automatically produced a Mask. (Depending on how [or what] the Mask is applied it may have to be Inverted (CTRL I {eye).) The Link between the Layer and the Layer Mask has to be broken. This is simply done by clicking on the Link icon between the Layer and the Layer Mask. With the Link broken the Mask can be treated as a separate object. Pressing CTRL T will put a bounder box around the Layer Mask. With the cursor outside the box the cursor will become a semi-circle with arrows for ends. This allows the Mask to be spun on its axis. With today's image to only takes a slight turn to match the angle of the rider.
With the Mask set, change the Blend Mode to Multiply. This will maintain the colors of the image and just darken them. I'll use this, rather than just using black so the tones stay the same, just in a darker state. It'll most likely be too dark, so lower the Opacity to taste.
The same Mask can be used to Sharpen the front rider. The riders in back are slightly out of focus to start with, so this pushes them back further in the image and brings the front rider forward. A normal vignette finishes work on today's image.


0 comments:
Post a Comment