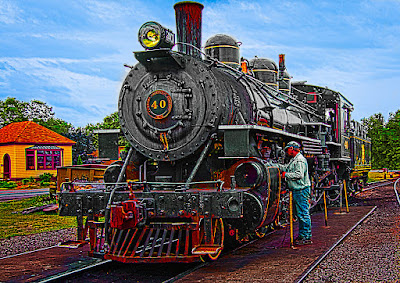
 Old trains, if you ask the folks who work on them, are living, breathing beasts that require constant tweaking, touching, twiddling, poking and prodding. Also, if you ask, they'll tell you that that's nothing new. It's not that they're old and breaking down. Steam trains needed the same tender (bad pun) loving care in their heyday. I wanted to show some of that care in today's image. The train probably doesn't look quite as bad in reality as it does in the HDR enhanced (??) version depicted today, but the color, although exaggerated, were all there. No color has been added on the train itself, only maximized. The one place the color was changed was on the dumpster to the left of the engine. It was originally sort of a bright blue and grabbed the eye as soon as you looked at the shot. A simple Hue/Saturation Adjustment Layer that changed the Hue from blue to a rusty looking brown subdued the glare of the out of place color. I don't mean to say that was the only modification made to the image. To learn what the other changes are and how they were done, hit the "read more".
Most of the "distractions" were removed from the image. Several sets of over head wires really cluttered up the scene. They were removed using a couple different techniques. One was the Clone Stamp Tool (S). Anywhere that the wires got close to a defined change in shape or texture is where the Clone Stamp Tool. The preview available in CS5 makes accurate placement of the cloning easy. A good example would be along the roofline of the building .
Another technique was to use the Clone Stamp Tool (S) again along some of the wires and take out sections at a time by laying down a point, going to the other end of a straight line, holding down the Shift Key and clicking at the end of the stretch. Often a little touchup was needed to break up the lines.
Content Aware Fill (Edit/Fill or Shift F5) was used along the wires also. The biggest use of CAF (Content Aware Fill) was taking out a car that was crossing the tracks to the right of the scene. Just using the Loop Tool (L) with no trickery resulted in parts of the engine showing up in the woods. Not good. An easy way to control where CAF uses to make its calculations is to use a Layer Mask. Select (how to make the selection is up to you) anywhere you don't want used. Make it a Layer Mask and then do another selection, with the remaining piece of the image and tell CS5 to do a Content Aware Fill there. Content Aware Fill will only take information from the area it can see. It will not use the area under the Layer Mask. Once the fill is accomplished, discard the Layer Mask and continue working on the iamge as you would normally.
After the image was pretty much maxed out the barrel of the engine looked a little bit (a lot) green. A Black & White Adjustment Layer was added and the accompanying Mask filled with black. That hides whatever the Adjustment Layer was doing. Printing on the Mask with a white Brush (B) made the barrel shades of gray while allowing the rest of the scene to be in color.
The image was Sharpened and a Layer Mask took out the sharpening from the sky. The last step (always the last step) was to apply a vignette to hold the viewers eye into the image.


0 comments:
Post a Comment