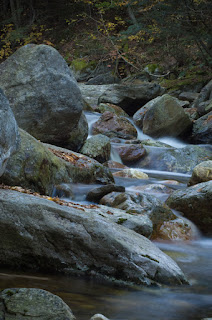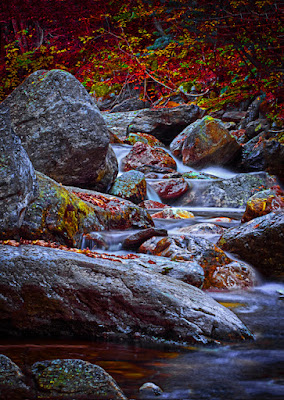
 Today we have a before and after (actually, for folks who typically read English, an after and before) of a stream in Vermont. I invite everyone to take a close at the two images. The one on the right is (hopefully obviously) the before. There's a couple things about it. One is that it has a different aspect ratio than the finished image, yet nothing has been cropped away. The second thing to looked at is the angle of the water flowing through the scene. The white falls drop in just about the center of the image was used to correct the unfortunate tilt of the camera when the shot was taken. To find out how the image was straightened without anything being cropped away, hit the "read more".
Correcting the lean was the easy part. The Ruler Tool (i [eye]) was used to stretch a line across what I think should be a horizontal section of the image. With Adobe Photoshop CS5 there is a Straighten button that shows up when using the Ruler Tool. Clicking on that button will Straighten and Crop an image based on the line drawn using the Ruler Tool. Holding down the ALT key when clicking on the Straighten button will Straighten the image without Cropping. This Straightens along the line, but makes the image sit in the work area skewed to the degree of the fix. Blank triangles are formed around the image indicating empty canvas. Use the Polygonal Lasso Tool (L) to make a Selection around one of the triangles. Dig into the image slightly when making the triangle. Use the Fill dialog box (Select/Fill or Shift F5) and set the fill to Content Aware. By digging into the image by a few dozen pixels you give the program some idea of what it should be attaching things to. The first triangle formed in today's image was at the top. Content Aware Fill correctly figured out the leaves and trunk of the tree on the far left. The piece I thought was the most amazing was the right side triangle. Rather than extending the rock at just about the center height of the image, it ended the rock very naturally and put some leaves on its right flank. All in all, Content Aware Fill did a great job on the image, adding about 10% to the content.
There are no false colors in today's image. I typically use individual Hue/Saturation Adjustment Layers (Red, Yellow, Green, Cyan, Blue, and Magenta) to bring out the colors. The Saturation slider is brought to 100% and then brought down in 10 point increments (hold down the Shift Key as you either roll the scroll wheel on your mouse or tap the Down Arrow Key). Today's image has nine, rather than six, Hue/Saturation Adjustment Layers. In addition to the normal six, it has one each additional Red, Yellow and Green Adjustment Layer. Different parts of the image needed different amounts of Saturation increase. Rather than painting with shades of grey or lowering the Opacity of the Brush Toll (B) I find it easier to use more Adjustment Layers and localize the areas needing different amounts of adjustment. That's just the way I find it easy to work. Masks are Black and White with no gray tones. As many Adjustment Layers as is required to create the vision you have can be employed and each is finitely adjustable.
Once all necessary changes were made to the scene all the Layers were selected (Shift Click on all Layers) and made into a Smart Object. Two copies of the Smart Object were made (straight copies, not New Smart Object via Copy). Copy one was used to Sharpen the image and copy two was used to put a vignette round the edges.


0 comments:
Post a Comment