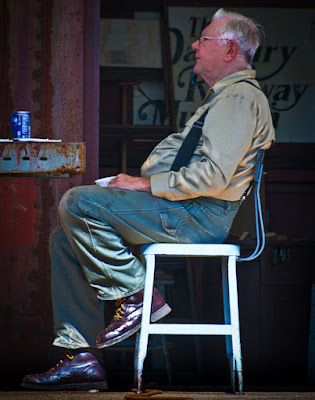
 A while back I mused that it would be interesting to do some
Norman Rockwell-ish shots. Today's image
becomes the first in what, I hope, will be a series of either re-creations or homage
type shots based on Rockwell's work. One
of the notable things about the way Rockwell worked was his use of photography
to get fragments of ideas as a photo to incorporate into his paintings. He'd hire neighbors as the
"actors", a professional photographer to do the shoot and borrow
locations in the Stockbridge, Massachusetts area as sets. Rockwell immortalized many of the townsfolk
and descendents today point with pride at Saturday Evening Post covers and say
'that's my" whoever. Grandmother,
uncle, brother, sister or more. I don't
know the fellow in today's image and he never knew I was taking a shot of
him. There's more to what Adobe
Photoshop CS5 had to do with the image than meets the eye. To find out what was done in CS5, hit the
"Read More".
Today's image is actually a five shot HDR (High Dynamic
Range) image. It started out in Adobe
Photoshop Lightroom 3 as part of the catalog of a shoot at the local train
museum. A couple friends are setting up
a night train shoot and we were at the museum scouting locations. The folks at the museum couldn't have been
nicer and posed if asked. The problem
was that, for the most part, they'd ham it up a little and the posed shots
looked, well, posed. In today's image
the fellow was just having a little lunch.
I noticed him sitting there, taking a break from doing some woodwork in
a boxcar converted to a woodshop. We had
bright sunlight and I rattled off a five shot, bracketed burst, hand held. The shutter speed ranged from a fast of
1/2000 second to a slow of 1/125 second.
The first trip out of LR3 was selecting the five images and
using LR3's Merge To HDR Pro in Photoshop command (Photo/Edit In/Merge to HDR
Pro in Photoshop). That brought the five
images into CS5 and opened the HDR dialog box.
The Detail was increased, Exposure and Gamma brought down just a bit and
Vibrance cranked up about half way.
The left side of the original shot stopped just about at the
left side of the soda can. The image was
straightened up using the Ruler Tool (I) with the ALT Key held down. Rather than turning and cropping an image to
fit, holding down the ALT Key straightens the image and leaves the excess
backing. Each of the four triangular
pieces of excess was individually selected using the Quick Selection Tool (W). Once the selection was made it was expanded
by 30 pixels (Select/Modify/Expand) to "bite" into the remaining
image. With that done, Content Aware
Fill (Edit/Fill) magic was done to add unavailable detail. It worked great in this case and added to the
shelf, including adding the third slotted hole.
In addition to giving some space to the left of the soda can it also
gave a little room in front of his shoe.
After that it was back to LR3 for finishing. Since this was shot in Nikon's RAW format,
the only thing that needed to be done was to save the file (File/Save). Because nothing on a pixel level can be done
to a RAW file, doing a simple Save is all that's needed. Lightroom will produce another file. In this case it was named TJP7281 Edit. LR3 appends one of the original file names
with the word Edit to denote the fact that it has been modified with an
external image editing program.
While in LR3, the colors were adjusted, the image sharpened,
his hair was sharpened a little more (using the adjustment brush). The final crop was applied. And then it was back to CS5. A New Layer (Layer/New/Layer) was set and
filled with 50% gray. The Blend Mode was
changed to Overlay. The Brush Tool (B)
was selected and the Opacity of the Brush brought down to about 15 - 20 %. Each of the folds of the fellow's shirt and
pants were darken in the dark areas and lightened in the light areas to add
definition. A Wacom tablet and pen was
used to get the fine detail. Adjusting
the pressure of the pen allows for increasing and decreasing the width of each
stroke. Once the folds and wrinkles were
emphasized to was another trip back to LR3.
This resulted in a file named TJP 7281 Edit Edit. Note that a second "Edit" was
added. This would continue to build for
as many round trips as needed.
Back in LR3, final
sharpening, any noise reduction and adding a vignette completed the work done
to today's image.


0 comments:
Post a Comment