Showing posts with label Adobe. Show all posts

Thursday, December 17, 2015

Getting Depth And Dimension Using Lightroom's Adjustment Brush

The first thing I'd like to do is thank Steve over at Photoshop: Senior Edition for picking up the posts here on the Gallery, giving proper credit and passing along the info.  I got a kick out of the video he did exploring adding a Luminosity Adjustment Layer to images in order to fine tune the colors.  Thanks Steve.  Let's get together to discuss how we can add benefit to both blogs.  BTW:  Photoshop: Senior Edition can be found by clicking this link.

Now, about today's image.  Basically it's a shot of a knot in a piece of sawn barn board.  It's a plain old flat chunk of wood.  The depth from the high spot to the lowest spot is probably no more than a sixteenth of an inch, but notice how it appears to come forward in the image and drop off on a completely different plane.  All images taken in a RAW space are pretty much flat.  A little interest can be added using Adobe Photoshop Lightroom's (LR) Highlights, Shadows and Contrast sliders, but it is kind of limited.  Back in the days of film and darkrooms people made print after print Dodging and Burning small areas to either bring the area forward of push it back in the print.  We "should be" doing the same thing today, but we don't have to blow several sheets of expensive photographic paper to see our progress.  To find out how to using LR's Adjustment Brush to Dodge and Burn, hit the "Read More"
Read more!

Saturday, November 21, 2015

Adding Dramah With Photoshop Blend Modes

First, I know.  Drama is misspelled in the title, but there's a reason.  The shot is of Egg Rock Light in Frenchman's Bay Maine.  And "Mainer's" from down east put an upward tick of "ah" on almost any word ending a sentence. That's my justification and I'm sticking to it.  The "big question" posed by today's image is "how many shots does it take to make a dramatic image?"  Well in this case the answer would be three and it might not be the three you might think.  I'm kind of notorious for replacing uninteresting skies, but that "ain't" it.  That's the sky that was there when we were there.  It's not the lighthouse 'cause that's what I was taking a picture of.  There's a saying about once you rule everything else out the answer must be what's left, no matter how improbable that might be.  What's left, in this case, is the waves.  To find out how they got there, hit the "Read More".

Read more!

Monday, November 2, 2015

Taming The Sun Using Lightroom

It was the best of times, it was the worst of times.  (Hmmm, pretty catchy.  Someone ought to use that as the opening line of a book or something.)  Anyway, I was out shooting with some friends on Saturday.  One of the group had arranged for us to go to a horse farm here in Connecticut.  As far as the day goes (end of October) you couldn't ask for a better day to be outside in the fresh air.  As far as shooting goes, yuck!  Brilliant blue skies with the sun shining down mightily.  The only way (for me) was to shoot for the shadows and bring the hot areas back in post processing.  To find out what else went on, hit the "Read More".

Read more!

Wednesday, October 28, 2015

Using Photoshop Luminosity Blend Modes To Control Color

Where have we been lately?  There's been no posts in almost a month (give or take).  Well, for most of that time I've just been lazy, but for ten days we were running around the great state of Maine.  It helps to have friends.  Doris has reconnected with someone we went to high school (a long time ago) with.  She just happens to have a house in Maine, on the ocean, with a direct view of Cadillac Mountain in Acadia National Park.  For the second year she's just tossed us the key to the front door and said "go have fun".  We did.  We spent seven days at her beautiful place.  (Thanks J.) We've been going to Maine every October for at least the past ten years and before that we'd go at other times of the year.  There's been two "bucket list" targets in Maine for a while now.  One was shooting West Quoddy Head Lighthouse and the other checking out (and shooting) Baxter State Park.  Got to do both this year and I'm guessing you can tell today's image is not from the lighthouse.  To see how the colors were drawn out of today's image, hit the "Read More".

Read more!

Tuesday, October 6, 2015

Using Photoshop Layers To Fill In What's Not There

I'm reasonably good at making Masks.  I use Adobe Photoshop's (PS) Quick Selection Tool (W) and Topaz Labs' Remask and PS's Calculations.  Whatever  is the best tool for the task at hand.  But, sometimes things slip through the cracks or are too much trouble to bother with.  Take a look at today's image. There's a lot of fringe down at the bottom of the dancer's regalia.  The background was a mess.  People standing around, other dancers, banners, tents, evergreen boughs, speakers, and all sorts of other "stuff".  The fringe wasn't a big problem to extract.  The big deal was tiny tips of the feathers and pom-pom in the headdress.  To find out what the solution was (at least the solution I used) to "getting" the detail, hit the "Read More".

Read more!

Thursday, September 24, 2015

What Do You Do On A Raining Day With Photoshop Lightroom?

I run into a lot (okay, some) people who are doing what's known as a 365 Project.  You can find many examples of such tasks on Flickr or some of the other social photography sites.  The trick is to take at least one photo every day for an entire year.  It is a good idea to live someplace that has beautiful clouds or sunsets every day, but most people don't live in Shangri-La or other Edenistic locales,  Most of us live in the real world.  Today's image gives those of us in not so pristine climates a chance to keep the momentum going.  It's simple to do and comes up with unique images.  I say unique because no two images are ever the same.  To learn what this "secret" technique might be, hit the "Read More".

Read more!

Tuesday, September 15, 2015

One More Way To Deal With Distracting Backgrounds In Photoshop Or Lightroom

Okay, in today's image you can see that "the background" isn't exactly a big distraction.  In fact, it isn't.  It isn't anything.  It was never there.  Adobe Photoshop (PS)  really had nothing to do with what you're looking at.  Just about everyone knows the bane of a photographers existence is a bald sky.  That is usually the case.  But, in today's image it works to our advantage.  The local Garden Conservancy had an "open garden" this past weekend.  Naturally we rallied the troops and got some friends out shooting in the garden.  It's a beautiful, private garden that is only opened once a year.  Proceeds go to the Garden Conservancy, so the few bucks to get in is well spent.  To find out "the secret" to today's image, hit the "Read More".

Read more!

Monday, September 14, 2015

Using Photoshop To Get Rid Of A Background

This will be the second post in a row dealing with getting rid of distracting backgrounds.  If you haven't seen the other post I'd suggest you might want to check it out.  Today's image goes in the direct opposite direction.  Instead of doing all sorts of tricks to hide the background, today's image just plain eliminates "most" of  it.  The only piece of the background left is the shadow.  (Sort of like the Cheshire Cat.)  It would have been nice if I'd had the chance to shoot this fellow on a seamless white background and be done with it.  Unfortunately, he was in the middle of a dance circle with other dancers and people milling around in the background.  It made for an okay snapshot, but nothing to make it "an image".  For a couple of ideas about how to get rid of a difficult background, hit the "Read More".
Read more!

Tuesday, September 8, 2015

Photoshop Tools For Eliminating Distracting Backgrounds

Any time you're at any kind of festival, what's behind your subject of interest becomes important.  If your objective is getting a head shot you probably don't have too much to worry about (if you have a long enough lens).  Set your F-stop as low as it will go, focus on the eyes and let the background be totally out of focus.  If the plan is to get a full length shot (as in today's image) your problems multiply.  Even the fastest glass can only do so much.  The things that are conspiring against you are your minimum F-stop number (largest aperture), the distance between you and the subject and the distance between the subject and the background.  If you look back a couple of posts you'll see a head shot of a friend.  He was about half the distance of today's image away, but the background was about two hundred feet behind him.  Therefore, the background was fully out of focus.  In what started out as today's image, the fellow was probably sixty feet from me, but the people standing in the background were about sixty feet further back.  They were definitely not "in focus", but what they were was still recognizable.  That gives a good starting point for a montage.  To find out about a few of Adobe Photoshop's (PS) extraction tools, hit the "Read More".

Read more!

Monday, August 31, 2015

Wanna Get Better Images? Stand In Front Of More Interesting Subjects

Okay, it doesn't hurt to stand in front of a beautiful woman with flawless skin.  Casual portraits can be had in almost any circumstance.  Today's image is of a dancer at an Indian Pow Wow held over the weekend.  She was just walking out of the tribal dance circle and was unaware of my taking her picture.  (She was, as were all the dancers, aware that the "tourists" were snapping away, but none knew if a camera was pointed at them.)  The current plan is to take several images shot over the weekend and make a composite depicting the ceremonial activities of the day.  It'll be a fairly complex piece, so it'll take a while before it sees the light of day.  There were a couple considerations when the original shots were taken and (so far) minimal post processing done to today's image.  To find out what the thought process was, hit the "Read More".
Read more!

Monday, August 24, 2015

Making Big Things Small With Photoshop Blur Galleries

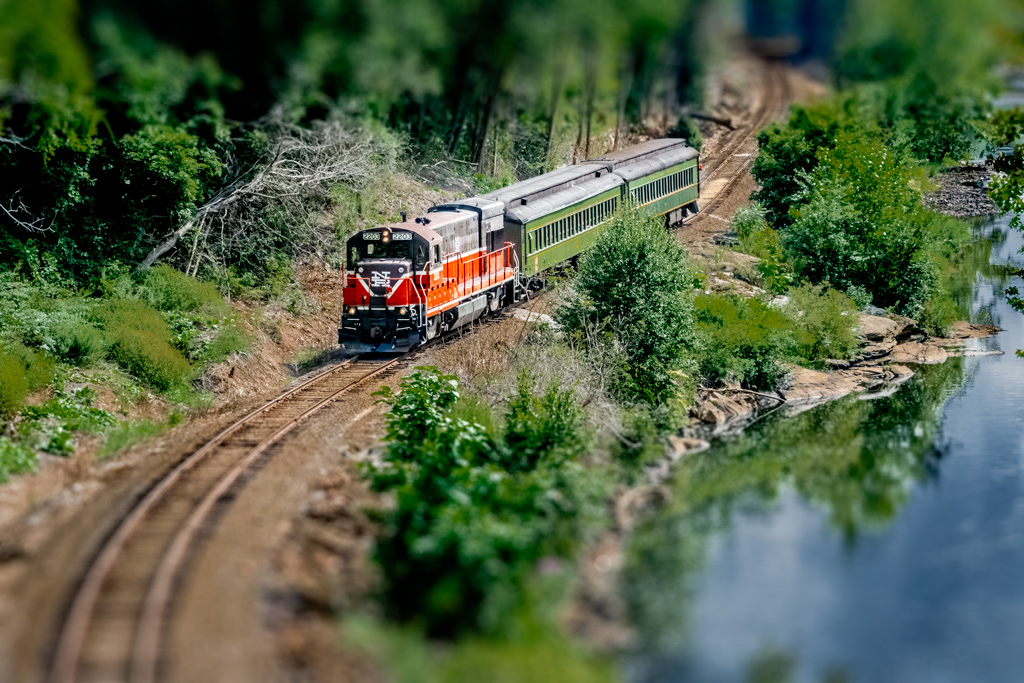
Every once in a while you'll look through the viewfinder of your camera and see something that really isn't there.  That was the case with today's image.  We were taking "a shortcut" (not really) home and were on a road that follows the Naugatuck River.  It's one of my more favorite routes home.  We heard a train whistle blow where there is no regular service, so I knew it had to be one of the New England Railroad Museum's tour trains.  If you were to flip back a ways in these posts you'd find a couple shots for trains along this track.  I had Doris pull up the museum's schedule (ain't the internet great for such things on the fly).  The train had left the station about twenty minutes before, so it had to be on it's downward leg when we heard the whistle.  The typical ride is a half hour pushing the cars down the track and pulling them back to the station.  The "pulling" stretch is the one to shoot.  Figuring a one hour round trip and where the train went under a bridge put the engine coming round the bend about ten minutes to three.  As it worked out, it was about nine minutes of when it came into view.  As I looked through the viewfinder a model railroad came to mind.  To find out how a real train got to looking like a model training, hit the "Read More".
Read more!

Tuesday, August 11, 2015

Using Photoshop Luminosity Masks When Dealing With Harsh Light

Light doesn't get much harsher than a bright blue cloudless sky.  That's what we were up against on Saturday.  The next town over from us was hosting a Civil War Reenactment.  The subject of today's image was one of the Confederate Volunteers.  These folks (men, women and children) come out for the weekend to different locations around the country with the idea of "putting on a show" for the attendees and having a good time for themselves.  Some are pretty straight laced.  They tend to be the "officers".  The "rabble", the "common ruck", the enlisted men and volunteers tend to be much scruffier.  That's where the characters are.  They're portraying the bone crushing weariness of having endured years of conflict and suffering.  The fellow in today's image shows that weariness.  But all wasn't peaches and cream as someone trying to get a decent photograph of these guys.  With the bald sky and the beating down sun it was almost impossible not to get shots with extremes of highlight and shadow.  One saving grace was that both the Union and the Rebel "armies" setup their encampments on the edges of the fields where there was a bit of shade.  Today's image was taken as "the Rebel troops" lined up for inspection.  Right out in the open sun.  To find out what was done in camera and in post processing, hit the "Read More".
Read more!

Monday, July 27, 2015

PLaces You Can't Go Without Photoshop

Click on image to enlarge
Today's image definitely qualifies as a place you can't visit without, at least, some knowledge of Adobe Photoshop (PS).  Why?  Basically, it's because the earth doesn't curve that way.  The horizon of an image can do many things.  It can be tipped (a big no no).  It can show the sweep of the land as in a arête along a mountainside with an apparent (but not real) slope to the surface.  Using an extreme wide angle lens the horizon can be bowed either up or down, but it can't be bowed both up and down.  In any case, today's image isn't what it seems.  To find out how many shots were used in today's image, hit the "Read More".

Read more!

Thursday, July 23, 2015

Five Ways To Makeover One Image With Photoshop

Click image to enlarge
We were away for a couple days this past weekend (plus).  First to a photography conference in Massachusetts and then up to Lake Winnipesaukee for a couple days.  Today's image was taken on a visit to the "Castle In The Clouds" mansion.  A New Hampshire preservation site.  A nicely preserved mansion high on a mountain (hill) overlooking the area.  The "original" image looked almost nothing like what you see.  It was actually a couple horses in a field (just kidding).  I've just gotten an 8mm fisheye lens and spent all day Monday using only the "fish" to see what it would (could) do.  The image doesn't look much like it was taken with an extreme wide angle lens, but that's where the Adobe Photoshop (PS) "magic" comes in.  To find out what the "five ways" the image has been changed, hit the "Read More".

Read more!

Wednesday, July 15, 2015

What Would Ansel Adams Do If He Had Lightroom?

Click on image to enlarge

Ansel Adams is quoted as saying "you don't take a photograph, you make it."  I don't think he ever said you don't have to start with a method of recording the scene before you.  I hear a lot of people say they want to "get it right in the camera".  A couple of other quotes by Adams are "Dodging and burning are steps to take care of mistakes God made in establishing tonal relationships."   One more would be "the negative is the equivalent of the composer's score, and the print the performance".  What's all that got to do with today's image (or any image for that matter)?  It's just that today's image straight out of the camera really doesn't look much like what you see.  It's been "developed".  The "out of camera" image is a RAW file and, as such, lacks tone, contrast, color and any sense of place.  It's a blah lifeless digital negative.    Ninety nine present of what was done to the image was done in Adobe Photoshop Lightroom (LR),  the "other" percent was done in Adobe Photoshop (PS).  Both were the CC 2015 versions, but only the newest LR was needed.  What was done in PS can be done in just about any version you have on your computer.  To go through the image with me, hit the "Read More".
Read more!

Friday, July 10, 2015

Using Lightroom's Dehaze on Informal Portraits

We were at a family gathering last weekend and I told Doris that I wasn't going to bring a camera.  It was time for family, not for photography.  At the last moment I said I'd toss the camera in the car "just in case",  The just in case wasn't so much if anyone asked me (or anyone cared) to get some shots as much as it was if the mood struck me.  It wacked me up along side my head and I clicked the shutter more than five hundred times.  The kid (he's 31 or 32) in today's image is a nephew.  He's about 6'2", a body builder (more excellent shape rather than muscle bound), shy and better looking than he knows.  As you can see, if anybody's looking for a male model, he'd be a good candidate.  To find out "what's going on" in today's image, hit the "Read More".
Read more!

Wednesday, July 8, 2015

Isolation Using Lightroom's Radial Filter And Brush

Today's image is another from a photowalk in the New York Botanical Garden (NYBG).  It was the end of the day (for us at least) and we were just hanging out by an artificial lily pond.  I judge a fair number of photo competitions during a given year and one thing I typically harp on is changing your angle of view.  Too many people enter images taken from their standing height.  If I get one to comment on I'll suggest the person go back to the same place (or a similar situation) and move around.  Stand on a chair, squat down, go up to the second floor if there is one, put the camera down on the ground, anything.  Just don't stand there and shoot from five feet high.  Well, at the NYBG I certainly took my own advice.  I was laying flat on my belly, looking like the aftermath of a criminal assault  or something.  The friends I was with got a kick out of what I'd do to get a shot.  Obviously today's image is not a full frame.  It's wildly cropped to isolate and increase the "focus" on the flowers.  It see how Adobe Photoshop Lightroom (LR) helped draw attention to the flowers, hit the "Read More".
Read more!

Monday, July 6, 2015

Playing With Photoshop CC 2015 Dehaze

Since the recent release of Adobe Photoshop (PS) CC 2015/Adobe Photoshop Lightroom (LR) CC 2015 I've seen several articles about what's new.  One of the more interesting (and creative) additions is the Dehaze tool.  In LR it can be found in the Effects Panel and in PS it's found by going to or going through Adobe Camera Raw (ACR)  (Filter/Camera Raw Filter).  I'd highly recommend turning the Layer into a Smart Object (Filter/Convert For Smart Filters) so you can go back and forth from Layers to ACR at will.  The primary use I've seen folks talk about with the Dehaze tool is in landscape photography.  Crank the slider to the right and the haze over distant parts of the landscape become much cleaner and more contrasty.  You may have noticed that that's not exactly what's going on in today's image.  To get an idea of what's going on, hot the "Read More".
Read more!

Wednesday, July 1, 2015

The Myth About Depth of Field

Click on image to enlarge.
Have you ever spoken to a fellow shooter about Depth of Field (DoF)?  Have you ever been told you must have expensive, "fast glass" (a lens with a large maximum aperture - like F2.8 or F1.4) to get shallow DoF?  Well, it all depends on what you're shooting and what your subject is.  If you were to shoot someone's portrait using almost any lens and had enough empty space between the subject and the background you could shoot closed down to the minimum aperture (F 16 or F22) and get an acceptably out of focus background.  (It might have to be miles away and your subject at the minimum focusing distance of the lens, but you could do it.)  Take a look at today's image.  Before reading on, take a shot (guess) at what aperture might have been used.  Once you've made up your mind, hit the "Read More".
Read more!

Monday, June 22, 2015

An Easy Way To Get Better Images.

Click on image to enlarge.
There's an old axiom on how to get better pictures.  It's "stand in front of more interesting things".  You've got to admit, today's subject is "interesting".  We were at a small, local Renaissance Faire on Saturday with some friends.  Places like a Ren Faire or Pirates Den or Indian Powwow  or Steam Punk Festival are always great stops for getting "character" shots.  Just stand there and let the parade waltz on by.  We had all manner of people walking past.  A guy with big under turned bull horns.  A woman with a cross between medieval and steam punk as a costume.  A woman with the top of her back fully tattooed.  When she turned around she was a very pretty woman (not the woman in today's image).  A fellow with a large bulbous head he had "painted" (I'm sure it was some sort of theatrical makeup) white and then scribed it with veins.  Again, an interesting character.  A couple in full medieval dress renewing their wedding vows.  Priests, orks, fairies, warriors, princes, and kings (lots of kings - might be an ego thing).  There were somewhere between twenty and fifty characters I'd like to bring back to the studio and do some real portraits.  But, on the right day you can get some reasonable faces to work with.  To find the "trick" of getting better shots, hit the "Read More".
Read more!