Showing posts with label Question. Show all posts

Wednesday, July 17, 2013

Wednesday Q&A: Photoshop Smart Objects - Try This Test


Adobe Photoshop Smart Objects are still the number one query that brings readers to The Kayview Gallery.  We've had a dozen difference posts (check out the archive list in the right hand column) discussing Smart Objects covering a period from 2011 through today’s post.  Today’s “image” is a little test I’ve created that you can replicate to prove to yourself that CTRL-ALT-SHIFT-E doesn’t work and Smart Objects do.  Once you’ve done the four finger salute to the left side of your keyboard, you’re stuck.  Sure, you can go back under the red line you see in the middle Layers Panel in today’s image.  You can make all sorts of changes to the Layers below.  Only problem is that they won’t be reflected back to the Layer above the red line.  The red line is “a line in the sand”.  You can’t cross it.  Take the test.  Set up a couple Layers that look like the Panel captioned “This is the basic layout for our discussion”.  You don’t have to follow it exactly.  Do whatever you’d like to set up a test.  Follow along with what you’ll find by hitting the “Read More”.
Read more!

Wednesday, May 15, 2013

Wednesday Q&A: Is It Time To Put The Kelby Group On The Shelf?

Based on the title you may think this post will be a rant about Kelby Media, Photoshop TV, Kelby Training, and The Grid and their support of Adobe Photoshop CC (PSCC).  It’s not.  They make a lot of good points about who will benefit from PSCC, who might want to think twice about it and who should probably stay away.  No, it’s about the fact that even the esteemed folks working with Kelby are beginning to show their age as far as Photoshop goes.  One thing that bugs me is how they’re missing the point on Smart Objects.  They say ‘oh, I open all my images in PS as Smart Objects’.  They’ll do a couple things and then say that their next step is to use the antiquated CTRL/ALT(OPT)/SHIFT/E salute to put a composite on the top of the stack before going on to other steps.  Doing the C/A/S/E thing breaks the link between the Smart Object and the original RAW image.  I don’t understand why they think that’s the way they should go.  Drives me nuts.  To find out how it makes me crazy, hit the “Read More”.
Read more!

Wednesday, May 8, 2013

Wednesday Q&A: Photoshop CC - Yes, Or Kick It To The Curb

Today’s image is another that’s just eye candy.  I might offer a paragraph at the end, but the news out there about Adobe Photoshop CC is far more important.  So, Adobe’s going subscription for either the whole shebang (all [almost all] Adobe applications) for $49.95 per month or $19.95 on a per application basis.  I use Adobe Photoshop CS6 and (at the moment) Adobe Photoshop Lightroom 5 Beta.  I’ve kept up with all the updates since Adobe Photoshop 7.  I don’t use any of the other Adobe applications.  No In Design, no Illustrator, no Premier, Muse, etc.  I understand that LR will continue to be a consumer product, not subscription (at this time).  It’s come down to being available for $79.00 at most outlets in the USA.  Version updates (CS3 to CS4, CS4 to CS5, etc) have been about every 18 to 24 months and have cost $199.00 for each version.  That works out to somewhere between $8.00 and $11.00 per month.  Adobe has a one year “special offer” for those who are up to date (using CS6) for $10.00.  That works out right in the ballpark of what we’ve been paying for the past ten years or so.  If they make that a permanent subscription price for plain old PS (not an Extended Version), I’d sign up today and happily pay by the month.  I’ve never used 3D, I don’t believe I need 3D.  If I had it available to me I might find it to be a wonderful thing, but I don’t think so.  Hopefully Adobe will figure out a slightly more tiered pricing structure during this first year.  I do have a couple thoughts on what I “might” do if I would have to go up to $19.95 a month for PS CC only.  Hit the “Read more” to find out what my thoughts are.
Read more!

Wednesday, April 24, 2013

Wednesday Q&A: Import Issue In Lightroom For A Friend

I was out with a group of photographers last night and a friend asked me a question about importing images into Adobe Photoshop Lightroom 4. (I believe he said he hadn’t gone up to LR5 Beta yet.)  His file system is a date system, where the first level folder is the year.  The next level down is the month.  He said he was very faithful to Keywording.  If you’re absolutely on top of Keywording you could dump all your images into one giant folder and depend on Keywords to find any images you want.  Trick is you’d have to be 100% true to Keywording every image.  Naturally you can do it by the batch.  Highlight everything that has to do with the same subject and add the keywords to all of them at once.  You can also use the Paint spray can found at the bottom of the Grid View to apply Keywords just by “spraying” over images.  As with almost anything coming from Adobe, there’s a dozen different ways to accomplish a task.  The issue this friend had was ending up with a duplicate year folder filled with the same thing he puts in the folder he created.  To learn what the problem might be, hit the “Read More”.
Read more!

Wednesday, April 10, 2013

Wednesday Q & A: When To Use Photoshop's Eraser Tool --- Never!


I look through a lot of tutorials.  Some have some interesting tricks that I’ll incorporate into my workflow.  But!  I’ll tell you where I lose my curiosity.  As soon as the mention of the Adobe Photoshop CS6 (and before)’s Eraser Tool (E) comes up, I’m out of there.  I might flip through to see how the tutorialist (hey, somebody has to make up new words) gets to their finished product, but as far as thinking I might learn a trick or two, no thanks.  I haven’t used the Eraser Tool in at least a half dozen years.  As far as I’m concerned, there’s just no use for it.  My recommendation, for anyone trying to learn something from internet tutorials, is to have a red flag/fireworks/a distress signal of any stripe go off at the point where the “educator” first mentions the Erase Tool.  Take a look at today’s image.  Obviously I’m not trying to impress anyone with a wonderful work of art.  It’s strictly there as a means of explaining my advice to anyone using the Eraser Tool in Photoshop.  It’s a one word suggestion/recommendation/nudge/command/shout/warning.  STOP.  TO see my explanation and why I’m saying it, hit the “Read More”.

Read more!

Wednesday, April 3, 2013

Wednesday Q&A: How Do You Reset "Color" In The Lightroom Adjustment Brush?


Today’s image is just eye candy.  It has nothing to do with the question at hand.  I’ve been asked this same question twice in the past two weeks and have recently seen erroneous answers to it from (of all people) “The Photoshop Guys”.  Specifically, both Scott Kelby and Matt Kloskowski.  Today’s post is going to be one of the shortest ever.  Don’t even bother hitting the “Read More” down at the bottom of the post.  There won’t be anything more to read.  For the proper answer (and I know there are a dozen different ways to do something in Lightroom or Photoshop), let’s make it a little bit of a quiz.  Or maybe it’s better stated as an exercise in deduction.  Let’s go.

·         If you have the Adjustment Brush selected in Adobe Lightroom 4 and the Exposure is set to some increased value, how can you reset it to exactly zero?  Answer:  Double click on the word Exposure.

·         Still using the Adjustment Brush, how might you reset the Clarity slider to zero?  Answer:  Double click on the word Clarity.

·         Here it comes!!!  Even still with the Adjustment Brush active, what might you do to zero out the Color Picker?  Hmmm, let me think about that one.  Ya wanna guess what you would do to reset the Color to a zero value.  You guessed it.  Double click on the word Color.

Now that wasn’t so hard to deduce, was it?  (Apologies to Scott and Matt for picking on them.)
Read more!

Wednesday, March 27, 2013

Wednesday Q&A: Is Photoshop's Pen Tool Dead?


I was out with some friends last night and one of my “buddies” said he had recently "discovered" the Adobe Photoshop Pen Tool (P).  His sidekick asked if I used the Pen Tool.  My response was that no one has used the Pen Tool in the past decade.  He insisted that it was a new “wonder tool” they’ve both added to their arsenal of “ease of use” tools lately.  I asked if he had also just upgraded his auto sound system to an eight track player.  He said, having been practicing a little, he could now create a Path around an object in less than five or six minutes.  I shook my head and rolled my eyes.  I resigned myself to the fact that I wasn’t going to convince either one that they were “going down a rabbit hole”.  Once home I got to thinking about what they were trying to do and where using the Pen Tool might be a good thing.  Today’s image is just a shot I was playing with a couple years ago to look at some lighting.  Once I finished playing with it I “put a ring on it”.  I put a Stroke (Edit/Stroke) on it just to show the Selection I’d made.  To find out about my thoughts on the Pen Tool (P) (pro or con) hit the “Read More”.

Read more!

Wednesday, February 13, 2013

Wednesday Q & A: Smart Objects. Using, Getting Rid Of and Why They Are the Greatest Thing Since Sliced Bread

Just that we'll be going in "baby steps".
The number one query that brings people to The Kayview Gallery is about Smart Objects.  What are they?  How to use them?  How to get rid of them?  How do you prevent images from opening as Smart Objects?  Any way you can twist it, people are either interested in Smart Objects or vexed by them.  Hit the "Read More" and we'll go through the questions one by one.

Let's start out with "what are they?".  They're containers.  If you are familiar with Russian nesting dolls, they make a reasonable analogy.  You can put one Smart Object inside another Smart Object.

Read more!

Wednesday, November 7, 2012

Wednesday Q&A: how to put multiple copies of one picture photoshop


I've done a couple posts on using one image multiple times in Adobe Photoshop CS6.  The first was using the same image (enlarged and blurred) as a background to the mainimage.  That's one way to do it.  The title of today's Q&A comes directly from a search query that brought someone to The Gallery.  I don't think that first instance was what the seeker was looking for.  I believe today's image portrays what many questioners are looking for.  The most common use for this type of "putting multiple copies of a one shot on one printout page" is making a keepsake for Grandmother or selling sports cards.  Something having (as in today's image) one 5 x 7, two 2.5 x 3.5 and four 2 x 2.5 inch copies (or other variations) on one sheet.  In Adobe Photoshop CS4 it was easy.  The Picture Package app was built right in.  In Adobe Photoshop CS5 or CS6 it's not.  But don't worry.  Adobe hasn't completely abandoned us.  They have it available as a free download.  To find out where to get the elusive Picture Package, hit the "Read More".
Read more!

Wednesday, August 15, 2012

Wednesday Q & A: What Is Sharp? Photographically.

Got an email the other day from a fellow I know from the local summer college baseball league.  He's at all the games and is the unofficial team shooter.  In the email he had several shots posted online by a Boston area photographer.  He just wanted to ask a question about them, so there's no piracy of intellectual property.  His point was that the shots were nice and sharp and he wanted to know why his shots didn't come out like that.  The shots involved were of a vintage baseball game.  I just shot a vintage game back in June, so I had a couple shots I could use to explain what he was seeing in his comparison of the Boston photogs shots versus his.  The shot on the left in today's image is similar to the one from Boston.  The other is the original of the shot.  The Boston guy left all the MetaData on his shot, so it was easy to see what he was doing when he clicked the shutter.  High shutter speed, slightly elevated ISO, lens cranked out to 200 mm, F4, and the subject was 21' away.  I was able to take a SWAG (Scientific Wild A$$ Guess) at what was going on.  To find out the secrets I uncovered (sounds like a mystery novel), hit the Read More.
Read more!

Wednesday, January 4, 2012

Wednesday Q&A - Getting Images To NOT Open As Smart Objects

An interesting search brought someone to the blog the other day from  Cape Town, South Africa.  The entire query was "how do I stop ACR opening my images in CS5 as smart object?"  This is the second time in the past few weeks someone was asking about how to NOT do something in Adobe Photoshop CS5.  The last one dovetails with today's question and the post of November 21, 2011 was titled "Wednesday Q&A - Getting Rid Of SmartObjects".  It's interesting that folks want to not use this extremely helpful piece of Photoshop wizardry.  Smart Objects are incredibly useful and there have been several posts dealing with them here at the Gallery.  Back in July of last year I did a two part "Wednesday Q&A" (Part 1) (Part 2) about just why Smart Objects are so great.  I use Smart Objects every day  and can't imagine (anymore) working without them.  Just the other day, while preparing the image of the motocross rider coming through a curve, Smart Objects saved a great deal of time for me.  I'd gone through several steps, used Convert To Smart Object (select all the Layers you want to make a Smart Object, right click on any Layer and pick Convert To Smart Object) several times and then noticed a mistake I'd made back two or three nested Smart Objects ago.  Had I used the older CTRL/ALT/Shift/E to make a composite on the top of the Layer Stack I would have been in big trouble when I saw my mistake.  The only thing I would have been able to do would have been to scrap the Composite Layer and everything above it.  That would have trashed a considerable amount of work.  By using Smart Objects I was able to cycle back through the Smart Objects to the point of the problem, fix the problem and then Save and Close my way back to the point I had been at when I noticed my error.  A two minute fix rather than a half hour rebuilding what had already been done.  But, let's get to today's question.  To learn the simple answer, hit the "Read More".
Read more!

Wednesday, December 7, 2011

Wednesday Q&A - Trust A Retail Salesperson?

Today's image does relate to the Q&A topic.  The topic comes from a direct email from the guy who was my last boss at Intel before retiring.  Back in the summer he had borrowed a lens from his brother (or brother-in-law ???) and used it to get closer to some landscape type subjects.  At that time he wanted a recommendation on which lens he should buy.  I gave him a couple options,  The serious route of going for a Canon 70 - 200 F2.8 IS and the less budget busting 70 - 300 F4 - 5.6 IS.  He thought he might be able to get the $150.00 75 - 300 "kit" lens.  I talked him out of it and he decided that he could wait until the holidays to get his lens as a "gift" from his wife.  That's where the problem came in.  She had lost the email I'd sent and went to a store knowing only that the upper end of the zoom was 300mm.  His wife explained that the use of the lens would be to get closer to the subjects of the photographs.  The salesperson at the store talked her into the cheap 75 - 300mm "kit" lens and --- wait for it ---a 25mm extension tube.  The explanation being that it was needed for his Canon camera to get closer to subjects.  The title of today's post in "Trust a Retail Salesperson?"  The simple answer is absolutely not.  To find out where this opinion comes from, hit the "Read More".
Read more!

Wednesday, November 16, 2011

Wednesday Q & A: Using Photoshop CS5's Smudge Tool To Sharpen?


Today's title asked the question: "can Adobe Photoshop CS5's Smudge Tool be used as a sharpening device.  Well, looking at the two insets, flanked by the original image and the repaired image shows the answer is yes.  The (left) original image comes right out of Adobe Lightroom 3.  LR3 was used on most of the image to adjust color, tone, lighting and other things.  The Adjustment Brush was used to lighten the shadow area under the cap.  That resulted in a distinct light/dark light.  In the second inset the line is gone.  How was it done?  To find out how, hit the "Read More".

Read more!

Wednesday, November 9, 2011

Wednesday Q&A - Why Use Individual Hue/Saturation Layers?

Oh boy, have I been getting questions about why I use individual (Red, Yellow, Green, Cyan, Blue, and Magenta) Hue/Saturation Adjustment Layer in Adobe Photoshop CS5.  The gist of the questions is why I'd bother using multiple H/S Adjustment Layers when it would be easier to scroll down through the colors on one Layer.  The answer is actually pretty simple.  I really don't care about the colors of the Adjustment Layers, I want the Layer Masks.  Do a double click on today's image to get to a larger view of the image.  Don't worry about the shot too much.  Look over to the right and checkout the Layers Panel I have attached.  In the Panel, look at the Layer Masks that go along with the individual colors of the Hue/Saturation Adjustment Layers.  You can see that each color (other than the Red) has a unique Mask.  There's even two Cyan H/S Adjustment Layers, each with a unique Mask.  The Masks are the key to the question of why I use the multiple Layers rather than adjusting each color on one Layer.  A secondary explanation is needed for the two Cyan Layers.  I often see tutorials where the instructor uses either different shade of gray with the brush Opacity at 100% or they'll bring the Brush Opacity down to 15%- 20% and build up the masking.  The problem I see with that technique is that if you go too far with the buildup it's almost impossible to paint over the area accurately.  By using multiple copies of the same colored H/S Adjustment Layer the area can be fine tuned and the amount of masking can be held.  So, the simple explanation of why I use multiple Hue/Saturation Adjustment Layers is to have more (better) control over what I'm getting more colors.  To find out how that effected today's image, hit the "Read More".
Read more!

Thursday, September 15, 2011

Wednesday Photoshop Q&A - Is Puppet Warp Just For Making Gag Images?

The trend this week seemed to be more than the typical number of people looking for information on Adobe Photoshop CS5's Puppet Warp.  It appears it is getting the same rap the Liquefy Filter has gotten since it was introduced.  The first thing the Liquefy Filter was used for was giving friends elongated noses and the like.  It was a throwback to an old program for doing such playful thing named "Kai's Power Goo".  Once the novelty wore off people started finding out how useful Liquefy could be.  You probably can't find a cover of any fashion magazine that hasn't had the Liquefy Filter used to gently push a waist, some arm flab, a hip or two, or any other not so perfect body part into place.  Today, Puppet Warp is an alternative to Liquefy.  In some cases it provides more control over the tweaks being given.  One of the keys to using almost any tool Photoshop has to offer is moderation.  Don't use the Dodge and Burn Tools (O) at 100%.  Use them at 10 - 15% and build up the effect you're looking for.  Don't make big sweeps with the Liquefy Tool (Filters/Liquefy).  Little tiny pushes with fairly big brushes (in the Blot Liquefy Tool) let's you find tune whatever needs fixing.  To see how the Puppet Warp Tool was used on today's image, hit the "Read More".
Read more!

Wednesday, July 27, 2011

Wednesday Photoshop Q&A - The Number One Burning Question

Since June 1st the same keyword search (verbatim) has brought someone (or some people) to the blog 71 times.  That's more than once a day, including weekends.  What is this burning question?

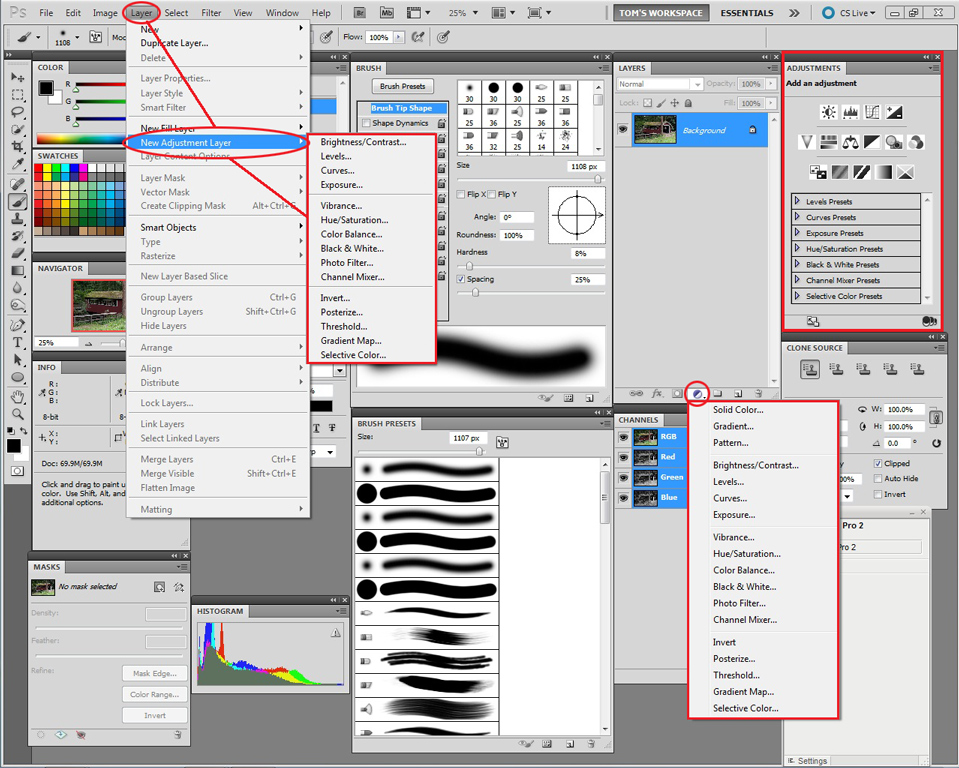
What are two ways to create image adjustment layers in CS5?

You'd think, after visiting the blog that many times, my guest would have the answer.  Don't get me wrong, I love having people come to the blog through a Google search.  So, today's post will be devoted to getting this question answered.  I read through all the sources of entry to the blog each day.  It's great to know that people have taken to considering "The Kayview Gallery" a resource.  There have been more than 300 posts on the blog, covering a large variety of photography and Photoshop related subjects.  Over 60% of the posts have had something to do with techniques in Photoshop.  If I were to look back on some of the postings from 2009 I do believe I'd laugh.  I'd probably say "boy, that's a dumb why to do that (whatever "that" may have been)".  The reason would be that Photoshop has evolved and, I hope, so have I.  A year and a half ago I was saying that the CASE technique (Ctrl/ALT/Shift/E) of making a composite Layer on top of what was already done was the "hot" way to go.  I haven't used that method in more than a year.  The way "the cool kids" are doing that type of thing today is using Smart Objects.  It's a much more flexible way to work.  I've written about it several times lately.  (In fact, the past two Wednesday Q&A posts have been about Smart Objects.

Let's answer today's question.  In fact, we'll discuss three methods of producing an Adjustment Layer.  Follow me by hitting the "read more".

Read more!