Wednesday, June 30, 2010

Relaxing In Baltimore

We did some long days while on vacation looking for some reasonable images. On the way back to Connecticut we thought we’d relax at a couple spots we’d wanted to visit for quite a long time. One of the stops was at the Intercontinental Harbor Court on the Inner Harbor in Baltimore Maryland. Nice hotel, with a view across the harbor just about as you see it in today’s image. It was an easy day of travel from Washington DC up the road just a few miles (less than sixty) along the back roads. We arrived at the hotel fairly late in the afternoon with just about enough time to settle into the room and go out to dinner. Naturally the cameras came along with us as we walked along the harbor to a waterfront restaurant. The Inner Harbor area was one of the first sites to be repurposed into the centerpiece of a city and a cultural center. Many cities, such as San Antonio with the River Walk and New York’s South Street Seaport are examples of taking a look at the success of the Inner Harbor and saying “me too”. After dinner we walked around the plazas and shot some general interest shots. We watched the street performers and talked to people who saw our cameras and wanted to know more about what we were shooting with and what recommendation we might make for cameras. According to the write ups by Inner Harbor – Baltimore.org, the harbor is one of the most photographed areas of the city. It had the “typical” history of use, disrepair and rebirth that’s been seen in many similar attractions across the country. Today’s image looks pretty straight, but there are a couple of wrinkles that make it worth talking about. To learn more about the tweaks on today’s image, hit the “read more”.
Read more!

Monday, June 28, 2010

Welcome Home

No, not to my home, it’s the title of the shot. This is another shot from our recent road trip. One of the not so good things about shooting in areas not close to your home base is that you’re there when you’re there. We were at Westover Plantation somewhere around noon, on a bright sunny, cloudless day. It wasn’t like we could stand around for five or ten minutes for a cloud to drift by and flatten out the lighting a bit. The answer was what I was doing all during this particular vacation. Almost every “shot” taken during the trip was auto-bracketed by one stop. I sure it’s easy on a Canon, Sony or Olympus DSLR, but on a higher end Nikon it’s ridiculously simple. In the menus I’ve set the Function Button on the front lower right hand side of the camera to bracket Auto Exposure (AE) only. Once that’s done it’s just a matter of holding down the button and turning the Main Command Dial. As a “norm” I used a three step bracket at one step increments. That typically gave me exposures at -1.3, -.3, and +.6. My “normal” Exposure Value (EV) is set to -.3 to get richer shots in general. That’s an easy recommendation for getting “better” shots in general. There are two reasons for doing a plus and minus one stop bracket. I usually have the camera set to high speed sequence on the shutter. The first reason to shoot a three stop bracket is to have a selection of exposures to choose from. Most of the time, if you’re shooting a landscape or informal portrait, the land isn't going to move and the subject of the portrait isn’t going to change expressions too much when you’re shooting at daylight speeds. The second reason is that it will give you a basis for a soft HDR. You won’t be able to get the wild swings you can get with a two or three stop bracket, but you will have something to work with. To find out what twist of techinque was applied to today’s image, hit the “read more”.
Read more!

Friday, June 25, 2010

Aboard The Summer Reader

As I mentioned the other day, we just got back from vacation. Vacations, whether it’s our typical cruise in January or out shooting in spring or fall is usually a time for relaxing and cranking through a few books in the evenings. This last vacation had too much “stuff” going on in the evenings until the last two days to get through several books. I did pickup one titled “Over the Edge of the World” by Laurence Bergreen. It has a subtitle of “Magellan’s Terrifying Circumnavigation of the Globe”. It’s a really good account of what they went through to explore in the 1500’s. Today’s image is sort of a tribute to the book. I went for making it look a little “old” by applying a sepia tone and making the edges somewhat raggy. The contrast was bumped up and some highlights allowed to be blown out. The rope work is actually from the Charles Morgan, berthed at Mystic Seaport in southeastern Connecticut. It’s one of those things where you say, oh well, it’s really a nothing shot and tuck it away. Reading the book jogged my memory of shooting at the seaport and I flipped through the shots to see if there was anything that could be representative of the narrative being told. There are a couple shots up through the masts, with the rigging and a few more of the boats at anchor, but this simple view of the rope seems to relate to the book’s story. Exploration, whenever it takes place, exacts a toll. I have a “tribute” I did to the Columbia astronauts. We were in Florida on January 16, 2003 and I’ve always wanted to experience a Space Shuttle liftoff. We went over and were one of the thousands lining the beach as it launched. I got a few shots of the vapor trail against the blue morning sky and was okay with the result. It was a picture of Columbia’s last launch. On February 1st, as it was returning to earth it disintegrated over Texas. Seven lives gone in the name of exploration. Magellan started out with five ships and a crew of more than 260. One ship made it, with eighteen crewmen still alive. The Columbia disaster was known within minutes. I dare say, most people don’t know the extent of loss in the first trip around the world. In schools the mention is “Magellan was the first to sail around the world”. I know I was never taught anything about what happened along the way. Be that as it may, to find out about what was done to today’s image, hit the “read more”.
Read more!

Wednesday, June 23, 2010

Nostalgia means different things to different people. Some think back to their childhood. Some think even further back, to a time that’s been romanticized in movies or stories from relatives handing down the history of the family. I might have like to meet my maternal great grandfather. I did some genealogy a while back and learned he was a railroad crossing attendant in the early part of the last century. I went to the newspaper in the town serving the area he worked in and found his obituary. It was a glowing account of how he served the community both on the job and as a citizen. One thing that caught my eye was a passage relating how thoughtful he was in doing his work. It went something like: ‘each winter, when the streets had been plowed and the tracks cleared, Mr. McGuiness would shovel snow back onto the tracks’. When I read that, it struck me as being a little bizarre. I thought, perhaps “olde great granddad” might have benefited from a wee bit of mental health assistance. After mulling it over in my mind it dawned on me that I was thinking in a late twentieth, early twenty first century place a time. Reverting back to early last century the “picture” became much clearer. Cars were rare and horse drawn sleighs and trucks with runners would have be the norm. The steel runners, sliding across the steel rails would have generated heat and possibly “cold welded” the runner to the track, creating a hazard if a train were coming barreling through town. By shoveling snow back onto the track he was providing a slippery surface for the traffic. As the newspaper had said, it was a benefit to the travelers of the day. Today’s image is not the station my great grandfather worked at, but the one in the town we now live. The “new station” is down the track about a quarter mile. The move came because the main road would have to be gated whenever a train stopped to discharge and take on passengers. To find out about the “hand coloring” of today’s image, hit the “read more”.

Read more!

Monday, June 21, 2010

Going Where Life Leads Me

If you’re a frequent reader of this blog you’ve probably noticed a gap in the postings. Last week didn’t have the normal Monday, Wednesday, Friday sequence of posts. Will, we were on vacation and didn’t have access (or the inclination) to get online. We were foot loose and fancy free vagabonds zipping along the roads of the east coast. The ultimate destination was Colonial Williamsburg in Virginia, but taking the easy route wasn’t going to be much fun. We could have been there in one fairly long day, but decided to go “the scenic route”. We wound go traveling through places that were past their prime, but Americana none the less. The next couple of posts will be about the places we saw and stayed. The first night was in Cape May, New Jersey. The town has a great heritage as a resort. Victorian homes can be seen with their “gingerbread” restored and painted in the fashion of the “Vics” as they would have been while first built, will reasonably gaudy colors mixed and matched. Many of the old Victorians along the east coast have had their gingerbread removed, porches taken down and painted blah white. It’s pretty sad to see the faded glory. In Cape May many have been restored, but the town is winding down. It may be the recession or general decline of people’s interest in sun, sand and surf, but it was evident. The town appears to be fighting, but the theater is closed, along with some of the stores. It’s not a ghost town by any means, but it is showing its age. We stayed at a place called the Beach Shack. It’s a hotel right along the strip, across the street from the beach. For the most part there are no buildings on the beach side of the street, so we were as close as possible. With the name “Beach Shack” we were a tad worried about what we had agreed to, but ended up pleasantly surprised with a very clean, freshly painted room, complete with a flat screen TV. The beds were comfortable, the shower warm and the staff was very friendly. Travelocity gives it a two star rating, but compared with some of the other places we stayed I think it may have deserved three. Today’s image is from the “boardwalk” just across the street from the Beach Shack. The fellow was cranking down the beach as if going somewhere special. It was about seven in the morning and there were probably a total of six people on the sand. I thought his determination made for a Norman Rockwell type slice of nostalgia. I remember a Rockwell scene where a guy’s hat was flying out in the breeze and this image brought that to mind. I may try Adobe Photoshop CS5’s new “Puppetwarp” on this a see about bending the fellow a little forward to give him a little more drama. To find out what was done to today’s image, hit the “read more”.

Read more!

Friday, June 11, 2010

We Don't Need No Stinkin' Rules......Duh, Yeah, We Do.

I look at today’s image and think of Paul Simon’s song Kodachrome. “They give us nice bright colors. They give us the greens of summer. Makes you think all the word’s a summer day, oh yeah.” We certainly have the greens of summer in today’s image. The fire hydrants around the area have recently been painted and I can’t remember them being more contrasty . The bright red and white standing in at the edge of a lush, green hill side was too much to walk past. One of the more interesting parts about this shot is that it’s about two hundred yards (meters) from my front door. It was a great day for photography a couple days ago and I decided to grab the camera and walk into town. The sun was playing peek-a-boo with some great fluffy clouds and the light was alternating between contrasty, cloudy bright and richly soft. All I had to do is wait a couple of minutes for the next cloud to come along and I had my choice which lighting condition I wanted. Actually, I wanted them all, so every time I found something to shoot it was just a case of shoot, shoot, shoot and then wait a little and back to shoot, shoot, shoot. A walk that typically takes less than an hour lasted more than two. The air was dry and the breeze was light. The changing light made for a great opportunity for photography. If you look at today’s image you can see what the light was like when the shot was taken. Look just under the lip of the flange, see the slight shadow? The full sun shots had a fairly heavy shadow. The ones under the maximum shadow of a cloud had none. Just as the sun fell behind the edge of the cloud there came this extremely soft light that gave plenty of detail and popped the colors. To find out about some of the decision process behind taken this shot, hit the “read more”.

Read more!

Wednesday, June 9, 2010

The Circus Is Back In Town Thanks To Adobe Photoshop CS5

Our town actually does have a connection to the circus. One doesn’t play here, or winter here, or train here, or probably doesn’t even know where Bethel, Connecticut is, but there’s a link. Phineas Taylor Barnum, that’s right, P. T. Barnum, of Barnum and Bailey Circus was born here. America’s impresario and possibly its greatest huckster was born here. So, today’s image is sort of pays homage to our “favorite son”. His life was as garish as the colors of the wagon we have today. I guess I’ve gotten kind of caught up in the wave of enthusiasm about High Dynamic Range images. I’ve been using it a lot lately for two different purposes. The first is the most obvious and exaggerates the edges and colors of an image. The second is a quieter use. No exaggeration, just enhancement of already present colors. Last month I did a post about “Unbelievable Believable HDR”. Both are legitimate uses for HDR and each have their enthusiasts. Adobe Photoshop CS5’s HDR Toning makes it so easy to push a single shot into the realm of fantasy that it almost seductive. How far can an image be pushed and still be true to what was seen through the viewfinder. Monday’s door scene had a splash of HDR applied to create a starting place for boosting the colors. Today’s pushes an image over the edge and no one is going to think that was the way I came on the scene. Last month, in this very blog, I say I wanted to try going a little more subtle with the colors in some of my images. Well, that lasted about two days and since then I’ve been getting somewhat crazy with the push of color in more than a fair share what’s been put up here on the blog. I’m going to have to rein myself in a little and get back to more “photographic” types of images. HDR is fun. It does have a place in photography. It looks like it’s going to go the way of all computer “improvements”. It started out as a niche and needed special software to “get into the club”. It’s now gone mainstream as a part of Photoshop CS5. The next step will be integration into the cameras themselves. Cameras already have a variety of modes such as Monochrome, Sepia, Vibrant and others, depending on what camera you’re looking at. HDR will become another option that will be selectable. At that time the software will become a finishing tool as it is for a “normal” shot today. To find out what “tweaks” can be found in today’s image, hit the “read more”.

Read more!

Monday, June 7, 2010

Finally, A Use For The Tragic Wand Tool

I have to thank Dave Cross, one of the “Photoshop Guys”, again. He had a tip a few weeks ago about making a selection for using Adobe Photoshop CS5’s new Content Aware Fill routine. His recommendation (I can’t call anything from those guys a “suggestion”) was to use the Select/Modify/Expand command to enlarge the area created by straightening an image or the ragged area produced in making panoramas before using Content Aware Fill. It just gives you a little more of a “bite” for the analysis to start with. Typically it works better than using the bare selection. Without the extra few pixels I’ve had a dashed line appear as an outline along the Selection to Fill junction. With the Selection expanded, it just doesn’t happen. That got me to thinking about other applications for expanding a Selection before doing other operations on it, like desaturating the fringe sometimes found when cranking up a Hue/Saturation Adjustment Layer. Since the fringing occurs in multiple places on an image, and it’s typically a very small line that we’re talking about, using something like the Quick Selection Tool would be painfully slow. Using the Magic (tragic) Wand with the Contiguous option unchecked will pick up all similarly colored areas. Often much more than the fringe will be targeted. The unwanted areas are typically larger areas and easily unselected using the Loop Tool in a minus state (L with the Alt Key held down). To follow the next few steps, hit the “read more”.
Read more!

Friday, June 4, 2010

Another What's Important In An Image?


Here’s an interesting dilemma, where do I want the viewer’s eye to go to in today’s image? The baby’s at least softly focused, enough to see that’s there’s a baby there, but certainly not sharp enough to be the primary point of the image.  Everybody has shots of babies. I shoot Nikon’s, but having the camera as the main interest would be dumb. That leaves us with “Mom”. So, what’s important about Mom? It surely isn’t her camera holding technique or the fact that her bra strap is showing. It’s the look of joy on her face that “is” the shot. Since there was only one child at the table I’m pretty sure this is the “first born”, the pride and joy of Mon and out of the shot, Grandma. The group was sitting under an umbrella, enjoying a break from walking up and down the main drag of Kent Connecticut. She probably didn’t analyze the factors that would make up the shot and she has the camera set on Auto. (You can see it in an enlargement of the image.) I’m sure her joy is the child and not the photography. That’s all right. In fact, it’s fine. Using photography to “capture the moment” is what 99% of all photography is about. I’ve known a guy who made a living shooting what he calls “invisible pictures”. Images you contact every day, but don’t spend one second thinking about. He shot industrial components, for years. Take a look at the flyer from the grocery store that came in today’s newspaper. It’s filled with photography that you don’t think twice about. It’s a can of soup, a box of cereal, a loaf of bread. All technically fine images, but I’d be willing to bet not one professional photographer taking those shots had the look that “Mom” has on her face when they snapped the shutter. We can make a living with all types of photography, but the joy is in the reason for clicking the shutter, not the act. If you’ve shot one hundred weddings, or a thousand door hinges, or hundreds of beautiful models you don’t have the joy that “Mom” has in today’s image. It might surprise you what was done to today’s image. To find out what, hit the “read more”.
Read more!

Wednesday, June 2, 2010

Back And Forth With Photoshop CS5 HDR

After Monday’s tribute to Memorial Day I thought I’d lighten things up a little with another image from the weekend. I had just watched Kelby Training's newest set of videos, “A Day With Jay Maisel” where Scott Kelby spends a day walking the streets of New York City with Maisel. Jay Maisel is a big time photographer and the videos were fascinating to watch. One of the first things Scott noticed was that Jay was shooting in a high speed burst mode. Scott asked Jay if he was shooting bursts to ensure he was getting at least one sharp image, or possibly a subtle expression change. Jay replied that he was bracketing his exposure. He wasn’t sure if he’d want a little over or a little under exposure. How brilliant is that. Here’s a world class photographer hedging his bets by simply bracketing his exposure. Film’s cheap (free) today, so why not. The first thing I did when we got to the town of Kent, Connecticut on Monday was put the camera in the automatic exposure bracketing mode. I kept my “normal” -.3 EV as the standard exposure, so I wound up with exposures of -1.3, -.3 and +.7. Shot like that all day. Big thing to remember was to keep the finger held down. Being a bright sunny day the typical exposures were above 1/1000th second, so the duration wasn’t very long. All shots were hand held, but with the entire cycle being about a half second the changes in the scene were minimal. The three shot burst gives the photographer several options. One would be to have a selection of exposures to choose from. A second would be to have a starting point for playing with Photoshop CS5 HDR Pro and HDR Toning. Today’s image gives a sense of the excitement that can be found in Kent on any summer weekend. To find out more about today’s image and how it was created, hit the “read more”.
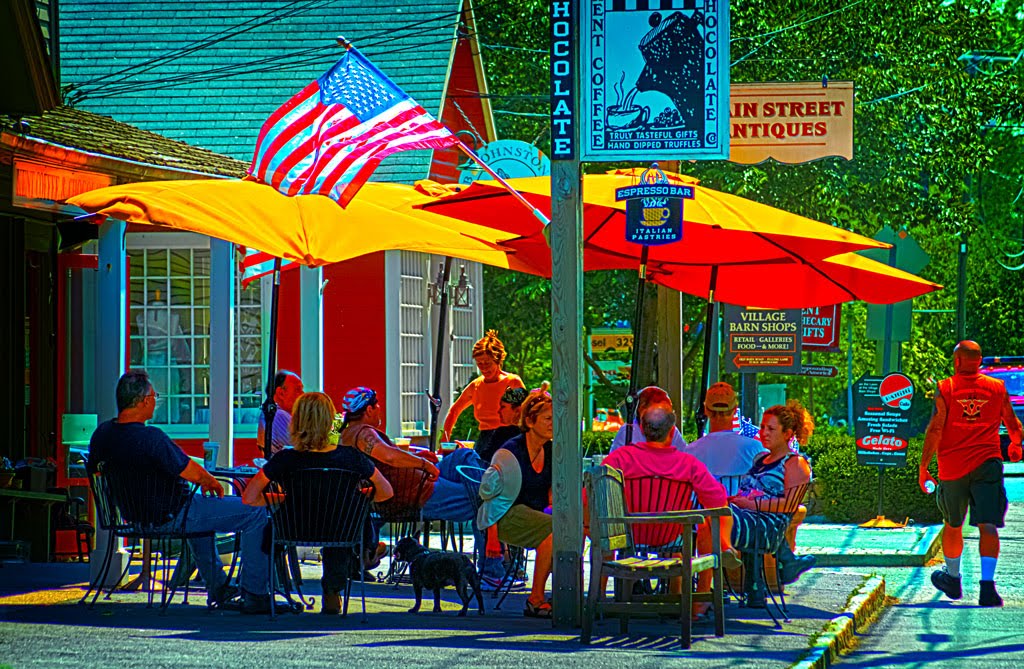
Read more!