skip to main |
skip to sidebar
 First things first, the Eye-Fi Connect X2 card was
introduced almost two years ago. So,
it's not exactly new on the market. It's
not even new to me. I bought it sometime
last year, probably about nine months ago.
Why did I buy it? To use Eye-Fi's
Direct Mode with my wife's camera going to the iPAD.
Why am I blowing the horn about it now?
Because it works, finally. When I
first got it I spent about a week fiddling with it, trying to get it to
work. After throwing up my hands, I
called Eye-Fi tech support. They were as
patient and helpful as could be, but we still couldn't get it to work. Something was missing. Last week I had a couple minutes to kill and
picked up the camera again, still with the Eye-Fi card in it. It works fine as a straight memory card, so
why not use it. I watched a couple
YouTube views and one from F-Stoppers and decided to have another run at
it. A couple videos talked about an update
for the Eye-Fi Center that sits on the computer and a firmware update for the
card itself. I downloaded and installed
both. Played the F-Stoppers, stopping
the video at each step, following the instructions and going on to the next
step. Once I completed all the steps,
TADA, still nothing. To find out what
the key to getting it working was, hit the "Read More".
First things first, the Eye-Fi Connect X2 card was
introduced almost two years ago. So,
it's not exactly new on the market. It's
not even new to me. I bought it sometime
last year, probably about nine months ago.
Why did I buy it? To use Eye-Fi's
Direct Mode with my wife's camera going to the iPAD.
Why am I blowing the horn about it now?
Because it works, finally. When I
first got it I spent about a week fiddling with it, trying to get it to
work. After throwing up my hands, I
called Eye-Fi tech support. They were as
patient and helpful as could be, but we still couldn't get it to work. Something was missing. Last week I had a couple minutes to kill and
picked up the camera again, still with the Eye-Fi card in it. It works fine as a straight memory card, so
why not use it. I watched a couple
YouTube views and one from F-Stoppers and decided to have another run at
it. A couple videos talked about an update
for the Eye-Fi Center that sits on the computer and a firmware update for the
card itself. I downloaded and installed
both. Played the F-Stoppers, stopping
the video at each step, following the instructions and going on to the next
step. Once I completed all the steps,
TADA, still nothing. To find out what
the key to getting it working was, hit the "Read More".
Read more!
 I am a Photoshop Guys
fanboy. I hang on every word from Scott,
Matt, Dave, Corey, RC and , occasionally, Pete (the jury's still out on him). I read their blogs, I watch Photoshop User
TV, and D-Town, and Killer Tips, and Planet Photoshop. I buy their books, I subscribe to Kelby
Training. I spend enough to pay
somebody's salary (or least it seems like it).
But, make a suggestion for a twist they put on the web by leaving a
comment and the comment never gets posted.
Lately I've offered alternate ways to accomplish the topic of discussion
posted by Corey Barker, Larry Becker and Matt Kloskowski. In each case the suggestions never saw the
light of day. The latest one happened
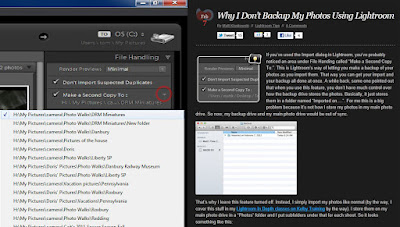
the other day. Matt said he doesn't use
the "Make a second copy to:" feature in Adobe Photoshop Lightroom 3
(or 4 Beta) because, according to Matt, "Basically, it just stores them in
a folder named "Imported on...".
The "comment" I made wasn't rude, didn't deride, was written
as a humble suggestion from a fan, and, as I said, never made it past the
screeners. I'd be willing to bet Matt
doesn't review the comments that come in, but whoever does isn't doing Matt or
those who are his faithful followers a service by censoring helpful
comments. To find out what Matt missed
in making his statement that "Make a second copy to:" doesn't fit his
needs, hit the "Read More".
I am a Photoshop Guys
fanboy. I hang on every word from Scott,
Matt, Dave, Corey, RC and , occasionally, Pete (the jury's still out on him). I read their blogs, I watch Photoshop User
TV, and D-Town, and Killer Tips, and Planet Photoshop. I buy their books, I subscribe to Kelby
Training. I spend enough to pay
somebody's salary (or least it seems like it).
But, make a suggestion for a twist they put on the web by leaving a
comment and the comment never gets posted.
Lately I've offered alternate ways to accomplish the topic of discussion
posted by Corey Barker, Larry Becker and Matt Kloskowski. In each case the suggestions never saw the
light of day. The latest one happened
the other day. Matt said he doesn't use
the "Make a second copy to:" feature in Adobe Photoshop Lightroom 3
(or 4 Beta) because, according to Matt, "Basically, it just stores them in
a folder named "Imported on...".
The "comment" I made wasn't rude, didn't deride, was written
as a humble suggestion from a fan, and, as I said, never made it past the
screeners. I'd be willing to bet Matt
doesn't review the comments that come in, but whoever does isn't doing Matt or
those who are his faithful followers a service by censoring helpful
comments. To find out what Matt missed
in making his statement that "Make a second copy to:" doesn't fit his
needs, hit the "Read More".
Read more!
 There's a couple ways today's image could have been
made. One would be to zoom in closer,
turn the camera to vertical, take three or four shots and stitch a panorama. The advantage to this method is greater
detail. You're zoomed in, so the leaves
on the trees become a larger piece to each of the images. If you're using Adobe Photoshop CS5 (or CS4),
or Adobe Photoshop Elements 10 (or 9) you have excellent stitching
ability. It's basically a pushbutton
function. You just say, take this, this
and this image. Click on Auto and let
CS5 do all the hard work. Aligning the
images, blending the details and smoothing out any color differences. If there's any vignetting, CS5 will take care
of that. If there's tonal changes from
the left image to the right image (as in a wide sweep that takes in a large arc
of the sky) CS5 will figure out the optimum balance across the scene. But, that's not how today's image was
done. It's an "old fashioned"
pano. It's one shot that had too much
information. Other than showing where
the water was going, the bottom portion of the original added nothing to the
interest in the image. The top suffered
from the same malady. Once you know
there are trees in the shot, you really don't have to show the tops. Up at the tree tops the sky was pretty bland,
so why include it. The human mind can
figure out that somewhere the trees stop.
You don't have to hit a person over the head and point that out. In the "as taken" image the stream
was dead center. Booorrring. So the image was cropped in from the
right. There was nothing wrong with the
right side, it's just that it didn't "help" the image. Once the image was hacked down to its current
size it got a new twist on an old workflow.
TO fine out what's changed, hit the "Read More"
There's a couple ways today's image could have been
made. One would be to zoom in closer,
turn the camera to vertical, take three or four shots and stitch a panorama. The advantage to this method is greater
detail. You're zoomed in, so the leaves
on the trees become a larger piece to each of the images. If you're using Adobe Photoshop CS5 (or CS4),
or Adobe Photoshop Elements 10 (or 9) you have excellent stitching
ability. It's basically a pushbutton
function. You just say, take this, this
and this image. Click on Auto and let
CS5 do all the hard work. Aligning the
images, blending the details and smoothing out any color differences. If there's any vignetting, CS5 will take care
of that. If there's tonal changes from
the left image to the right image (as in a wide sweep that takes in a large arc
of the sky) CS5 will figure out the optimum balance across the scene. But, that's not how today's image was
done. It's an "old fashioned"
pano. It's one shot that had too much
information. Other than showing where
the water was going, the bottom portion of the original added nothing to the
interest in the image. The top suffered
from the same malady. Once you know
there are trees in the shot, you really don't have to show the tops. Up at the tree tops the sky was pretty bland,
so why include it. The human mind can
figure out that somewhere the trees stop.
You don't have to hit a person over the head and point that out. In the "as taken" image the stream
was dead center. Booorrring. So the image was cropped in from the
right. There was nothing wrong with the
right side, it's just that it didn't "help" the image. Once the image was hacked down to its current
size it got a new twist on an old workflow.
TO fine out what's changed, hit the "Read More"
Read more!
 What you see on the left side of today's image is a finished
product. What's on the right side is a
"work in progress" using about twenty Layers in Adobe Photoshop CS5. On the right I've gone back through the image
and made most of the Blend Modes Normal.
Except where you see the very black and very white shading marks. Those Layers had to be left in Overlay [or Soft
Light] Blend Mode to be able to "see through" the Layer to show how
it was done. The first thing to say is
that I didn't do all the touching up and then, at the end, changed all the
Blend Modes. The Blend Modes and the
Opacity of each little tweak were made as the adjustments were applied. I know I wouldn't, and I'm pretty sure no one
else would either, be able to "predict" what would happen if all the
Blend Modes and Opacity changes were made as a final step. Now, it's not like the young lady looked
terrible before I started to play with the image. I just felt opening things up a little and
creating better definition would "improve" the shot. To find out what all those marks mean, hit
the "Read More".
What you see on the left side of today's image is a finished
product. What's on the right side is a
"work in progress" using about twenty Layers in Adobe Photoshop CS5. On the right I've gone back through the image
and made most of the Blend Modes Normal.
Except where you see the very black and very white shading marks. Those Layers had to be left in Overlay [or Soft
Light] Blend Mode to be able to "see through" the Layer to show how
it was done. The first thing to say is
that I didn't do all the touching up and then, at the end, changed all the
Blend Modes. The Blend Modes and the
Opacity of each little tweak were made as the adjustments were applied. I know I wouldn't, and I'm pretty sure no one
else would either, be able to "predict" what would happen if all the
Blend Modes and Opacity changes were made as a final step. Now, it's not like the young lady looked
terrible before I started to play with the image. I just felt opening things up a little and
creating better definition would "improve" the shot. To find out what all those marks mean, hit
the "Read More".
Read more!

 First things first, the Eye-Fi Connect X2 card was
introduced almost two years ago. So,
it's not exactly new on the market. It's
not even new to me. I bought it sometime
last year, probably about nine months ago.
Why did I buy it? To use Eye-Fi's
Direct Mode with my wife's camera going to the iPAD.
Why am I blowing the horn about it now?
Because it works, finally. When I
first got it I spent about a week fiddling with it, trying to get it to
work. After throwing up my hands, I
called Eye-Fi tech support. They were as
patient and helpful as could be, but we still couldn't get it to work. Something was missing. Last week I had a couple minutes to kill and
picked up the camera again, still with the Eye-Fi card in it. It works fine as a straight memory card, so
why not use it. I watched a couple
YouTube views and one from F-Stoppers and decided to have another run at
it. A couple videos talked about an update
for the Eye-Fi Center that sits on the computer and a firmware update for the
card itself. I downloaded and installed
both. Played the F-Stoppers, stopping
the video at each step, following the instructions and going on to the next
step. Once I completed all the steps,
TADA, still nothing. To find out what
the key to getting it working was, hit the "Read More".
First things first, the Eye-Fi Connect X2 card was
introduced almost two years ago. So,
it's not exactly new on the market. It's
not even new to me. I bought it sometime
last year, probably about nine months ago.
Why did I buy it? To use Eye-Fi's
Direct Mode with my wife's camera going to the iPAD.
Why am I blowing the horn about it now?
Because it works, finally. When I
first got it I spent about a week fiddling with it, trying to get it to
work. After throwing up my hands, I
called Eye-Fi tech support. They were as
patient and helpful as could be, but we still couldn't get it to work. Something was missing. Last week I had a couple minutes to kill and
picked up the camera again, still with the Eye-Fi card in it. It works fine as a straight memory card, so
why not use it. I watched a couple
YouTube views and one from F-Stoppers and decided to have another run at
it. A couple videos talked about an update
for the Eye-Fi Center that sits on the computer and a firmware update for the
card itself. I downloaded and installed
both. Played the F-Stoppers, stopping
the video at each step, following the instructions and going on to the next
step. Once I completed all the steps,
TADA, still nothing. To find out what
the key to getting it working was, hit the "Read More".


