skip to main |
skip to sidebar
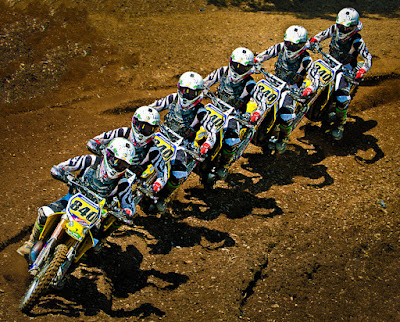 Today's image, obviously, is a series a images taken using
continuous high speed shutter. Before we
get into it I'll talk a little bit about Nikon's (or any manufacturer's)
continuous mode of shooting. It kind of
cracks me up when some friends say with certainty that their camera can shoot
at six, seven or nine frames per second.
In the case of today's image(s) that's most likely the case. But, if you're in low light and your shutter
speed is one second, you can shoot at a maximum of --- one frame per second. If you're shooting a seven shot bracket, and
your "normal" shutter speed is 1/100 of a second, you'd have 1/12 of
a second as your longest shutter speed.
Add up 1/12th +1/25th +1/50th +1/100th + 1/200, +1/400, and 1/800th and
you'll find you've used up just about that whole second. Start at 1/50th and that one second is long
gone before you get that six frames per second over. A friend of mine who has a D3 (not a D3X)
found that out the hard way when he heard my D300 start to labor during a seven
shot bracket. He wanted to show me how
fast his D3 was. I told him to use the
same Aperture I had, in Aperture Priority Mode.
His camera went click, click. click, click, click,
click, click, same as mine
had. There are some rules of physics
that you can't break no matter how good your camera is. But, back at today's image, it's a burst of
exposures in high speed continuous mode with plenty of sunlight. It was clicking away as fast as the mechanism
would go. Seeing as the Nikon D300 can
run at six frames per second, today's image should be about a one second
interval. Putting the sequence together
in Adobe Photoshop CS5 is easier than you might suspect. To learn how it was done, hit the "Read
More".
Today's image, obviously, is a series a images taken using
continuous high speed shutter. Before we
get into it I'll talk a little bit about Nikon's (or any manufacturer's)
continuous mode of shooting. It kind of
cracks me up when some friends say with certainty that their camera can shoot
at six, seven or nine frames per second.
In the case of today's image(s) that's most likely the case. But, if you're in low light and your shutter
speed is one second, you can shoot at a maximum of --- one frame per second. If you're shooting a seven shot bracket, and
your "normal" shutter speed is 1/100 of a second, you'd have 1/12 of
a second as your longest shutter speed.
Add up 1/12th +1/25th +1/50th +1/100th + 1/200, +1/400, and 1/800th and
you'll find you've used up just about that whole second. Start at 1/50th and that one second is long
gone before you get that six frames per second over. A friend of mine who has a D3 (not a D3X)
found that out the hard way when he heard my D300 start to labor during a seven
shot bracket. He wanted to show me how
fast his D3 was. I told him to use the
same Aperture I had, in Aperture Priority Mode.
His camera went click, click. click, click, click,
click, click, same as mine
had. There are some rules of physics
that you can't break no matter how good your camera is. But, back at today's image, it's a burst of
exposures in high speed continuous mode with plenty of sunlight. It was clicking away as fast as the mechanism
would go. Seeing as the Nikon D300 can
run at six frames per second, today's image should be about a one second
interval. Putting the sequence together
in Adobe Photoshop CS5 is easier than you might suspect. To learn how it was done, hit the "Read
More".
Read more!
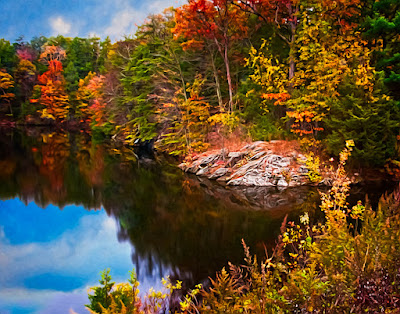 Today's image reminds me "a little bit of" of Lou Bega's song Mambo No. 5. In it he sings about a composite woman he'd
like to have. He's looking for "a
little bit of ... " many different woman.
Check it out, it's a cute song from a couple years ago. Today's image has "a little bit of"
the Sharpening Tool (no keyboard shortcut), "a little bit of" the
Blur Tool (same tool set), "a little bit of" selective vignetting, "a
little bit of" Adobe's Pixel Bender and "a little bit of"
Content Aware Fill. I say "a little
bit of" for each one because none are applied to the entire image. The result is a cohesive image that appears
to have been treated as a whole. In
addition, it has a sky dropped in with its resultant reflection in the
water. I'd be willing to bet that my
buddy Lorri will look at it and think (at first) it was a one button filter
application. It's nothing if it's not
really far from the case. There's about
a half dozen nested Smart Objects, a dozen independent Layers, at least four
trip back and forth from Adobe Photoshop CS5 and Adobe Photoshop Lightroom
3. Everything serves a function. I don't believe there are any gratuitous operations. We'll take a walk through the image and show
where each alteration was done. To follow
along, hit the "Read More".
Today's image reminds me "a little bit of" of Lou Bega's song Mambo No. 5. In it he sings about a composite woman he'd
like to have. He's looking for "a
little bit of ... " many different woman.
Check it out, it's a cute song from a couple years ago. Today's image has "a little bit of"
the Sharpening Tool (no keyboard shortcut), "a little bit of" the
Blur Tool (same tool set), "a little bit of" selective vignetting, "a
little bit of" Adobe's Pixel Bender and "a little bit of"
Content Aware Fill. I say "a little
bit of" for each one because none are applied to the entire image. The result is a cohesive image that appears
to have been treated as a whole. In
addition, it has a sky dropped in with its resultant reflection in the
water. I'd be willing to bet that my
buddy Lorri will look at it and think (at first) it was a one button filter
application. It's nothing if it's not
really far from the case. There's about
a half dozen nested Smart Objects, a dozen independent Layers, at least four
trip back and forth from Adobe Photoshop CS5 and Adobe Photoshop Lightroom
3. Everything serves a function. I don't believe there are any gratuitous operations. We'll take a walk through the image and show
where each alteration was done. To follow
along, hit the "Read More".
Read more!
 Everybody (well, just about everybody) knows about using an
Unsharp Mask (Filters/Sharpen/Unsharp Mask) to sharpen their images. It is an oxymoron that comes from the film
days of sharpening images. Many (well,
some) know how to use a High Pass Filter (Filters/Other/High Pass) to do some
very controllable sharpening. An even
smaller set of people know about using the Luminance Channel in LAB (that's L A
B, not referring to some laboratory somewhere) Mode. There, you don't mess with the color Channels
(the A Channel and the B Channel) and only Sharpen the L Channel . By only Sharpening the grey scale of the L
Channel you eliminate any chance of producing a color shift. And then there's a Brush on Sharpening
technique that very few people use. I
suppose some of the "early adopters" probably tried using the
Sharpening Tool (no keyboard shortcut - it's located under the Blur Tool) and
found it lacking. I believe the
Sharpening Tool fell into Adobe's JDI (just do it) tweaks that came in Adobe
Photoshop CS5. The JDI's were a set of little,
niggling, things that bugged enough end users and (apparently) Adobe Product
Managers that they made the decision to fix many things before releasing
CS5. Dodge and Burn is a good
example. They put in a checkbox that
says "Protect Tones". Prior to
CS5 the Dodge and Burn Tools (O) would just muddy up whatever they were applied
to. With the JDI fix, they work as they
were always supposed to. Being able to
set a default in the Stroke (Edit/Stroke) dialog box was another. Before it was set to Red and had to be
changed every time it was used. In CS5,
if you choose to do so, you can set the default color to whatever you
frequently use. If 90% of your Strokes
are Black, set it to Black in one case and it'll remain "sticky"
until you change it. A great sanity
fix. Lots of people were bugged with
that one. Another is the subject of
today's post. To find out how it was
used in today's image, hit the "Read More".
Everybody (well, just about everybody) knows about using an
Unsharp Mask (Filters/Sharpen/Unsharp Mask) to sharpen their images. It is an oxymoron that comes from the film
days of sharpening images. Many (well,
some) know how to use a High Pass Filter (Filters/Other/High Pass) to do some
very controllable sharpening. An even
smaller set of people know about using the Luminance Channel in LAB (that's L A
B, not referring to some laboratory somewhere) Mode. There, you don't mess with the color Channels
(the A Channel and the B Channel) and only Sharpen the L Channel . By only Sharpening the grey scale of the L
Channel you eliminate any chance of producing a color shift. And then there's a Brush on Sharpening
technique that very few people use. I
suppose some of the "early adopters" probably tried using the
Sharpening Tool (no keyboard shortcut - it's located under the Blur Tool) and
found it lacking. I believe the
Sharpening Tool fell into Adobe's JDI (just do it) tweaks that came in Adobe
Photoshop CS5. The JDI's were a set of little,
niggling, things that bugged enough end users and (apparently) Adobe Product
Managers that they made the decision to fix many things before releasing
CS5. Dodge and Burn is a good
example. They put in a checkbox that
says "Protect Tones". Prior to
CS5 the Dodge and Burn Tools (O) would just muddy up whatever they were applied
to. With the JDI fix, they work as they
were always supposed to. Being able to
set a default in the Stroke (Edit/Stroke) dialog box was another. Before it was set to Red and had to be
changed every time it was used. In CS5,
if you choose to do so, you can set the default color to whatever you
frequently use. If 90% of your Strokes
are Black, set it to Black in one case and it'll remain "sticky"
until you change it. A great sanity
fix. Lots of people were bugged with
that one. Another is the subject of
today's post. To find out how it was
used in today's image, hit the "Read More".
Read more!
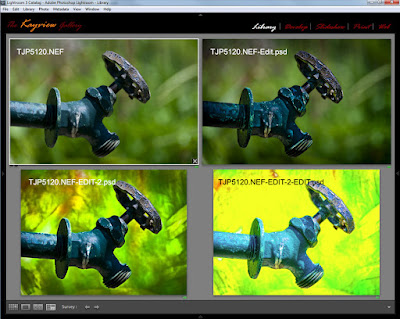 I gave a class last spring and saw one of the attendees the
other day. He said "ya gotta clear something
up for me". In the class I had
taken an image from Adobe Photoshop Lightroom 3 (after going as far as I could
initially) over to Adobe Photoshop CS5.
There I played with adding a couple Layers, added a couple pieces from
other images and generally messed with the shot. When I was done there, I wanted to do other
things back in LR3. The part the fellow
wanted clarification on was how I saved it.
That took me back a little and I asked "what do you
mean"? He explained that he
"always" does a Save As rather than just plain Save. I asked him to tell me why he did that. That's when I saw why he wanted some
explanation. His justification for using
Save As was that he wanted to preserve his original image. Take a look at today's image. It's the same shot, four different ways. The original is on the upper left. The other three have had one, two and three
trips over to PS CS5 and back. Each
time, a simple Save was used, yet there are now four files that show up in
LR3. (It also applies to Adobe Bridge.) To find out what's going on, hit the
"Read More".
I gave a class last spring and saw one of the attendees the
other day. He said "ya gotta clear something
up for me". In the class I had
taken an image from Adobe Photoshop Lightroom 3 (after going as far as I could
initially) over to Adobe Photoshop CS5.
There I played with adding a couple Layers, added a couple pieces from
other images and generally messed with the shot. When I was done there, I wanted to do other
things back in LR3. The part the fellow
wanted clarification on was how I saved it.
That took me back a little and I asked "what do you
mean"? He explained that he
"always" does a Save As rather than just plain Save. I asked him to tell me why he did that. That's when I saw why he wanted some
explanation. His justification for using
Save As was that he wanted to preserve his original image. Take a look at today's image. It's the same shot, four different ways. The original is on the upper left. The other three have had one, two and three
trips over to PS CS5 and back. Each
time, a simple Save was used, yet there are now four files that show up in
LR3. (It also applies to Adobe Bridge.) To find out what's going on, hit the
"Read More".
Read more!
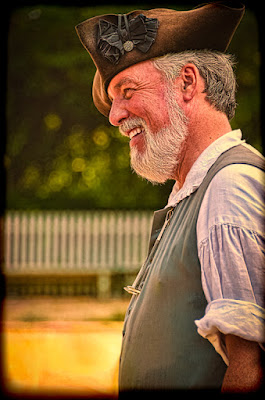
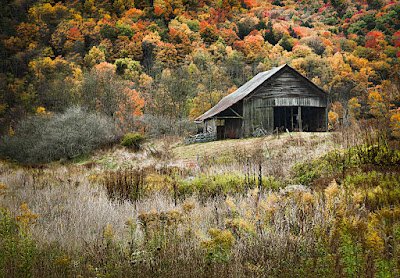
 Simplifying today's image comes from trying to do
"something" different from a shoot we did back in April. We've featured about a half dozen shots here
on The Kayview Gallery from that session.
I shoot with a typical Nikon DSLR, so the square format was the first change
that was made. The original image had
too much room on the left side and a little confusing detail on the right. One of the biggest things new shooters need
to learn is making good decisions about their photography. Good decisions when looking through the
viewfinder. Doing most of the composing
in the camera. Rick Sammon runs around
with several clichés on how to turn "snapshots into great shots. One of his axioms is 'the name of the game is
fill the frame". Rick is a good
shooter, written a bunch of photography books, but is a little pompous for my
taste. Never the less, he's right about
filling the frame. The nothingness on
the left of the original of today's image? Get rid of it.
The part the fellow in the shot
was working on became a maze of shapes on the right. Get rid of the too. One of the benefits it gives is that it puts
the subject and his hands at two strong points in the composition. Mentally project the tic-tac-toe grid of
"the rule (suggestion) of thirds" on the image and you'll see the
fellow's cheekbone and hands now align on the intersections of the upper
horizontal line. They say, if you know
the "rules", you can break them.
If you know the "rules" you can also use them. The "rule of thirds" in particular
has come into some derision in recent years, but it's pretty much by those one
US Vice President once called "the nattering nabobs of negativism". The
"rule of thirds" came a "rule" because it represents a
powerful place to put important components of an image. To read about other ways used to simplify
today's image, hit the "Read More"
Simplifying today's image comes from trying to do
"something" different from a shoot we did back in April. We've featured about a half dozen shots here
on The Kayview Gallery from that session.
I shoot with a typical Nikon DSLR, so the square format was the first change
that was made. The original image had
too much room on the left side and a little confusing detail on the right. One of the biggest things new shooters need
to learn is making good decisions about their photography. Good decisions when looking through the
viewfinder. Doing most of the composing
in the camera. Rick Sammon runs around
with several clichés on how to turn "snapshots into great shots. One of his axioms is 'the name of the game is
fill the frame". Rick is a good
shooter, written a bunch of photography books, but is a little pompous for my
taste. Never the less, he's right about
filling the frame. The nothingness on
the left of the original of today's image? Get rid of it.
The part the fellow in the shot
was working on became a maze of shapes on the right. Get rid of the too. One of the benefits it gives is that it puts
the subject and his hands at two strong points in the composition. Mentally project the tic-tac-toe grid of
"the rule (suggestion) of thirds" on the image and you'll see the
fellow's cheekbone and hands now align on the intersections of the upper
horizontal line. They say, if you know
the "rules", you can break them.
If you know the "rules" you can also use them. The "rule of thirds" in particular
has come into some derision in recent years, but it's pretty much by those one
US Vice President once called "the nattering nabobs of negativism". The
"rule of thirds" came a "rule" because it represents a
powerful place to put important components of an image. To read about other ways used to simplify
today's image, hit the "Read More"
Read more!
 Today's image is a bounce to the edge in one direction. I occasionally ping pong between using
plug-ins and not using plug-ins. My
thought is that there is nothing you can do with a plug-in that can't be done
in Adobe Photoshop CS5 alone. The way I
think of it is sort of like the "Laws of Physics". People can do some amazing things, but
whatever someone does it can't break the Laws of Physics. Same with plug-ins for Adobe Photoshop CS5. Plug-ins allow people to make some amazing
images, but they have to stay within the envelop of what CS5 can do. If that's the case, why would anyone bother
using a plug-in? The answer is simple. Ease!
If you listen to Photoshop educators like Scott Kelby, or if you've ever
attended one of his seminars, he's says flat out: "this is the way you do it in
Photoshop" and shows the Photoshop way to get to an image. He'll also say: "but this is the way I
do it for my own use today", and bring up a plug-in. In the early days of personal computers I
went out and bought an Intel 286 based machine.
I mentioned it to my brother, who happens to be a EE (Electrical
Engineer). He said if he wanted one he'd
build it himself. That was like thirty
years ago. He's gone through several
computers, but he has yet to build one.
Why? Same reason. Ease! Being
a EE, I'm sure he could have bought the individual components, plugged
everything together, and assembled a computer.
But he hasn't. Plug-ins are a
crutch for those who don't know how to create an effect in raw CS5 (not CS5
ACR). They'll push buttons until they
wind up with a good looking image. I'd
prefer to know what the plug-in is doing and then let the plug-in do its job
and get me someplace much quicker that recreating the wheel. To find out what plug-in was used for today's
image, hit the "Read More".
Today's image is a bounce to the edge in one direction. I occasionally ping pong between using
plug-ins and not using plug-ins. My
thought is that there is nothing you can do with a plug-in that can't be done
in Adobe Photoshop CS5 alone. The way I
think of it is sort of like the "Laws of Physics". People can do some amazing things, but
whatever someone does it can't break the Laws of Physics. Same with plug-ins for Adobe Photoshop CS5. Plug-ins allow people to make some amazing
images, but they have to stay within the envelop of what CS5 can do. If that's the case, why would anyone bother
using a plug-in? The answer is simple. Ease!
If you listen to Photoshop educators like Scott Kelby, or if you've ever
attended one of his seminars, he's says flat out: "this is the way you do it in
Photoshop" and shows the Photoshop way to get to an image. He'll also say: "but this is the way I
do it for my own use today", and bring up a plug-in. In the early days of personal computers I
went out and bought an Intel 286 based machine.
I mentioned it to my brother, who happens to be a EE (Electrical
Engineer). He said if he wanted one he'd
build it himself. That was like thirty
years ago. He's gone through several
computers, but he has yet to build one.
Why? Same reason. Ease! Being
a EE, I'm sure he could have bought the individual components, plugged
everything together, and assembled a computer.
But he hasn't. Plug-ins are a
crutch for those who don't know how to create an effect in raw CS5 (not CS5
ACR). They'll push buttons until they
wind up with a good looking image. I'd
prefer to know what the plug-in is doing and then let the plug-in do its job
and get me someplace much quicker that recreating the wheel. To find out what plug-in was used for today's
image, hit the "Read More".
Read more!
 Today's image does relate to the Q&A topic. The topic comes from a direct email from the
guy who was my last boss at Intel before retiring. Back in the summer he had borrowed a lens
from his brother (or brother-in-law ???) and used it to get closer to some
landscape type subjects. At that time he
wanted a recommendation on which lens he should buy. I gave him a couple options, The serious route of going for a Canon 70 -
200 F2.8 IS and the less budget busting 70 - 300 F4 - 5.6 IS. He thought he might be able to get the
$150.00 75 - 300 "kit" lens. I
talked him out of it and he decided that he could wait until the holidays to
get his lens as a "gift" from his wife. That's where the problem came in. She had lost the email I'd sent and went to a
store knowing only that the upper end of the zoom was 300mm. His wife explained that the use of the lens
would be to get closer to the subjects of the photographs. The salesperson at the store talked her into
the cheap 75 - 300mm "kit" lens and --- wait for it ---a 25mm
extension tube. The explanation being
that it was needed for his Canon camera to get closer to subjects. The title of today's post in "Trust a
Retail Salesperson?" The simple
answer is absolutely not. To find out
where this opinion comes from, hit the "Read More".
Today's image does relate to the Q&A topic. The topic comes from a direct email from the
guy who was my last boss at Intel before retiring. Back in the summer he had borrowed a lens
from his brother (or brother-in-law ???) and used it to get closer to some
landscape type subjects. At that time he
wanted a recommendation on which lens he should buy. I gave him a couple options, The serious route of going for a Canon 70 -
200 F2.8 IS and the less budget busting 70 - 300 F4 - 5.6 IS. He thought he might be able to get the
$150.00 75 - 300 "kit" lens. I
talked him out of it and he decided that he could wait until the holidays to
get his lens as a "gift" from his wife. That's where the problem came in. She had lost the email I'd sent and went to a
store knowing only that the upper end of the zoom was 300mm. His wife explained that the use of the lens
would be to get closer to the subjects of the photographs. The salesperson at the store talked her into
the cheap 75 - 300mm "kit" lens and --- wait for it ---a 25mm
extension tube. The explanation being
that it was needed for his Canon camera to get closer to subjects. The title of today's post in "Trust a
Retail Salesperson?" The simple
answer is absolutely not. To find out
where this opinion comes from, hit the "Read More".
Read more!
 What a beautiful weekend the past couple of days have
been. A slight chill in the air (it's
about time), semi clear skies and a photowalk with a couple of friends down to
Liberty State Park in New Jersey. We had
dinner with a couple friends last Tuesday and they mentioned they were going to
Liberty SP on Saturday. They asked if
we'd be interested in joining them. We
had our usual zero on the calendar and thought it would be a fun day to do some
shooting. Lorri Freedman is the shooter
of the pair and she has a great eye for images and does a great job doing some
Photoshop magic with the images she shoots.
Check out her SmugMug portfolio.
I'm sure you'll agree. Well, we
left the house at 9:00 AM for what Google Maps said would a ninety minute
drive. We were supposed to meet at
11:30, so we'd left ourselves plenty of time.
Grabbed some coffee to go at the local Dunkin Donuts and set off. Would you believe the GPS knows of a second
Liberty State Park about twelve miles from the one that was our intended
target? In checking Google Maps I knew
we wanted exit 15E on the New Jersey Turnpike.
Google had given one option of taking, basically, city streets once we'd
crossed over into NJ on the George Washington Bridge. I figured I'd ignore the GPS until we'd gotten
to Exit 15E and then follow it on in.
After exiting at the appropriate spot the GPS said take a left, take a left
and get back on the Turnpike in the opposite direction. I knew that was wrong and if we just headed
east the GPS would recalculate and find the way. It fought with us for the next half hour and
I finally surrendered and followed the directions from the GPS. After all, it knew "a way" to get
us there. Followed the instructions
until it said we were within a block or so of our destination. I knew that couldn't be the case, because the
LSP we were looking for was on the Hudson River Estuary and the GPS had us in
the middle of Jersey City. Asked Doris
to reprogram the GPS using Statue of Liberty rather than Liberty State
Park. It gave three options. Two in NYC and one said New Jersey
access. Asked Doris to use the Jersey access
option and we were finally in route to the right spot. Of course, instead of being a half hour
early, we were now 45 minutes late. Lorri
and Mark were very gracious about our tardiness and had waited past one boat
out to Ellis Island and the Statue. It
is nice to have understanding friends.
To find out about today's image and why they don't lineup exactly, hit
the "Read More".
What a beautiful weekend the past couple of days have
been. A slight chill in the air (it's
about time), semi clear skies and a photowalk with a couple of friends down to
Liberty State Park in New Jersey. We had
dinner with a couple friends last Tuesday and they mentioned they were going to
Liberty SP on Saturday. They asked if
we'd be interested in joining them. We
had our usual zero on the calendar and thought it would be a fun day to do some
shooting. Lorri Freedman is the shooter
of the pair and she has a great eye for images and does a great job doing some
Photoshop magic with the images she shoots.
Check out her SmugMug portfolio.
I'm sure you'll agree. Well, we
left the house at 9:00 AM for what Google Maps said would a ninety minute
drive. We were supposed to meet at
11:30, so we'd left ourselves plenty of time.
Grabbed some coffee to go at the local Dunkin Donuts and set off. Would you believe the GPS knows of a second
Liberty State Park about twelve miles from the one that was our intended
target? In checking Google Maps I knew
we wanted exit 15E on the New Jersey Turnpike.
Google had given one option of taking, basically, city streets once we'd
crossed over into NJ on the George Washington Bridge. I figured I'd ignore the GPS until we'd gotten
to Exit 15E and then follow it on in.
After exiting at the appropriate spot the GPS said take a left, take a left
and get back on the Turnpike in the opposite direction. I knew that was wrong and if we just headed
east the GPS would recalculate and find the way. It fought with us for the next half hour and
I finally surrendered and followed the directions from the GPS. After all, it knew "a way" to get
us there. Followed the instructions
until it said we were within a block or so of our destination. I knew that couldn't be the case, because the
LSP we were looking for was on the Hudson River Estuary and the GPS had us in
the middle of Jersey City. Asked Doris
to reprogram the GPS using Statue of Liberty rather than Liberty State
Park. It gave three options. Two in NYC and one said New Jersey
access. Asked Doris to use the Jersey access
option and we were finally in route to the right spot. Of course, instead of being a half hour
early, we were now 45 minutes late. Lorri
and Mark were very gracious about our tardiness and had waited past one boat
out to Ellis Island and the Statue. It
is nice to have understanding friends.
To find out about today's image and why they don't lineup exactly, hit
the "Read More".
Read more!
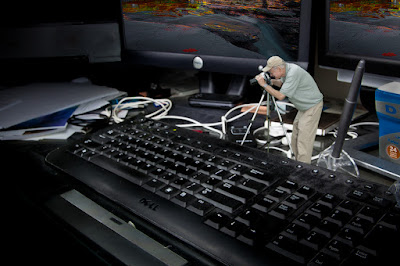 Today's image looks like one shot. Okay, maybe two. After all, I really don't know anyone that
small, or anyone who has a desk that big.
One or the other. Today we have
an example of what happens when you have too much time on your hands. As I said in the last post, the year is
winding down and jobs are getting a little scarce. Happens every year. People are busy with holidays, budgets have
been spent, the marketing folks are more interested in cleaning things up before
the end of the year rather than starting new projects and on and on. Big thing on the calendar for today is paying
the bills. They don't do any winding
down just because it's the last month of a year. The tripod was sitting next to the desk
yesterday. The camera on the floor by
the back wall. Okay, let's stop right
there. You may be wondering why the camera
is on the floor. It's a psychological thing. I've had this theory since I'd been in my
early twenties. "Always put cameras
and drunks on the floor. It's the only
way you can be assured they won't fall off something." I've had personal experience with both and
it's stood me in good stead. Alright,
back to today's discussion. The other
thing I was doing was trying to resurrect a backup computer who's harddrive has
bitten the dust (literarily I think). At
first I thought it might be interesting to take a couple shots of the inside of
the computer through the grill on the back.
Sort of interesting, but nothing special. I looked at my desk and thought it was
interestingly messy. The lighting is the
key to today's image. To find out about
it and the post processing, hit the "Read More".
Today's image looks like one shot. Okay, maybe two. After all, I really don't know anyone that
small, or anyone who has a desk that big.
One or the other. Today we have
an example of what happens when you have too much time on your hands. As I said in the last post, the year is
winding down and jobs are getting a little scarce. Happens every year. People are busy with holidays, budgets have
been spent, the marketing folks are more interested in cleaning things up before
the end of the year rather than starting new projects and on and on. Big thing on the calendar for today is paying
the bills. They don't do any winding
down just because it's the last month of a year. The tripod was sitting next to the desk
yesterday. The camera on the floor by
the back wall. Okay, let's stop right
there. You may be wondering why the camera
is on the floor. It's a psychological thing. I've had this theory since I'd been in my
early twenties. "Always put cameras
and drunks on the floor. It's the only
way you can be assured they won't fall off something." I've had personal experience with both and
it's stood me in good stead. Alright,
back to today's discussion. The other
thing I was doing was trying to resurrect a backup computer who's harddrive has
bitten the dust (literarily I think). At
first I thought it might be interesting to take a couple shots of the inside of
the computer through the grill on the back.
Sort of interesting, but nothing special. I looked at my desk and thought it was
interestingly messy. The lighting is the
key to today's image. To find out about
it and the post processing, hit the "Read More".
Read more!

 Today's image, obviously, is a series a images taken using
continuous high speed shutter. Before we
get into it I'll talk a little bit about Nikon's (or any manufacturer's)
continuous mode of shooting. It kind of
cracks me up when some friends say with certainty that their camera can shoot
at six, seven or nine frames per second.
In the case of today's image(s) that's most likely the case. But, if you're in low light and your shutter
speed is one second, you can shoot at a maximum of --- one frame per second. If you're shooting a seven shot bracket, and
your "normal" shutter speed is 1/100 of a second, you'd have 1/12 of
a second as your longest shutter speed.
Add up 1/12th +1/25th +1/50th +1/100th + 1/200, +1/400, and 1/800th and
you'll find you've used up just about that whole second. Start at 1/50th and that one second is long
gone before you get that six frames per second over. A friend of mine who has a D3 (not a D3X)
found that out the hard way when he heard my D300 start to labor during a seven
shot bracket. He wanted to show me how
fast his D3 was. I told him to use the
same Aperture I had, in Aperture Priority Mode.
His camera went click, click. click, click, click,
click, click, same as mine
had. There are some rules of physics
that you can't break no matter how good your camera is. But, back at today's image, it's a burst of
exposures in high speed continuous mode with plenty of sunlight. It was clicking away as fast as the mechanism
would go. Seeing as the Nikon D300 can
run at six frames per second, today's image should be about a one second
interval. Putting the sequence together
in Adobe Photoshop CS5 is easier than you might suspect. To learn how it was done, hit the "Read
More".
Today's image, obviously, is a series a images taken using
continuous high speed shutter. Before we
get into it I'll talk a little bit about Nikon's (or any manufacturer's)
continuous mode of shooting. It kind of
cracks me up when some friends say with certainty that their camera can shoot
at six, seven or nine frames per second.
In the case of today's image(s) that's most likely the case. But, if you're in low light and your shutter
speed is one second, you can shoot at a maximum of --- one frame per second. If you're shooting a seven shot bracket, and
your "normal" shutter speed is 1/100 of a second, you'd have 1/12 of
a second as your longest shutter speed.
Add up 1/12th +1/25th +1/50th +1/100th + 1/200, +1/400, and 1/800th and
you'll find you've used up just about that whole second. Start at 1/50th and that one second is long
gone before you get that six frames per second over. A friend of mine who has a D3 (not a D3X)
found that out the hard way when he heard my D300 start to labor during a seven
shot bracket. He wanted to show me how
fast his D3 was. I told him to use the
same Aperture I had, in Aperture Priority Mode.
His camera went click, click. click, click, click,
click, click, same as mine
had. There are some rules of physics
that you can't break no matter how good your camera is. But, back at today's image, it's a burst of
exposures in high speed continuous mode with plenty of sunlight. It was clicking away as fast as the mechanism
would go. Seeing as the Nikon D300 can
run at six frames per second, today's image should be about a one second
interval. Putting the sequence together
in Adobe Photoshop CS5 is easier than you might suspect. To learn how it was done, hit the "Read
More".


