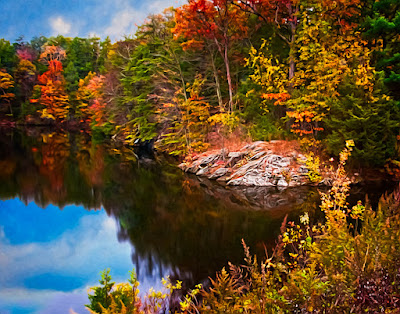
 Today's image reminds me "a little bit of" of Lou Bega's song Mambo No. 5. In it he sings about a composite woman he'd
like to have. He's looking for "a
little bit of ... " many different woman.
Check it out, it's a cute song from a couple years ago. Today's image has "a little bit of"
the Sharpening Tool (no keyboard shortcut), "a little bit of" the
Blur Tool (same tool set), "a little bit of" selective vignetting, "a
little bit of" Adobe's Pixel Bender and "a little bit of"
Content Aware Fill. I say "a little
bit of" for each one because none are applied to the entire image. The result is a cohesive image that appears
to have been treated as a whole. In
addition, it has a sky dropped in with its resultant reflection in the
water. I'd be willing to bet that my
buddy Lorri will look at it and think (at first) it was a one button filter
application. It's nothing if it's not
really far from the case. There's about
a half dozen nested Smart Objects, a dozen independent Layers, at least four
trip back and forth from Adobe Photoshop CS5 and Adobe Photoshop Lightroom
3. Everything serves a function. I don't believe there are any gratuitous operations. We'll take a walk through the image and show
where each alteration was done. To follow
along, hit the "Read More".
As is typical, today's image started out in LR3. One of the primary functions of Lightroom is
DAM (Digital Asset Management). While
importing your images from the camera LR3 makes life easy. It writes each image to the primary database
and backs it up to a secondary storage drive.
You can keyword images on import and apply any global processing you
might desire. A great time savings. The first step in processing the image is
heading to the Develop Module in LR3.
General tweaks are the first order of business. Cleaning up any sensor dust, setting the base
exposure, white balance, contrast, and other adjustments you probably make to
every image.
A more dramatic sky from the same shoot was opened and
tweaked in the same manner (not the same tweaks) as the base image.
The next step was a trip to CS5. Both images were brought in and stacked as
Layers. The Blend Mode was changed to Darker
Color. In today's case that resulted in
about a 90% success. The clouds showed
through the rock outcropping on the short.
A simple Layer Mask and a little black paint with the Brush Tool (B)
make short work of correcting that excess coloring.
Then a side trip to Adobe's Pixel Bender (available from
Adobe Labs) and the Oil Paint filter applied.
A little adjusting of the sliders and it was back to CS5. A Smart Filter was made of the Layers and the
image brought back into LR3 (File/Save).
This resulted in a XYZ 1234.NEF-Edit.PSD file. Some noise was pulled out in LR3 using the Detail
Panel. Then it was back to CS5.
Once in CS5 three additional copies were made (CTRL J three
times). The top two copies were turned
off (click on the eyeball icon). Copy
one was used for Sharpening using the High Pass Filter (Filter/Other/High Pass)
technique. The Blend Mode was changed to
Overlay. To see the sharpening, click
the eyeball on and off. Copy two was
brought back up (click of the copy 2 Layer eyeball). The Rectangular Marquee Tool (M) was used to
make a selection around the rock outcropping.
A 250 pixel feather (Select/Modify/Feather) was applied and a Layer Mask
used to isolate the area. The Layer Mask
was then inverted (CTRL I[eye]). The
Blend Mode of that Layer was changed to Multiply and the Opacity brought down
to approximately 50%.
On copy three, a larger selection was made with the
Rectangular Marquee Tool (M) covering everything but about a 10 % ring around
the outside. Same thing. A Layer Mask was applied, inverted and the
Blend Mode changed again to Overlay. The
Opacity of this Layer was brought down to about 60-70%.
In the case of the two copy
Layers the Blur Tool (no keyboard shortcut available) was used to soften the
sky. On the original copy in this Smart
Object the Sharpen Tool (nested with the Blur Tool and the Smudge Tool) was
used to bring out the rock outcropping.
In both cases the tools were applied to a new, clean, blank Layer
located just above the Layer being worked on.


0 comments:
Post a Comment