Friday, July 29, 2011

Simple Compositing With Adobe Photoshop CS5

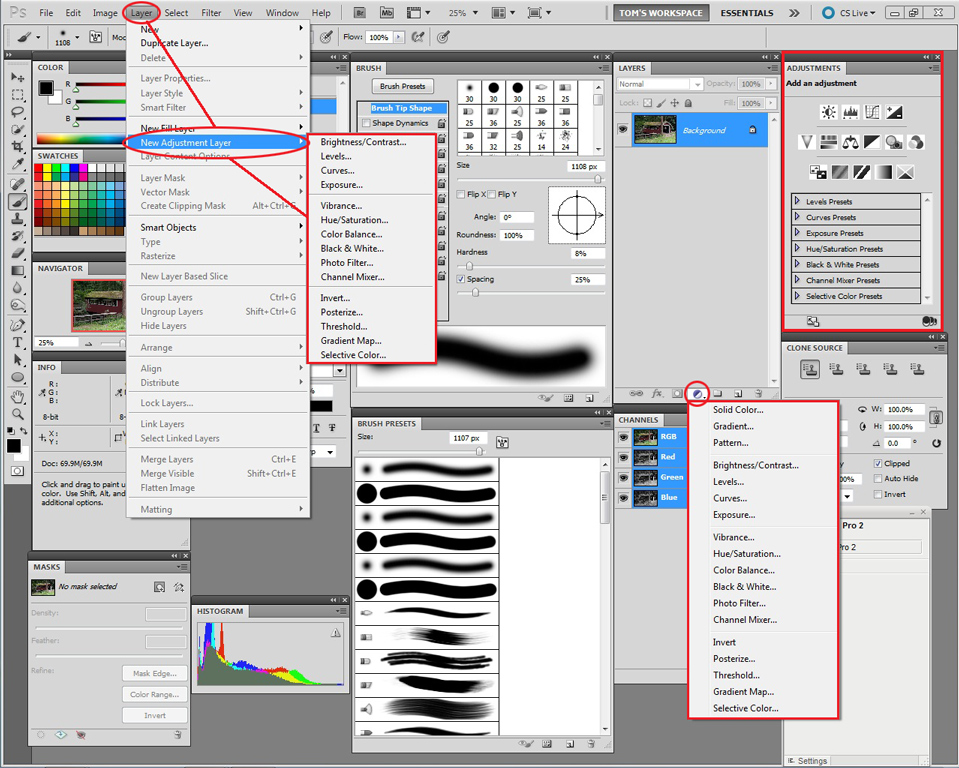
What's the first thing that comes to mind when you look at today's image?  Probably, "nice snapshot".  A man sitting on a bench, reading a book.  The thing is, the actual bench the guy was sitting on was about 25 miles and 9 months away from the bench you see here today.  After I took the shot of the bench in the park, I couldn't help but think that it needed some human interest.  The bench, the tree, the park scene was nice, but "if only".  A couple of young lovers, a hiker taking a break, someone lying on the bench trying to get in a nap in the park, something, almost anything to make the shot have a little life.  I remembered a shot from last fall, a nice shot of a guy sitting on a very similar bench, but the shot had a distracting background.  Cars, walkers, wires, half of the guys dog, about anything you can think of that would mess up a reasonable shot of a man relaxing in the late summer sunlight.   Benches like the one on the town green in Litchfield or in the State Park in Southford looked to be pretty similar.  I dug through the shots from the fall shoot and spotted the shot I was thinking of.  How the man traveled the 25 miles and 9 months will be revealed by hitting the "read more".

Read more!

Wednesday, July 27, 2011

Wednesday Photoshop Q&A - The Number One Burning Question

Since June 1st the same keyword search (verbatim) has brought someone (or some people) to the blog 71 times.  That's more than once a day, including weekends.  What is this burning question?

What are two ways to create image adjustment layers in CS5?

You'd think, after visiting the blog that many times, my guest would have the answer.  Don't get me wrong, I love having people come to the blog through a Google search.  So, today's post will be devoted to getting this question answered.  I read through all the sources of entry to the blog each day.  It's great to know that people have taken to considering "The Kayview Gallery" a resource.  There have been more than 300 posts on the blog, covering a large variety of photography and Photoshop related subjects.  Over 60% of the posts have had something to do with techniques in Photoshop.  If I were to look back on some of the postings from 2009 I do believe I'd laugh.  I'd probably say "boy, that's a dumb why to do that (whatever "that" may have been)".  The reason would be that Photoshop has evolved and, I hope, so have I.  A year and a half ago I was saying that the CASE technique (Ctrl/ALT/Shift/E) of making a composite Layer on top of what was already done was the "hot" way to go.  I haven't used that method in more than a year.  The way "the cool kids" are doing that type of thing today is using Smart Objects.  It's a much more flexible way to work.  I've written about it several times lately.  (In fact, the past two Wednesday Q&A posts have been about Smart Objects.

Let's answer today's question.  In fact, we'll discuss three methods of producing an Adjustment Layer.  Follow me by hitting the "read more".

Read more!

Monday, July 25, 2011

Bringing Out Detail with Adobe Photoshop Lightroom 3

Summertime and the living might be easy, but photography is as challenging as ever.  You'll really have to click on today's image to see a larger version to be able to see the detail in the forest at the back of the scene.  There is a lot of detail and it took a little work to bring it out.  The sunlit tree in the middle ground showed detail from the start, but the shadow area looked almost blank.  Just sort of a blue haze covered area that left a hole that was pretty unattractive.  After processing, the area is rich with subtle detail.  The day (yesterday) was somewhat overcast with threats of rain.  In fact, a fine rain started just as we were leaving.  There's a little bit of everything in today's image.  To find out what steps were taken to "develop" the image, hit the "read more".

Read more!

Wednesday, July 20, 2011

Wednesday Photoshop Q&A Smart Objects - Part 2 - Nesting

It's pretty obvious, if you look at the second image in the stack, that a "Mistake" has been made.  Take a look at the screen captures of different stages of creation of today's image.  In the first panel a simple pano was made out of three original images.  To illustrate the point a deliberate "mistake" was made right after the pano was made.  Obviously, the word mistake wouldn't appear in a typical image, but it could be a small piece of rubbish, a double or smeared person walking by, or any number of other things that would detract for the overall image.  In this case, the mistake goes unnoticed until the very end of the processing.  The image is complete, with adjustments made, the image sharpened and the final vignette applied.  Then the mistake was noticed.  Through the magic of Smart Objects, all the work done to the image is not lost.  No Layers had to be recreated, no Hue/Saturation Adjustment Layers had to be discarded.  Double clicking on the base Smart Object opens the Smart Object beneath, which opens the underlying Smart Object, which, eventually, takes us back to the original components making up the pano.  We can stop anywhere along the process and make changes.  The "secret" to nested Smart Layers is Save and Close, Save and Close, Save and Close your way back up to the top level.  If you started out in Adobe Photoshop Lightroom 3 you can hit Save once more and it will produce a PSD file next to the original set of images.  It'll be named XYZ123.edit.psd.  You'll be able to reopen it at any time and make any modifications needed at any point in the processing.  My thoughts can be found by hitting the "read more".


Read more!

Tuesday, July 19, 2011

Rear Curtain Sync In Photoshop CS5

You can probably see that today's image was shot on a bright sunny day.  It's a little tough to get a flash shot using Auto FP High Speed Sync on a bright day without having a bank of flashes.   Joe McNally did a great video of a shoot he did in Dubai a couple years ago and if you count the number of speedlites you'll see it takes a lot of power to overpower the sun.  Same holds true for today's image.  To get the motion lines, in camera, you'd need to set the camera to rear curtain sync and be able to effect the exposure with the flash rather than the sun.  It's just easier to do it in post production if you don't have access to a dozen or so speedlites.   One of the big problems with using Motion Blur in Adobe Photoshop CS5 is getting lines in front of the subject as well as behind the subject.  It's not a big trick to get rid of the lines before the subject, but it is a trick.  To find out what the trick is, hit the "read more".
Read more!

Wednesday, July 13, 2011

Wednesday Photoshop Q&A - Smart Objects - Part 1

People come to the blog in several ways.  Some come direct.  Some by referral from other sites.  Some through tweets or Facebook recommendations, but a lot are coming from Google searches.  The Google searches tend to be lumped into general questions.  The wording might be different, but a half dozen may be looking for information about how to use Calculations to make Masks in Adobe Photoshop CS5.  More have been asking about Smart Objects lately.  For the foreseeable future (nothing's permanent) I'm going to try to make Wednesday's a Q&A day based on the Google searches I see coming through.  So, let's get started.

  1. More than 10% of the inquiries are about Smart Objects.  What are they, how to use them, can they be nested and the like.

Smart Objects were introduced in Adobe Photoshop CS4.  It sort of languished there with few people knowing about them or using them.  In CS5, Adobe changed one of the ways to access them by putting an option in the Filters dropdown with the title of "Convert For Smart Filters".  To use Smart Filters you first have to make the Layer a Smart Object.  The indicator for a Layer being a Smart Object is the clipped lower right corner of the Layer's icon in the Layers Panel.  To follow this discussion, hit the "read more".

Read more!

Monday, July 11, 2011

Finishing An Image In Adobe Photoshop Lightroom 3

It might sound like blasphemy coming from me, but sometimes an image just doesn't have to make the trip from Adobe Photoshop Lightroom 3 to Adobe Photoshop CS5 and back.  This from the guy who never met an image he didn't want to mess with.  Not that today's image wasn't tweaked a bit, but nothing needed to be done that couldn't be done in LR3.  A friend heard about a couple things that sounded like good candidates for getting some interesting shots and spread the word to our cabal of friends.  He just said "I'll be at this location on Sunday.  If anyone wants to join me, see you there".  That's all it took and it wound up with a half dozen friends shooting some motocross races.  One of the big reasons for running out to do some shooting (other than for the joy) was that the better half just got a brand new lens.  She's slowly building her gear up, had ordered a Nikon 70-300 lens and wanted to try it out.  Most of her shots are typically big shots.  Landscapes, bushes of flowers and general images.  With the 70-300 I explained that she wanted to isolate smaller pieces of things.  Saturday we ran out to Weir Farm Historic Site to experiment.  After a couple wider shots, she got the hang of focusing in on a small cluster of flowers against some distant trees as an example.  I have to tell you, I was very impressed with the images that came out of the Nikon 70-300 VR lens.  I've had a 70-300 since before VR (Vibration Reduction) was ever introduced and was mildly satisfied with the lens.  When I saw the results out of the 70-300 VR I was blown away.  Today's image (it's one of mine) was taken at 1/640 sec at F8.  Just fast enough to freeze the rider, but give a hint of wheel spin on the front wheel.  Wifey's similar shot (1/640 second at F5.6) shows the  same wheel spin, but the lines and folds of cloth on the rider's driving suit are really crisp.  Okay, to find out how today's image was finished, hit the "read more".
Read more!

Wednesday, July 6, 2011

Are You Smarter Than Your Camera?

What would your camera say about today's image?  Today's cameras are pretty remarkable pieces of equipment.  Another name for a camera might be a single purpose computer.  It does fit the definition of a computer by having a processor and memory, memory, memory.  Those are the two components that actually make up a computer.  If you tie hydraulics, actuators, grippers and a motor  to it you have a robot.  If you connect a sensor, a couple thermocouples, and a valve to it you'd have a water cooler.  If you put the computer in a light tight box, along with a different type of sensor and some glass you have a camera.  Even with the power of the computers in today's cameras it's still up to the photographer to decide what he/she is going for.  Even with all the computerization I had to go to Manual Mode to get today's image.  Don't worry about the flag.  That was put in during post production.  Just take a look at the man in the hat.  You can see the range of exposure between the bright sun on his shoulder, the neckerchief and the top of his hat compared to his face.  I just saw a video by a photographer who was advocating shooting with the subject between you and the sun.  Sort of like today's image.  I've forgotten who the fellow is, or I'd be happy to give him credit and put in a link.  The big discussion he was having was that he "had to" shoot in Manual Mode.  To get my take on it and see how today's image was shot, hit the "read more"

Read more!

Monday, July 4, 2011

Quick Post For The Holiday

It's the 4th of July and American's celebrate the birth of our country.  As with any entity, it has flaws.  Unlike any other country in the world we have the freedom to address those flaws unconditionally.  It's what makes America great.  This blog has a fairly substantial international following.  I hope the pride you have in your country is as great as ours is in the United States.

My hope is that, before too many 4th of Julys go by, we are a world at peace.  I hope everyone has a good day, holiday or not.  Thanks for reading.
Read more!

Friday, July 1, 2011

One Hundred Years Ago In Photoshop

Okay, Adobe Photoshop has only been around for twenty years and the CS5 version for somewhere a year.  I noticed that Nik Software has Silver Effects Pro 2 on sale for $99.00 through July 5th.  They have several offers that expire between July 5th and 15th.  Check them out here.  In the past I've talked about my aversion to using plug-ins, preferring to figure out how to do the equivalent technique in CS5 itself.  The thought is that teaching yourself how to do something in Photoshop gets you to understand how CS5 works.  There's is nothing that a plug-in can do that can't be done directly in Photoshop.  Nik Software, OnOne Software , and several other plug-in suppliers are top notch companies that were started by very clever Photoshop users who found a better way to do something.  What a plug-in does is automate the set of steps that will get you to a specific look on your image.  There's absolutely nothing wrong with that.  They tend to take the pain out of getting to "that look".  The big name plug-in companies put an easy to use GUI on their set of plug-ins to allow the user to have a good experience.  They are to be commended for making their products useable by the masses.  I downloaded Nik Software's fourteen day trial of Silver Effects Pro 2 the other day.  Today's image comes from playing with it.  To get my impressions about it, hit the "read more".
Read more!