
 Since June 1st the same keyword search (verbatim) has brought someone (or some people) to the blog 71 times. That's more than once a day, including weekends. What is this burning question?
What are two ways to create image adjustment layers in CS5?
You'd think, after visiting the blog that many times, my guest would have the answer. Don't get me wrong, I love having people come to the blog through a Google search. So, today's post will be devoted to getting this question answered. I read through all the sources of entry to the blog each day. It's great to know that people have taken to considering "The Kayview Gallery" a resource. There have been more than 300 posts on the blog, covering a large variety of photography and Photoshop related subjects. Over 60% of the posts have had something to do with techniques in Photoshop. If I were to look back on some of the postings from 2009 I do believe I'd laugh. I'd probably say "boy, that's a dumb why to do that (whatever "that" may have been)". The reason would be that Photoshop has evolved and, I hope, so have I. A year and a half ago I was saying that the CASE technique (Ctrl/ALT/Shift/E) of making a composite Layer on top of what was already done was the "hot" way to go. I haven't used that method in more than a year. The way "the cool kids" are doing that type of thing today is using Smart Objects. It's a much more flexible way to work. I've written about it several times lately. (In fact, the past two Wednesday Q&A posts have been about Smart Objects.
Let's answer today's question. In fact, we'll discuss three methods of producing an Adjustment Layer. Follow me by hitting the "read more".
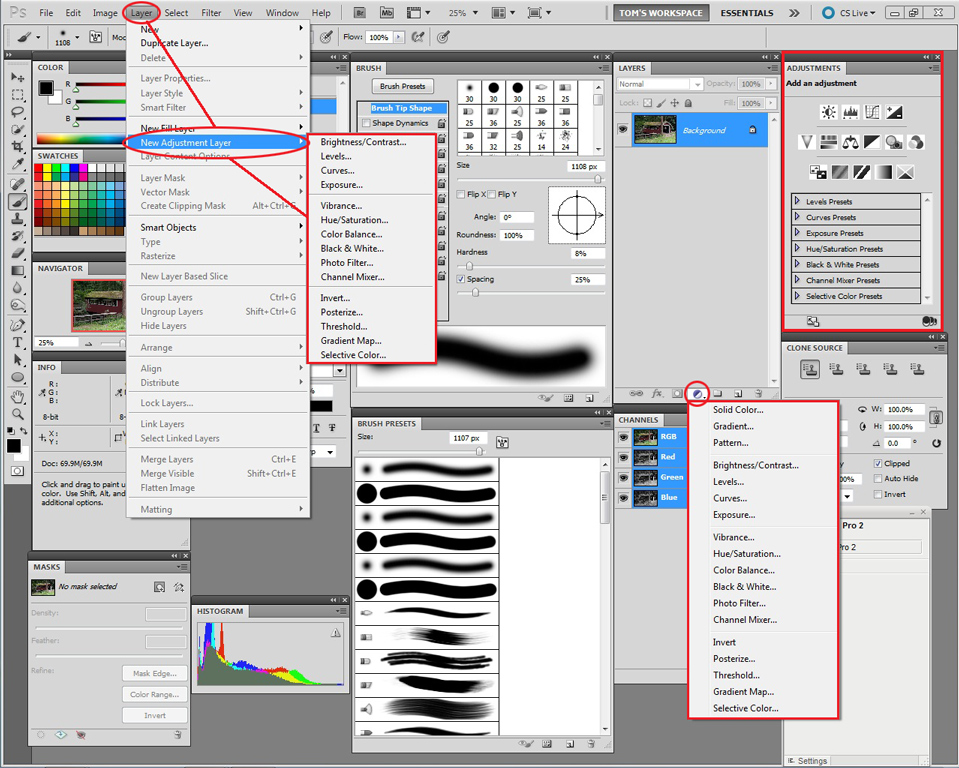
You might want to click on today's image to see a larger view of my "tools screen". I use a dual monitor setup, so I lay out the Panels I use frequently on one monitor and have the full screen to view the image I'm working on. The only thing I did today was Open a Raw file I looked at the other day (File/Open Recent) I clicked on the two methods of getting to Adjustment Layers and did a screen capture of each one. In Photoshop (wow, whoda thought) I Layered the two shots and used a Layer Mask to show both methods at once. Typically you'd get one dropdown or the other, not both, on screen at once.
The first method, the non-shortcut method, to put an Adjustment Layer into the Layers Panel is to go to Layer/New Adjustment Layer. You'll get a dropdown menu of some, but not all, of the available Adjustment Layers. This is shown on the left of today's image, outlined in red. If you're not good with shortcuts this would probably be the methods to use. You can find it, but it is a multiple steps process.
The second method is to look at the bottom of the Layers Panel (the top if you're using Adobe Photoshop Elements) and find the icon that has been described as "the black and white cookie". If you don't happen to be from the New York tri-state area you might want to follow this link to find out what a Black and White Cookie is. Clicking on the cookie produces a dropdown menu with all the options found in the Layer/New Adjustment Layer method plus three addition choices.
The newest method to get to Adjustment layers is through the Adjustments Panel. If you don't have it available in your setup, it can be activated by going to Window/Adjustments. This view gives each possible type of Adjustment Layer as an icon. Hover your cursor over any of the icons if you are unsure of which icon is what type of Adjustment. In this method there is also a number of presets available. You might be able to find just what you're looking for by using a preset.
There you have it. Three ways to get to Adjustment Layers. But!!! That's not the only you to be aware of about Adjustment Layers. Anything you do on an Adjustment Layer shows across the entire image, unless you clip it to the Layer below. You also, automatically, get a Mask with each Adjustment Layer. You can create zones having only the adjustment. I use this a lot when saturating colors using individual (Red, Yellow, Green, Cyan, Blue, and Magenta) Hue/Saturation Adjustment Layers. Certain areas of some images can take more saturation than other areas. Using the Mask to isolate those areas is an effective method of image control. But that's another story.


0 comments:
Post a Comment