 |
| Click on the image to enlarge. |
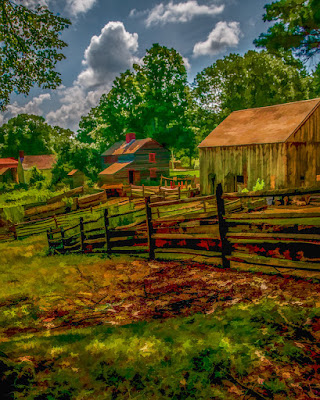
The first thing was to use Adobe Photoshop Lightroom (LR) to make a three shot HDR rendition of the scene. LRCC's newly added Merge to HDR feature works pretty good if you're looking for a realistic HDR image. I haven't tried it on the wild side of things yet, so I can't give an opinion on that.
I toned the resulting HDR image in LR. Did a little cropping to shape it up a little. Brought down the Highlights, brought up the Shadows and found the White and Black points. I didn't mess with the Clarity at that point.
Step two was bring the image over into Topaz Labs' Simplify 3 plugin. Used the Oil Painting preset as a start point and brought almost all the sliders down to make the effect reasonably simple. Once I was satisfied with the look it was back to LR.
Since the plugin had made a copy of the starting image I could flip back and forth to see what I had and what I got. I didn't like the sky in either case, so a short excursion over to PS was in order. Before going I found a version of the image where I did like the sky. With both the HDR/Simplified image and the natural image selection selected I brought them both into PS as Layers. (Photo/Edit In/Open As Layers in Photoshop)
In PS I picked only the natural Layer (turned off the Visibility of the other Layer). I added a (temporary) Levels Adjustment Layer and cranked up the Whites and down the Blacks. That gave me a high contrast version of the natural image. I then went to Calculations (Image/Calculations) and changed the Blend Mode to Hard Mix. That knocked out 95% of the sky and made the remaining portion of the image black. After Saving it as a new Channel I painted anything related to what was on the ground Black and the one remaining piece of cloud White. Both with the Brush Blend Mode (not the Layer Blend Mode) in a Normal Mode. After that I changed the Brush Blend Mode to Overlay and did a quick sweep (once with White, once with Black) to sharpen up the edges.
I switched the Channel back to RGB and went back to the Layers Panel. I turned the Visibility of the altered Layer back on and loaded the new Alpha Channel (Select/Load Selection/Alpha 1). With the Selection active a New Layer Mask was applied. As it happened, that gave me a natural scene with an altered sky. Yuck! CTRL I (eye) flipped the Mask and I had what I was looking for.
The image was returned to LR (File/Save, File Close [not Save As]) and any finishing touches added.
That's it. Like I said, it took longer to explain it than to do it. Have a good day.


0 comments:
Post a Comment