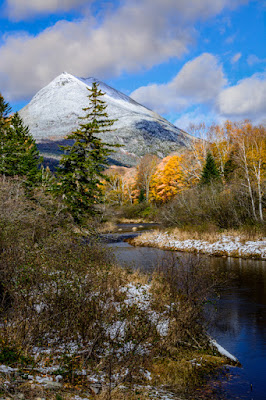
Where have we been lately? There's been no posts in almost a month (give or take). Well, for most of that time I've just been lazy, but for ten days we were running around the great state of Maine. It helps to have friends. Doris has reconnected with someone we went to high school (a long time ago) with. She just happens to have a house in Maine, on the ocean, with a direct view of Cadillac Mountain in Acadia National Park. For the second year she's just tossed us the key to the front door and said "go have fun". We did. We spent seven days at her beautiful place. (Thanks J.) We've been going to Maine every October for at least the past ten years and before that we'd go at other times of the year. There's been two "bucket list" targets in Maine for a while now. One was shooting West Quoddy Head Lighthouse and the other checking out (and shooting) Baxter State Park. Got to do both this year and I'm guessing you can tell today's image is not from the lighthouse. To see how the colors were drawn out of today's image, hit the "Read More".
As usual, 90% of the development of today's image was done in Adobe Photoshop Lightroom (LR). It just needed a touch more "sparkle" (??). I would say I could have taken it the rest of the way in LR, but saw a video on Youtube about using Adobe Photoshop (PS) Luminosity Blend Mode to have almost infinite control over the colors in an image.
The big three Blend Modes in PS are Multiply, Screen and Soft Light. But, there's about a dozen Blend Modes available and, for the most part, go unused. Whenever I see a new (to me) use for one of the more esoteric Blend Modes I have to try it out just to see how it works and put it in my quiver of arrows to be able to pull it out when needed.
I "always" open images out of LR into PS as Smart Objects. Unless I need to open a set of images for panos or HDRs or as Layers (that's why the "always" was in quotes.) Once in PS as a Smart Object I made a copy of the Smart Object (not a duplicate, a copy) (Layer/Smart Objects/New Smart Object Via Copy). I then applied a Black & White Adjustment Layer (Layer/New Adjustment Layer/Black &White). That Adjustment Layer was then clipped to the Smart Object Copy. (Hold down the Alt Key and click between the Layer and the Adjustment Layer to "clip" the Adj Layer to the Layer below.) By "clipping" the Adj Layer to the Layer below, any changes made in the Adj Layer will only effect the information in the Layer it's "clipped" to.
Then I changed the Blend Mode to Luminosity. (The Blend Mode dropdown is located in the Layers Panel just above the word Lock.) The dialog box for the B&W Adj Layer has access to all the usual suspects as far as color goes. (Red, Orange, Yellow, Green, Aqua, Blue, Purple, and Magenta.) Moving the sliders for each color changes the strength of whatever's in the image with that color. i.e. Green leaves, trees, grass, bushes, etc. are made up of both Yellow and Green, so both sliders affect any of those objects. Most red "things" have a little Orange to them, so playing with those two sliders control (along with a little Yellow) the warm tones. In an image like today's the Purple and Magenta play (again) "almost" no role. A very slight increase in the vibrancy of the stream in the lower right corner was the only visible evidence of anything going on.
So, just another method of controlling the colors of your images. Is it for every image? No, but it's another tool.
Excitement in the Skies! Solar Eclipse, 2024!
3 weeks ago


0 comments:
Post a Comment