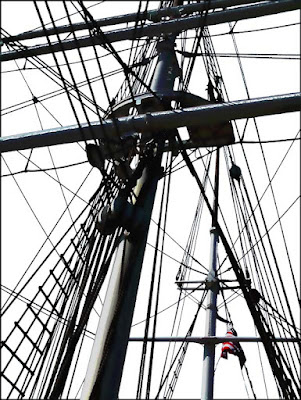
 Over the past month or so we've had three or four posts about replacing bald skies. A straight replacement, a replacement when a mask was needed to clean up some stray highlights and using a replacement to tone down highlights in areas other than the sky. Typically, bald skies are the kiss of death for an image, but in today's image the bald sky is an major element, it's the thing the sets off the shot. If the drab, gray sky had been left in the image would have been a muddy mess. With the stark contrast between the lines, mast and spars and the completely blank sky we end up with a powerful image. The spot color of the red stripes of the flag, positioned just below the intersection of thirds in the lower right corner draws the viewer's eye to the important "statement" of the image. The message of the shot becomes very clear. We realize the primary element of the image is a "tall ship". A symbol of the might of the nation when it was young. We call attention to the country the ship belongs to by the spot color in the flag. To find out about how this image was created, hit the "read more".
One of the uses of the Threshold Adjustment Layer is to isolate the tones in an image. I use it to find the black, white and middle gray points of most of the images you find on the blog. On the Threshold Adjustment Layer, pulling the cursor all the way to the left and "walking" it back up (highlighting the numeric value of zero and using the up arrow key)assists in finding the earliest instance of an "important" black. All the way right and counting down allows us to find the first instance of an "important" white. Producing a new layer, under the Threshold Adjustment Layer (CTRL "New Layer" Icon), filling it with 50% grey (Shift F5 and select 50% gray) and changing the Blend Mode to Difference gives us a middle gray at the far left end of the Threshold graph. Use the Color Sample Tool (Shift I until you get the eye dropper with the target) to set the black, white and middle gray points. That would be how you would neutralize any color cast in a typical image.
You might think this would be the way to produce today's image. Unfortunately, it's not. Because the Threshold Adjustment picks only black and white we wouldn't get the gray scale you see in the mast. Instead, a Layers Adjustment Layer was employed to reduce everything to black, white and a bit of gray. Playing with the sliders until we were almost there. Then the same "trick" we've been discussing about switching skies was used. With a white Background Layer, the Blend Mode was changed to Darker Color and everything cleaned up very well.
To get the red in the flag, another layer was added and the, now black, stripes painted red. A high level of zoom was used to focus on the flag and a very small paint brush used to cover the stripes.
Sometimes you have to use your knowledge of Adjustment Layers and pick up that might not be your first thought. It's like Bert Monroy likes to say, "just play, it's the best way to learn".


0 comments:
Post a Comment