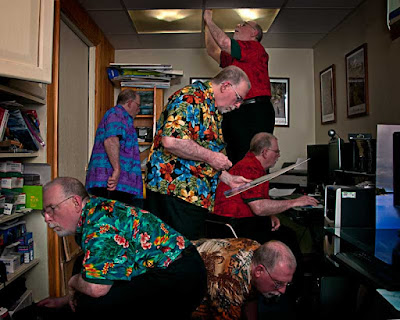
 Some days you just feel like goofing around. Today was one of those days. It’s raining and sort of dull outside, so I dragged out a tripod, speedlite and an idea I stole for a buddy of mine. Ernie did a masterful job of shooting a multiple shot sequence in his painting studio. It’s a wide shot, covering about thirty feet or so. He had the luxury of a wide area, so his shot has space between each of his personas. I don’t have the same luxury in the offices, so I’m overlapping myself all over the place in today’s image. The shoot itself only took a half hour, maybe a little more. I wasn’t going for commercial grade, just a goof. The most interesting shot was the one where I’m up checking something out in the lights. I almost took a header over the back of the rolling chair I was standing on. Standing on a rolling, “tippy” chair is probably not the brightest thing in the world to do. The ladder was at the far end of the studio, about 75’ away and adding a ladder to the space in the room would have been a wee bit rough. I figured, no problem, I’ve done this a hundred times. This time was the closest I’ve come to taking a tumble. I’m reminded of my aunt. She was a teacher of first or second graders and before school began one year she was on a chair, putting up decorations and wound up breaking both wrists. Think about it. Think of all the personal things you wouldn’t be able to do with two broken wrists. It’s not pretty. Ask my uncle. If you’d like to see how the “mechanics” of the image was done, hit the “read more”.
This image ends up being an exercise in Alpha Channels. Use your favorite tool to make the selection of each persona. Most of the heavy lifting was done with the Quick Selection (W) found in the tool group with the tragic Magic Wand. Fine tuning was done with the Magnetic Lasso Tool (L). Once a selection is made, right click on the selection and choose Save Selection. Give the selection a name in the dialog box that comes up, make sure the New Channel option is checked and click OK. This stores the selection as an Alpha Channel (look in your Channels Panel, you’ll see it). Repeat for each object that you want to stack. You’ll end up with a set of Alpha Channels that can be called up at any time.
Set up your background image. In this case it was the one up at the ceiling. For each successive layer, click on the Alpha Channel Mask while holding down the CTRL key. Next, click the Add Layer Mask icon in the layer panel. The mask will be populated with the Alpha Channel. Just keep repeating until all pieces are displayed in the final image.
It’s an exercise, have fun with it.


1 comments:
Very cool!!
Post a Comment