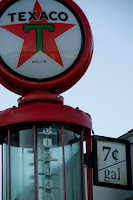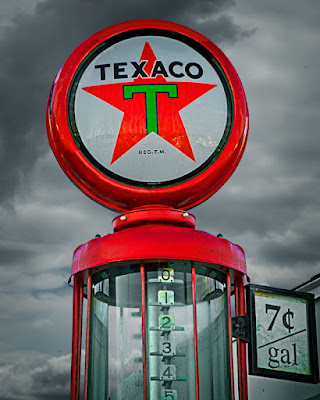

On the left you see what today's image looked like right out of the camera. On the right is the finished image. The first question that comes to mind is, if I wanted a shot of the entire pump, why didn't I step back, or crank the zoom a little wider, or change lenses, or something to make life a little easier. Well, the truth is I didn't expect to do anything with the shot. I just thought it was a cute little shot showing the price of gas a long, long time ago. Figured it would sit on the harddrive and be one of the images that was never looked at again. Then, on a whim, I was looking for a challenge one day and came across the shot of the old pump with the top and left side not there and the bald sky and said "can I rebuild the pump?" If you're interested in reading about the gyrations I went through to make the final image, hit the "Read more".
The first thing that was necessary was expanding the canvas. There are several ways to do this, including "uncropping" the image. Typically, using the crop tool in PS means you're going to take some part of the shot and make it the image. You can also go in the opposite direction. Instead of pulling the handles inward, you can pull them outward and make the canvas larger. If precision is what you're looking for you can go to Image/Canvas Size and enter either the exact size you want or how much bigger you'd like the canvas to be. Control of where the additional area is put is controlled by a grid box that can be made to point to where the space is to be added. There's no point to giving the numbers I used because it dependant on the original image size and the PPI you're working at.
.
The next step was to copy and paste, Free Transform and Warp pieces of the right side of the pump and fit them to the left side and top. This gave the shape of the pump, but scattered shadows all over the place. Using the Color Picker and painting in the proper shading with the Blend Mode set to Color made reasonably easy work of making highlight areas shadows and shadow areas highlights. Doing the same type of thing made for replacing the left hand side of the pump body. The right side was duplicated, flipped horizontally, moved and the price sign was removed by cloning.
.
So, the pump was in pretty good shape. Putting in the threatening sky was pretty easy. The sky in the pump shot was almost bald. A little blue showed in the top of the image, but that was easily painted out with white. The clouds came out of my "clouds" file. If you're outside, with your camera in your hands, and see some spectacular cloud formations, shoot them. If there's no interesting foreground, so what. The objective is to get an image element. An early post on this blog talked about shooting an evergreen branch in a white out. These are pieces you can use to "make" an image. As long as you're not trying to present the final image as reality, no problem. Painters take creative license when producing "art". There's no reason a photographer can't take "creative license" if the objective is "art". So much for a rant. Back to the matter at hand. There are several ways to place the clouds behind the pump. You can make a selection, using any of the selection tools available and use good masking techniques to insure you don't have ghosting. The easiest way I know how would be to use the Blend If sliders found in the layers effects panel. To get a nice tight edge you would probably have to split the sliders (holding down the ALT key, click and drag the left or right side of each slider to split it.)
.
The final step is to get the clouds to appear through the glass bowl of the pump. Make a selection of each portion of the glass. Only the parts you'd be able to see all the way through. The roofline and the support shafts of the pump (front and back) make it so you can't see what's behind them, they shouldn't be included in the selections. Put the selection in their own layer. CTRL J will do it. Bring the layer above the sky layer and lower it's opacity until you get a believable blend of the glass with the sky visible.
.
That's about all there is it this one. On a couple of occasions I've said it took you longer to read the explanation than it would take you to do the thing being discussed. This "ain't" one of those times. There's some work to be done to do this sort of manipulation. But, if you're up for a challenge, have a go at it. Work your way through the problems you come up against and have fun. .


0 comments:
Post a Comment