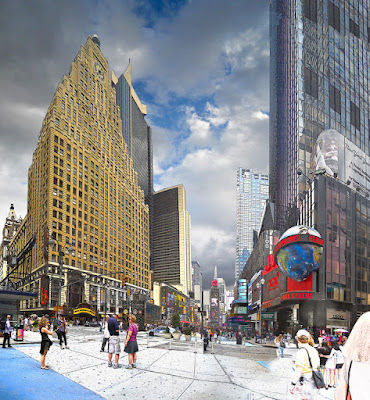
 At first glance you might think you're seeing "just another HDR image", but there's no HDR involved with today's image at all. We were wondering around the Times Square area in NYC on Saturday and I had my little 12 MP Nikon S3000 in my pocket "just in case". I thought we had gotten to and "interesting" area, so I whipped out the camera and took eight shots of the intersection. You read right, today's image is the result of eight shots. Four each in two rows. One of the really neat things about Adobe Photoshop CS5's Merge to Panorama is that it really doesn't care if you shoot a half dozen shots across a horizontal or four or five in a vertical or any combination of both. The computer will sit there and play jigsaw puzzle routines until it figures out what goes where and then assemble a coherent image. You can see the building on the left, looking like a space shuttle that just took off and is heading down range due to the wide angle used to take the shots. The buildings to the left look somewhat exaggerated and those to the right look fairly normal. To find out where the "HDRness" comes from and how we just happened to be there on such a beautiful day, hit the "read more".
What seems like an HDR effect is actually just an overlay of a Layer with a Find Edges (Filters/Stylize/Find Edges) Filter applied. After the Filter was initially made, a Levels Adjustment Layer was added and the edges were darkened to exaggerate the effect of the edges. The Blend Mode of the Filter was changed to Overlay and every sharp edge became almost cartoonish, or illustrative. One negative result was that it messed up the sky something fierce. The buildings looked cool. The people at the bottom looked like something you might see in an artist's rendering, but the sky just had to go.
Using the Quick Selection Tool (W) the sky was reasonably easy to pick out. Any misses were either brought in or moved out bay using the Shift and ALT modifiers to add what wasn't picked up or remove things that weren't gotten on the initial sweep. The easiest way I know to do this is to blow up the image so you can see the edges around the building (ALT Spacebar and either roll your scroll wheel or left click and move the mouse left or right). Once the sky was cleanly selected, the selection was saved (right click within the selection and choose the Save Selection option) as an Alpha Channel. (If you're using Adobe Photoshop Elements you'd just use Select/Save Selection. You'll be saving it an Alpha Channel, but PSE won't tell you that you are and won't let you see it as a Channel, but trust me, it's an Alpha Channel.) Once that's done, just go to your random cloud collection (everyone should shoot interesting looking clouds just to have a depot of clouds to choose from) and pick something appropriate looking for the scene. Today's clouds were a little to uniform from high in the sky to the horizon, so a Graduated Filter was applied to make the clouds further down the scene look just a little bit less intense.
So, thre you have it. A set of surreal looking buildings with a natural looking sky with, what looks like, a pencil sketch of the people milling around. A little bit of everything is today's image. Thanks for stopping by. BTW: That's the sister-in-law in the lower righthand corner.


0 comments:
Post a Comment