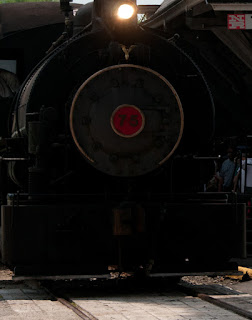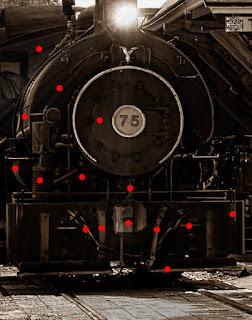
 Last Friday I did a posting about "Revealing Detail Using Adobe Photoshop Lightroom 3". A couple people who saw the image basically said "I don't understand. What detail did you pull out of where?" I suppose that's a compliment, because it was done with a light touch and the image was "the star" and not the work. Today we have two images. The one to the right is what was recorded by the sensor. To the left is a "detail" of the finished image. I made sure they were both the same size and resolution to be able to do an apples to apples comparison. The left image has been toned as a sepia to give the impression of being an old print. The toning added nothing to the detail, but I thought I'd mention it before someone asked. The red "Pins" represent the individual Adjustment Brush areas that were worked. I'll save time for anyone curious enough to count the Pins and say that there are fifteen Pins. In the case of a matching left and right side, only one Pin was laid down to show the area being worked. As an example, the far right Pin is there to lighten a bracket of some sort. The same bracket, lightened the same amount, also appears on the left side of the locomotive. Since it was done using the same Pin, there was no reason to drop a Pin on the left side. That would only serve to run up the count. To find out about some of the other Pins, hit the "read more".
One red dot, indicating a dropped Pin, that's missing is the one for the "75" logo. That area has had quite a bit of brightening. Identifying what was there was actually fairly easy. Since the Adjustment Brush works on selective area of an image and the controls in the Basic Panel of LR3 works on the global image. the entire image could be brightened, revealing what was hidden in the dark. The Brush work could be done, the global setting set back to neutral (the zero point) and the area "painted" with the Adjustment Brush brought up to the level of revealing the detail.
One shortcut keystroke that is extremely useful when making the fine adjustments is the "O" key. This turns on an Overlay of red (typically - it can be changed) showing what's being "tagged" for whatever adjustment is to be made. Turn the indicator on, paint over the item you're working on, turn the indicator off, return the global brightening back to the start point, reclick on the Pin and make the adjustment. Repeating the process over and over again is a quick method of making those fifteen different changes to the original image.
Some of the adjustments might wind up with exactly the same amount of change as others, but it's easier (and safer) to drop a Pin on each object to be adjusted. This technique applies to whatever can be done with the Adjustment Brush in Lightroom 3.


0 comments:
Post a Comment