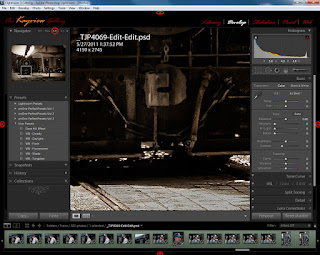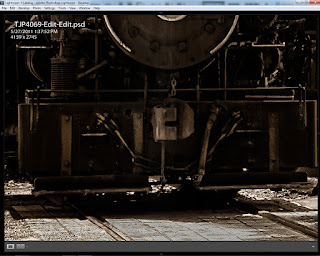
 This seems to be the image that won't go away. After the last post I got several questions (feel free to send me an email with any questions) about how I got down to the fine detail level on the front of the train in the image. To see what sparked the questions, click here. To see the original post with the full image, click here. The email questions along with questions asked at a presentation I gave last week at a local camera club showed me that further explanation was necessary. Today we have two screen shots showing Adobe Photoshop Lightroom 3 in two configurations. The one on the left is as LR3 is presented when first opened (right out of the box) with an image open. The right side shows the screen as I work. All of the panels have been retracted using the arrows on the outside of each panel. (If you click on the images you'll see a larger view of each.) To understand my thinking about each of the panels, hit the "read more".
The easiest one to discuss in the Film Strip at the bottom of the screen. At this time you can't do Layers in LR3. (OnOne Software has a beta out of their upcoming "Perfect Layers", but right now it's only a beta.) The usefulness of having the Film Strip showing is really only applicable if you're going to apply the same settings to multiple images and hiding it does not take that function away. Therefore (and specially if you're working one image only) there's no real reason to have it taking up screen space while working an image. So, get rid of it by retracting it using the bottom arrow button.
The function of the top bar is to select between the major sections of LR3 (Library, Develop, Slideshow, Print and Web). Well, other than the ego of seeing your custom Identity Plate, there "nothing to see here folks, so move along". When you're working on a specific image you aren't going to be flipping back and forth to the other parts of LR3. So, to maximize the available screen, push that one up.
The panel on the left might be used in the first couple of steps of developing an image. You still don't have to have the panel be persistent. All of the panels can be used just by bring the cursor over to the edge of the screen that contains the panel you'd like to use. Bring the cursor over to the panel, the panel opens, do what you need to do (for as long as it takes to do whatever it is you're going to do) and then move the cursor off the panel and it automatically retracts.
The last panel is where all the action occurs during the development of you image. As shown, the image is at a 1:1 magnification. Refer back to the other two posts to see the train only and the entire image. LR3 gives us the ability to go all the way up to 8:1 magnification. The same holds true for this panel as with the others. Roll the cursor over and every function is available. Knowing a couple of keyboard shortcuts certainly does hurt. When working the details of an image the biggest usage would probably come from rising and lowering the size and feather of the Adjustment Brush. If you know that the left and right Bracket Keys makes the Brush smaller and bigger - and - adding the Shift Key decreases and increases the feather , you probably have 60% of what you'll be doing. Tapping the "K" key start start a New Adjustment Brush. Now you've covered 90% of what you'll want to do when working the details of an image.
The big "take away" from this whole discussion would be to give yourself the maximum amount of screen to work in.


0 comments:
Post a Comment