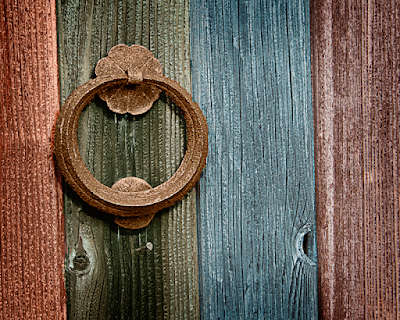
 Which of the colors in today’s image is the real, as shot, color? Any of them “could be”, but only one color in the shot has been left alone. The others have been changed using Blend Mode changes to alter the colors. As they were laid down they looked like a child’s painting, with blocky, opaque colors obscuring any detail. Getting to know how Blend Modes work and what they can do for your image is an important part of learning Photoshop. I was talking to a friend the other night and he said, “but there must be four or five different ways to do the same thing in Photoshop”. I replied that there was probably fifty ways to do anything in Photoshop. After thinking about it I decided I might want to modify that statement just a little. There probably “is” fifty ways to do something in Photoshop. The problem is that forty-nine involve pain and suffering and one is the ray of light shining on the spot of the problem. When someone (anyone) starts out using Photoshop they quickly feel overwhelmed. It’s a massive application with more elements (no pun intended) than a person could use in three careers. The more you learn about it the more “tricks” you pickup. The more “tricks” you have in your kit the easier to becomes to accomplish a task. The purpose of today’s image is not to show that I can change the color of wood, but to show that you can modify colors in a natural way. The applications of being able to change things while making them believable are wide ranging. The same techniques used today can be applied to changing a women’s makeup, making it more dramatic. Delicacy is the key to using many of the tools and techniques available in Photoshop. This holds true for most of what you do in Photoshop. Playing with Curves, you don’t make wild swings (unless you’re going for a solarization effect. The Liquify Tool, found under Filters, very soft movement enhances an image. Wild changes distort an image. With Photoshop, everything in “less than” moderation might be the saying. To find out what Blend Mode was used to change the colors in today’s image, hit the “read more”.
There are five different colors used in today’s image. Each started out as a preset in the Swatches Panel. Each had the same modifications made to it when it was applied. The first thing was making a selection for three of the four boards and the knocker. Each selection was put on its own layer. Colors selected were filled by any method you might be comfortable with. Shift F5 would bring up the fill dialog box, Alt Backspace would fill the selection with the foreground color, and other methods are available. Once the solid color is put down, the Blend Mode would be changed to Color. Bring the Opacity down to taste and you have the color you want. It’s typically better to go overboard and bring the effect back to a reasonable level using Opacity. It can be modified repeatedly as conditions warrant. Keeping your option as flexible as possible is one of the benefits of having a program as vast as Photoshop.


0 comments:
Post a Comment