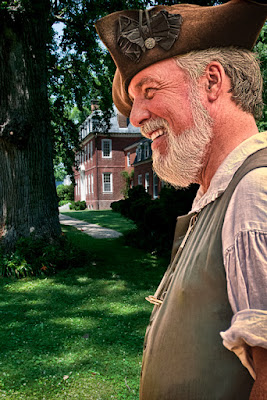
 Click on today's image, check it out in its larger
size. Look at the wisps of hair on his
chin and the back of his head. If that
"ain't" good enough for you, you can stop reading now. Adobe Photoshop CS5's Quick Selection Tool
(W) and Refine Edge make it a piece of cake to take a piece of an image out of
one shot and drop it in another shot. If
you're a frequent reader of the Gallery you might recognize the guy in the
image for the December 19, 2011 post.
Same guy, same frame. Just took
him out of his original shot (of the 19th) and put him in a new location. One thing that made the move easier was the
fact that we were going from his head being surrounded by a contrasty
background and being put on an equally contrasty background. Had I tried to put him in a scene with a nice
blue sky with fluffy clouds it may have been a different story and this post
might have included weeping and gnashing of teeth. Several friends have cried on my shoulder
about how hard it is to get a good extraction out of any image that wasn't shot
on a single color background. It could
be a white or gray background (black and green backgrounds have their own set
of problems). Today's image is an
example of taking a person out of a complex background and moving said person
to another complex background. The edge
is "good enough", but not perfect.
It doesn't have to be. It has to
be "good enough" to get the job done.
To find out how good is good enough, hit the "Read More".
The whole thing with "good enough" depends on what
you're putting the cutout on. One of the
easiest ways to find out "when" an extraction is good enough is to
view it on the background it'll be on when finished. Once a rough selection is made with the Quick
Selection Tool (W) you'd go directly to the Refine Edge dialog box. You can read about memorizing the shortcuts
the different modes the dialog box gives.
B for black, W for white, etc., but the easiest thing to remember is the
F key. It'll cycle you through each to
the possible overlays. One of the
overlays is "on Layers". If
you don't have anything under the Layer you do the extraction from, you'll have
a blank checkerboard pattern. If you've
copied the Layer (CTRL J) so as not to disturb the original you won't see any
change. If you put what will become the
background Layer under the extraction Layer you be able to see what the cutout
will look like on its intended target.
This is where the "good enough" cutout becomes important. Just for jiggles I put the guy from today's
image on a sky background. His chin hair
was good throughout. If I positioned the
wisps of hair at the back of his head on a part of the sky that was blue... no
problem. On an area that had grayer
clouds, no problem. When I moved it over
part of a particularly bright part of the cloud it was a mess. The fringing around each hair could be
quickly seen. In that spot it wasn't
good enough.
I could have gone in and played with the selection on a
pixel level to get that perfect cutout, but the plan was to use the fellow on
the background you see above. It wasn't
necessary to do any more than was already done.
The cutout was "good enough".
Try not to beat yourself up with work that doesn't
matter. Today's image wasn't going to
get any better by my fiddling around trying to get the perfect cutout. Some work just isn't worth the time you'd
have to put into it.


0 comments:
Post a Comment