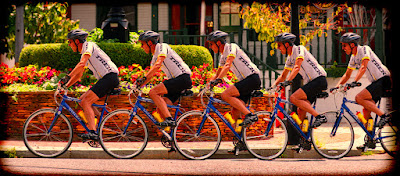
 I titled today's image "A Bicycle Built For
Five". It's sort of an optical
illusion. There are five riders on five
bikes, but only six wheels total. In
taking the series of shots, using high speed continuous, the rider managed to
move one bicycle length (approximately) between each opening of the
shutter. We could make a reasonable
estimate of the distance between the front and back wheel. We can pick up the shutter speed from the
Metadata associated with the frames in the sequence. We could actually make a high school level
physics problem out of calculating the speed the cyclist was traveling. How about that. Photography really can be used for more than
just making pretty pictures. When I
started playing with today's image it was just a simple case of plunking an
image down, creating a Layer Mask (the Add Layer Mask at the bottom of the
Layers Panel) and painting (on the Layer Mask) with black to reveal the
underlying Layer. No problem. As I went along I noticed that the handle
bars of one bike sat just behind the seat of the bike in front of it. The Layers were aligned using the background
elements, so all images are really in relation to one another. The background elements didn't move, so it
was fairly easy to get every frame in register.
To find out how that was done and why I used the Lasso Tool (L) in
making this composite, hit the "Read More".
Let's get each Layer "in register" with the one
before. The first thing I did was
rearrange the Layers in the Layer Stack.
Counting from back to front we'd have image #1, 2, 3, 4, and 5. The way they were transferred into Adobe
Photoshop CS5 from Adobe Photoshop Lightroom 3 stacked them as Layers #5, 4, 3,
2, and 1. Just the opposite way I want
to work with them. Rather than moving
five Layers, I just switched Layer #2 with Layer #4 and Layer #1 with Layer
#5. I then turned off the visibility of
the top three Layers. The next step was
to reduce the Opacity of the higher Layer to about 50%. Using the Move Tool (V) I slid the upper
Layer into the approximate location, aligning prominent elements. In the first two images it was the balusters of
the handrail. Once it was close I
brought the Opacity back up to 100% and change the Blending Mode to
Difference. Things that match exactly
will have no Difference and become pure black.
Using the arrow keys on the keyboard, with the Move Tool still selected,
I was able to nudge the upper Layer left, right and up, down until a
"close to perfect" match was achieved. The process was repeated with each additional
Layer.
With that done, a Layer Mask was applied to all Layers
except the bottom Layer. I used a black
Brush (B) to reveal the front wheel of the bike to the back. I noticed that the back wheel of the front
bike matched up with the front wheel of the back bike. (Feel free to reread that last sentence
several times if you wish.) My first
thought was to just reveal the front wheel of each bike. Unless I was interested in a bunch of one
footed men riding their bikes, that didn't work quite right. I brought all the front wheels to the front
of the image and then went back painted the shoes and legs back in on the Layer
Mask. I tried just using a fairly hard
Brush to Mask around the shoes, but that kept nicking either the shoe or the
tire.
I used the Polygonal Lasso Tool (L) to trace around the shoe
and painted the Mask either black or white depending on if I was inside the
selected area or outside the selected area.
(I used CRTL Shift I [eye] to flip what was selected and what wasn't
selected. That made life easy because
either the shoe was protected or the tire was protected. A simple swipe either way revealed the proper
portion of the image.


0 comments:
Post a Comment