skip to main |
skip to sidebar
 Let's take a rather blah image and spike it up a little. The inspiration for today's image comes from
the work of Mike Calascibetta, an extremely talent photographer/Photoshop
wizard from Burbank California. You can
see a small sampling of his fine art photography here. Mike does a lot of flowers and they are true
works of art. It appears Mike puts Layers and Layers over a
base image and adds pops of color to create really interesting images. Today's image takes several Layers and plays
with Blend Modes and big fuzzy brushes to make things more interesting. One of the attributes of Mike's work is the
use of pastel colors. In his work it
adds such depth that you can literarily look into his images and sees things in
your imagination. Really outstanding
stuff. In today's image there is only
two different images. Two separate
Layers with the flower and one with a smoke pattern from burning incense. To find out what became of the second flower
Layer and how the smoke was used, hit the "Read More".
Let's take a rather blah image and spike it up a little. The inspiration for today's image comes from
the work of Mike Calascibetta, an extremely talent photographer/Photoshop
wizard from Burbank California. You can
see a small sampling of his fine art photography here. Mike does a lot of flowers and they are true
works of art. It appears Mike puts Layers and Layers over a
base image and adds pops of color to create really interesting images. Today's image takes several Layers and plays
with Blend Modes and big fuzzy brushes to make things more interesting. One of the attributes of Mike's work is the
use of pastel colors. In his work it
adds such depth that you can literarily look into his images and sees things in
your imagination. Really outstanding
stuff. In today's image there is only
two different images. Two separate
Layers with the flower and one with a smoke pattern from burning incense. To find out what became of the second flower
Layer and how the smoke was used, hit the "Read More".
Read more!
 Okay, anybody wanna guess what the elements in this image
started out as? Would you believe
(great, now I'm sounding like Maxwell Smart) a Tiger Lily, a glass of water
with ice and the bare branches of a bush.
Add in a couple of black Layers with a Fibers Filter
(Filters/Render/Fibers) and a Clouds Filter (Filters/Render/Clouds). And, before I forget, one more black Layer
with a Lens Flare Filter (Filters/Render/Lens Flare) to create the sun. Stir in a couple Blend Mode changes and you
have today's image. Any resemblance to what the pieces started out
as is pretty much a coincidence. Shows what can happen when you have too much
time on your hands. I sort of like the
way it came out. If you're interested in
learning how it was done, hit the "Read More".
Okay, anybody wanna guess what the elements in this image
started out as? Would you believe
(great, now I'm sounding like Maxwell Smart) a Tiger Lily, a glass of water
with ice and the bare branches of a bush.
Add in a couple of black Layers with a Fibers Filter
(Filters/Render/Fibers) and a Clouds Filter (Filters/Render/Clouds). And, before I forget, one more black Layer
with a Lens Flare Filter (Filters/Render/Lens Flare) to create the sun. Stir in a couple Blend Mode changes and you
have today's image. Any resemblance to what the pieces started out
as is pretty much a coincidence. Shows what can happen when you have too much
time on your hands. I sort of like the
way it came out. If you're interested in
learning how it was done, hit the "Read More".
Read more!
 Today's image was processed using Adobe Photoshop Lightroom
4 Beta. All I have to say is: what an
upgrade. The jump from version 2 to version
3 was big, but this is huge. What anyone
thought about the way the sliders worked (in just about all panels) in LR3 is
about to be blown away by the functionality of LR4. Instead of Recovery and Fill Light, we have
Highlight and Shadow. It's more than
just a name change. Where Recovery
worked if you pushed it far enough, Highlight gives some fine control over
what's going on in the highlights without affecting the mid-tones and shadows. Same thing with the Shadows Slider. Where Fill Light opened the shadows, but also
brightened the overall image, Shadows opens the darkest areas (that have
detail) and doesn't mess with anything higher.
Today's image was sort of a test bed for both of these functions. The "lighting" on today's image is
a flashlight. A friend and I were over
at the Danbury Railway Museum experimenting with some "light
painting". Playing with flashlights
to act as a light source is imprecise at best.
There's a lot of trial and error involved and having the light fill in
all the nooks and crannies is a trick at best.
So, what you end up with works right into LR4 Beta's lighting
adjustments. There's a lot I like about
LR4 and, being a Beta, a couple of things that still need work. To take a look at my thoughts, hit the
"Read More".
Today's image was processed using Adobe Photoshop Lightroom
4 Beta. All I have to say is: what an
upgrade. The jump from version 2 to version
3 was big, but this is huge. What anyone
thought about the way the sliders worked (in just about all panels) in LR3 is
about to be blown away by the functionality of LR4. Instead of Recovery and Fill Light, we have
Highlight and Shadow. It's more than
just a name change. Where Recovery
worked if you pushed it far enough, Highlight gives some fine control over
what's going on in the highlights without affecting the mid-tones and shadows. Same thing with the Shadows Slider. Where Fill Light opened the shadows, but also
brightened the overall image, Shadows opens the darkest areas (that have
detail) and doesn't mess with anything higher.
Today's image was sort of a test bed for both of these functions. The "lighting" on today's image is
a flashlight. A friend and I were over
at the Danbury Railway Museum experimenting with some "light
painting". Playing with flashlights
to act as a light source is imprecise at best.
There's a lot of trial and error involved and having the light fill in
all the nooks and crannies is a trick at best.
So, what you end up with works right into LR4 Beta's lighting
adjustments. There's a lot I like about
LR4 and, being a Beta, a couple of things that still need work. To take a look at my thoughts, hit the
"Read More".
Read more!
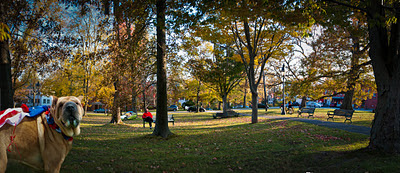 I've done posts on panoramas and I've done posts on
compositing and I've done posts on flipping back and forth from Adobe Photoshop
Lightroom 3 to Adobe Photoshop CS5, so I figured I'd do one combining all
three. I thought the park scene had
possibilities when I was flipping through LR3 this morning and decided to do
the pano. CS5 makes it so easy and it's
so forgiving that you can practically put the camera on a very short interval
timer sequence, click the shutter and throw the camera in the air and still be
able to come up with a pretty good pano.
The days of needing to be on a tripod (doing daylight panos), with a
lens null point mount, in manual exposure, with manual focus are over. Photoshop CS5 stitches, aligns, blends and
spits out a 99.99% correct panorama, 100% of the time. About the only thing the photographer needs
to do is overlap one frame to the next.
Come to think of it, in the toss it up in the air scenario, you could
probably do the same setup multiple times and get enough shots so CS5 would be
able to sort them all out and build one coherent image. I'll put that on my "todo" list and
report back. To find out more about
today's image, hit the "Read More".
I've done posts on panoramas and I've done posts on
compositing and I've done posts on flipping back and forth from Adobe Photoshop
Lightroom 3 to Adobe Photoshop CS5, so I figured I'd do one combining all
three. I thought the park scene had
possibilities when I was flipping through LR3 this morning and decided to do
the pano. CS5 makes it so easy and it's
so forgiving that you can practically put the camera on a very short interval
timer sequence, click the shutter and throw the camera in the air and still be
able to come up with a pretty good pano.
The days of needing to be on a tripod (doing daylight panos), with a
lens null point mount, in manual exposure, with manual focus are over. Photoshop CS5 stitches, aligns, blends and
spits out a 99.99% correct panorama, 100% of the time. About the only thing the photographer needs
to do is overlap one frame to the next.
Come to think of it, in the toss it up in the air scenario, you could
probably do the same setup multiple times and get enough shots so CS5 would be
able to sort them all out and build one coherent image. I'll put that on my "todo" list and
report back. To find out more about
today's image, hit the "Read More".
Read more!
 Click on today's image, check it out in its larger
size. Look at the wisps of hair on his
chin and the back of his head. If that
"ain't" good enough for you, you can stop reading now. Adobe Photoshop CS5's Quick Selection Tool
(W) and Refine Edge make it a piece of cake to take a piece of an image out of
one shot and drop it in another shot. If
you're a frequent reader of the Gallery you might recognize the guy in the
image for the December 19, 2011 post.
Same guy, same frame. Just took
him out of his original shot (of the 19th) and put him in a new location. One thing that made the move easier was the
fact that we were going from his head being surrounded by a contrasty
background and being put on an equally contrasty background. Had I tried to put him in a scene with a nice
blue sky with fluffy clouds it may have been a different story and this post
might have included weeping and gnashing of teeth. Several friends have cried on my shoulder
about how hard it is to get a good extraction out of any image that wasn't shot
on a single color background. It could
be a white or gray background (black and green backgrounds have their own set
of problems). Today's image is an
example of taking a person out of a complex background and moving said person
to another complex background. The edge
is "good enough", but not perfect.
It doesn't have to be. It has to
be "good enough" to get the job done.
To find out how good is good enough, hit the "Read More".
Click on today's image, check it out in its larger
size. Look at the wisps of hair on his
chin and the back of his head. If that
"ain't" good enough for you, you can stop reading now. Adobe Photoshop CS5's Quick Selection Tool
(W) and Refine Edge make it a piece of cake to take a piece of an image out of
one shot and drop it in another shot. If
you're a frequent reader of the Gallery you might recognize the guy in the
image for the December 19, 2011 post.
Same guy, same frame. Just took
him out of his original shot (of the 19th) and put him in a new location. One thing that made the move easier was the
fact that we were going from his head being surrounded by a contrasty
background and being put on an equally contrasty background. Had I tried to put him in a scene with a nice
blue sky with fluffy clouds it may have been a different story and this post
might have included weeping and gnashing of teeth. Several friends have cried on my shoulder
about how hard it is to get a good extraction out of any image that wasn't shot
on a single color background. It could
be a white or gray background (black and green backgrounds have their own set
of problems). Today's image is an
example of taking a person out of a complex background and moving said person
to another complex background. The edge
is "good enough", but not perfect.
It doesn't have to be. It has to
be "good enough" to get the job done.
To find out how good is good enough, hit the "Read More".
Read more!
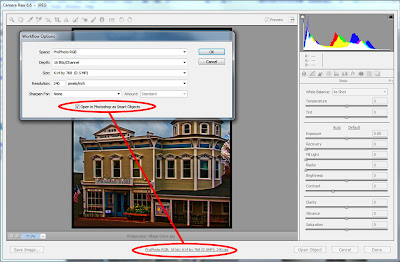 An interesting search brought someone to the blog the other
day from Cape Town, South Africa. The entire query was "how do I stop ACR
opening my images in CS5 as smart object?"
This is the second time in the past few weeks someone was asking about
how to NOT do something in Adobe Photoshop CS5.
The last one dovetails with today's question and the post of November
21, 2011 was titled "Wednesday Q&A - Getting Rid Of SmartObjects". It's interesting that
folks want to not use this extremely helpful piece of Photoshop wizardry. Smart Objects are incredibly useful and there
have been several posts dealing with them here at the Gallery. Back in July of last year I did a two part
"Wednesday Q&A" (Part 1) (Part 2) about just why Smart Objects
are so great. I use Smart Objects every
day and can't imagine (anymore) working
without them. Just the other day, while
preparing the image of the motocross rider coming through a curve, Smart
Objects saved a great deal of time for me.
I'd gone through several steps, used Convert To Smart Object (select all
the Layers you want to make a Smart Object, right click on any Layer and pick
Convert To Smart Object) several times and then noticed a mistake I'd made back
two or three nested Smart Objects ago.
Had I used the older CTRL/ALT/Shift/E to make a composite on the top of
the Layer Stack I would have been in big trouble when I saw my mistake. The only thing I would have been able to do
would have been to scrap the Composite Layer and everything above it. That would have trashed a considerable amount
of work. By using Smart Objects I was
able to cycle back through the Smart Objects to the point of the problem, fix
the problem and then Save and Close my way back to the point I had been at when
I noticed my error. A two minute fix rather
than a half hour rebuilding what had already been done. But, let's get to today's question. To learn the simple answer, hit the
"Read More".
An interesting search brought someone to the blog the other
day from Cape Town, South Africa. The entire query was "how do I stop ACR
opening my images in CS5 as smart object?"
This is the second time in the past few weeks someone was asking about
how to NOT do something in Adobe Photoshop CS5.
The last one dovetails with today's question and the post of November
21, 2011 was titled "Wednesday Q&A - Getting Rid Of SmartObjects". It's interesting that
folks want to not use this extremely helpful piece of Photoshop wizardry. Smart Objects are incredibly useful and there
have been several posts dealing with them here at the Gallery. Back in July of last year I did a two part
"Wednesday Q&A" (Part 1) (Part 2) about just why Smart Objects
are so great. I use Smart Objects every
day and can't imagine (anymore) working
without them. Just the other day, while
preparing the image of the motocross rider coming through a curve, Smart
Objects saved a great deal of time for me.
I'd gone through several steps, used Convert To Smart Object (select all
the Layers you want to make a Smart Object, right click on any Layer and pick
Convert To Smart Object) several times and then noticed a mistake I'd made back
two or three nested Smart Objects ago.
Had I used the older CTRL/ALT/Shift/E to make a composite on the top of
the Layer Stack I would have been in big trouble when I saw my mistake. The only thing I would have been able to do
would have been to scrap the Composite Layer and everything above it. That would have trashed a considerable amount
of work. By using Smart Objects I was
able to cycle back through the Smart Objects to the point of the problem, fix
the problem and then Save and Close my way back to the point I had been at when
I noticed my error. A two minute fix rather
than a half hour rebuilding what had already been done. But, let's get to today's question. To learn the simple answer, hit the
"Read More".
Read more!
 I titled today's image "A Bicycle Built For
Five". It's sort of an optical
illusion. There are five riders on five
bikes, but only six wheels total. In
taking the series of shots, using high speed continuous, the rider managed to
move one bicycle length (approximately) between each opening of the
shutter. We could make a reasonable
estimate of the distance between the front and back wheel. We can pick up the shutter speed from the
Metadata associated with the frames in the sequence. We could actually make a high school level
physics problem out of calculating the speed the cyclist was traveling. How about that. Photography really can be used for more than
just making pretty pictures. When I
started playing with today's image it was just a simple case of plunking an
image down, creating a Layer Mask (the Add Layer Mask at the bottom of the
Layers Panel) and painting (on the Layer Mask) with black to reveal the
underlying Layer. No problem. As I went along I noticed that the handle
bars of one bike sat just behind the seat of the bike in front of it. The Layers were aligned using the background
elements, so all images are really in relation to one another. The background elements didn't move, so it
was fairly easy to get every frame in register.
To find out how that was done and why I used the Lasso Tool (L) in
making this composite, hit the "Read More".
I titled today's image "A Bicycle Built For
Five". It's sort of an optical
illusion. There are five riders on five
bikes, but only six wheels total. In
taking the series of shots, using high speed continuous, the rider managed to
move one bicycle length (approximately) between each opening of the
shutter. We could make a reasonable
estimate of the distance between the front and back wheel. We can pick up the shutter speed from the
Metadata associated with the frames in the sequence. We could actually make a high school level
physics problem out of calculating the speed the cyclist was traveling. How about that. Photography really can be used for more than
just making pretty pictures. When I
started playing with today's image it was just a simple case of plunking an
image down, creating a Layer Mask (the Add Layer Mask at the bottom of the
Layers Panel) and painting (on the Layer Mask) with black to reveal the
underlying Layer. No problem. As I went along I noticed that the handle
bars of one bike sat just behind the seat of the bike in front of it. The Layers were aligned using the background
elements, so all images are really in relation to one another. The background elements didn't move, so it
was fairly easy to get every frame in register.
To find out how that was done and why I used the Lasso Tool (L) in
making this composite, hit the "Read More".
Read more!

 Let's take a rather blah image and spike it up a little. The inspiration for today's image comes from
the work of Mike Calascibetta, an extremely talent photographer/Photoshop
wizard from Burbank California. You can
see a small sampling of his fine art photography here. Mike does a lot of flowers and they are true
works of art. It appears Mike puts Layers and Layers over a
base image and adds pops of color to create really interesting images. Today's image takes several Layers and plays
with Blend Modes and big fuzzy brushes to make things more interesting. One of the attributes of Mike's work is the
use of pastel colors. In his work it
adds such depth that you can literarily look into his images and sees things in
your imagination. Really outstanding
stuff. In today's image there is only
two different images. Two separate
Layers with the flower and one with a smoke pattern from burning incense. To find out what became of the second flower
Layer and how the smoke was used, hit the "Read More".
Let's take a rather blah image and spike it up a little. The inspiration for today's image comes from
the work of Mike Calascibetta, an extremely talent photographer/Photoshop
wizard from Burbank California. You can
see a small sampling of his fine art photography here. Mike does a lot of flowers and they are true
works of art. It appears Mike puts Layers and Layers over a
base image and adds pops of color to create really interesting images. Today's image takes several Layers and plays
with Blend Modes and big fuzzy brushes to make things more interesting. One of the attributes of Mike's work is the
use of pastel colors. In his work it
adds such depth that you can literarily look into his images and sees things in
your imagination. Really outstanding
stuff. In today's image there is only
two different images. Two separate
Layers with the flower and one with a smoke pattern from burning incense. To find out what became of the second flower
Layer and how the smoke was used, hit the "Read More".


